Table of Contents
Advertisement
Advertisement
Table of Contents

Related Manuals for pitsco PRIZM

Summary of Contents for pitsco PRIZM
- Page 1 TETRIX® PRIZM™ Robotics Controller Programming Guide 43212...
- Page 2 No part of this product or related documentation may be reproduced in any form by any means without prior written authorization of Pitsco, Inc. All other product names mentioned herein might be the trademarks of their respective owners.
-
Page 3: Table Of Contents
Build, Code, Test, Learn . . . Go! ................................ 123 Appendix TETRIX PRIZM Robotics Controller Technical Specifications ....................124 PRIZM Controller Component Overview and Pinout Diagrams ..................126 TETRIX PRIZM Arduino Library Functions ........................... 133 TETRIX PRIZM Arduino Library Functions Chart ........................146 TETRIX PRIZM Arduino Library Functions Cheat Sheet ...................... -
Page 4: Tetrix® Prizm™ Robotics Controller Introduction
STEM knowledge. Plus, PRIZM is not just a great tool for teaching programming. It can bring to life lessons on sensors, power, gear ratios, and more. Even the controller’s clear polycarbonate shield was designed to maximize educational value –... -
Page 5: Prizm Controller Technology Overview
2 continuous rotation servo ports 2 DC motor control ports 2 quadrature encoder input ports Battery connection port For complete, detailed specifications, please refer to the TETRIX PRIZM Robotics Controller Technical Specifications located in the appendix on page 124. Getting Started... - Page 6 Encoder: A sensing device that converts motion to an electrical signal that is read by the PRIZM controller to determine position, count, speed, or direction of the TETRIX DC Motors Motor Shaft Encoder: Allows you to program the DC motors using both rotation and degrees.
-
Page 7: Prizm Setup
PRIZM™ Setup Attaching the Sensors: To connect a sensor to the PRIZM, plug one end of the sensor adapter wire into the sensor. Plug the other end into ports labeled D2-D5 or A1-A3. Attaching the DC Motors: To connect a DC motor to the PRIZM, attach... - Page 8 Building the TaskBot activity in this guide. Warning: Do not attempt to use third-party battery packs with the PRIZM controller. The TETRIX battery packs are equipped with a safety fuse and are the only packs approved for use with the system. Damage to the product as a result of doing so will void your warranty.
- Page 9 The battery pack can be plugged into either the top or bottom row of the port. Warning: Do not attempt to connect two battery packs to one PRIZM controller. Damage and failure will occur if this is attempted. Use only one battery pack to power the PRIZM system and any extra daisy-chained expansion controllers.
-
Page 10: Software Overview
The Arduino Software (IDE) uses a C-based programming language to communicate in such resources, a good with the PRIZM. Within the Arduino Software (IDE) an individual program is referred place to start would be the to as a sketch. Each of the activities in this guide will involve creating a sketch that Arduino website at gives instructions to the robot. -
Page 11: Software Setup
• Depending on your classroom and IT situation, For a deeper look at all available functions in the PRIZM library, please refer to the you might want to appendix section titled TETRIX PRIZM Arduino Library Functions. - Page 12 Restart the Arduino Software (IDE). Make sure the TETRIX_PRIZM library appears in the Sketch > Include Library menu of the software. In addition, several PRIZM sketch examples will now appear in the File > Examples > TETRIX_PRIZM drop-down menu. That’s it! We have successfully installed the PRIZM Arduino library.
- Page 13 USB port. Therefore, before we can begin programming, we first need to be sure that the PRIZM controller is properly set up in the Arduino Software (IDE) for communication over the USB port. The easiest way to do this is to first start the Arduino Software (IDE) and navigate to Tools >...
- Page 14 Figure 4: Port drop-down menu with PRIZM not connected. Please note that lists might vary. Next, plug the PRIZM controller into a USB port and power it up by connecting the TETRIX battery pack and turning the power switch on.
- Page 15 Navigate to Tools > Port and select the newly installed COM port. The new COM port will be the PRIZM. By selecting the new COM port, you are telling the Arduino Software (IDE) to use this port for communications. The COM port you use will likely be different from the one in Figure 5.
-
Page 16: Getting Started Activities
Arduino Software (IDE) and how it Arduino sketches and want works with the PRIZM and select basic hardware. Success with these first five to jump ahead, an overview activities will demonstrate how easy it is to use Arduino Software (IDE) with the of each library function can PRIZM and prepare you for coding the PRIZM TaskBot. -
Page 17: Activity 1: Hello World
Activity 1: Hello World! Let’s begin with a very simple sketch that will blink the onboard PRIZM red LED. This activity will be the PRIZM equivalent of a Hello World! program, which is usually the intro activity for any beginning programmer. The sketch we will create is one of the simplest and most basic PRIZM functions and requires only the PRIZM, a power source, and a USB connection to the computer. - Page 18 7). When the PRIZM is connected as shown, power on the PRIZM with the on/off switch. You will know the PRIZM has power by the glowing blue light. To see if the PRIZM is detected by the computer, check the port as we did in the Configuring USB Communication section.
- Page 19 Moving Forward Tip: Remember that you For more detailed information about the sketch process and the PRIZM library can print and use the TETRIX functions involved in blinking the LED, refer to the following sections within the PRIZM Arduino Library...
- Page 20 You could challenge yourself to communicate “Hello World!” in blinking Morse code. To start a new sketch, select File > New. Be sure to use the appendix: TETRIX PRIZM Arduino Library Functions in the back of the guide for help with sketch structure and syntax.
-
Page 21: Activity 2: Moving Your Dc Motors
• PRIZM controller • USB cable • A charged TETRIX 12-Volt Rechargeable NiMH Battery Pack • PRIZM Controller On/Off Battery Switch Adapter • Computer Opening the Sketch Before we open our next example sketch, be sure to save any sketch you want to reference later. - Page 22 Reset button is pressed. Executing the Code Before we can upload the sketch to the PRIZM, remember to check our connections. Keep in mind that we added a new connection with the motor. Upload the sketch. The green LED will light up, indicating that the code is ready to execute.
- Page 23 Remember what we learned from our first activity and think of creative ways to download can be found at include blinking LEDs with your rotating motor. www.TETRIXrobotics.com/ PRIZMdownloads. Be sure to use the appendix: TETRIX PRIZM Arduino Library Functions on page 133 for help with sketch structure and syntax. Getting Started Activities...
-
Page 24: Activity 3: Moving Your Servo Motors
• PRIZM controller • USB cable • A charged TETRIX 12-Volt Rechargeable NiMH Battery Pack • PRIZM Controller On/Off Battery Switch Adapter • Computer Opening the Sketch Before we open our next example sketch, be sure to save any sketch you want to reference later. - Page 25 PRIZM software library. In order to use the functions contained in the PRIZM software library, we must first declare a library object name that is then inserted as a “prefix” before each library function. The object declaration we use is PRIZM prizm;.
- Page 26 R/C model cars to control steering or R/C model airplanes to control flaps and rudders. Robots can use servos controlled by R/C transmitters – but they can also use servos controlled by PRIZM to operate robotic arms, grippers, tilting Tip: In the sketch window...
-
Page 27: Activity 4: Introduction To The Line Finder Sensor
• Grove Line Finder Sensor and cable • PRIZM controller • USB cable • A charged TETRIX 12-Volt Rechargeable NiMH Battery Pack • PRIZM Controller On/Off Battery Switch Adapter • Computer Figure 13: Contrasting light and dark surface Opening the Sketch Before we open our next example sketch, be sure to save any sketch you want to reference later. - Page 28 Many functions can go here, but we always use at least the PRIZM initialization statement, prizm. PrizmBegin(). The main purpose of this function is to configure the Start button.
- Page 29 Hold the sensor over the contrasting surface. As the sensor moves from light to dark, observe the red LED on the PRIZM. When the sensor is over a line, non- Tip: Remember that you reflective, or dark surface, the red LED will be off. When the sensor is over a white or can print and use the TETRIX reflective surface, the red LED will be on.
- Page 30 Tip: In the sketch window Finding our way in this world can be challenging. Telling a robot how to find its the PRIZM library functions way can be challenging as well. One way that robots within a warehouse can find change color when they their way to the right location is by having them follow lines.
-
Page 31: Activity 5: Introduction To The Ultrasonic Sensor
• PRIZM controller • USB cable • A charged TETRIX 12-Volt Rechargeable NiMH Battery Pack • PRIZM Controller On/Off Battery Switch Adapter • Computer Opening the Sketch Before we open our next example sketch, be sure to save any sketch you want to reference later. - Page 32 The serial monitor’s value as a tool lies in its ability to display data in real time that enables you to make better-informed design decisions about robot builds and programming. It can be used to display data from sensors connected to PRIZM or to examine any program data collected by the PRIZM – for example, encoder count data, DC motor current data, or servo position data.
- Page 33 In this sketch, Serial.begin(9600) enables and defines the speed of communication in the setup. Serial.print() tells what type of data to print. prizm.readSonicSensorCM() provides the type of data to print because it is within the parentheses of Serial.print(). And Serial.println(“ Centimeters”) clarifies the type of data being printed –...
- Page 34 For more detailed information about the sketch process and the PRIZM library functions involved in using the Ultrasonic Sensor and the serial monitor, refer to Tip: In the sketch window www.arduino.cc and the appendix: TETRIX PRIZM Arduino Library Functions: the PRIZM library functions change color when they •...
-
Page 35: Building And Coding The Prizm Taskbot
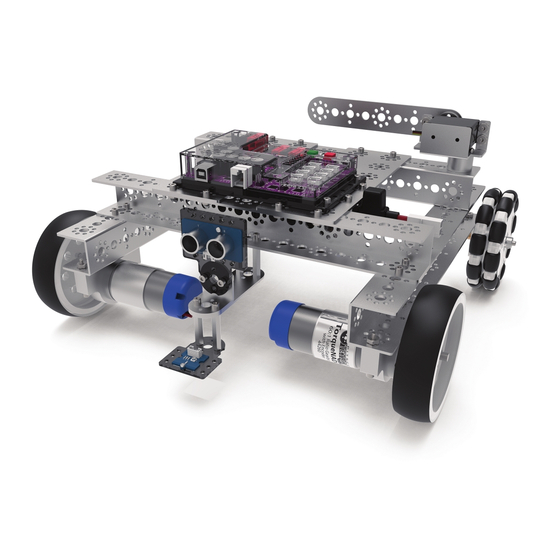
Building and Coding the PRIZM TaskBot This is what you have been waiting for. It is time to move to the next level. You have worked hard to learn the basics, and now it is time to apply them to an actual robot. - Page 36 Programmable Robotics Set Note: In order to complete the activities shown in this book, you must have the TETRIX MAX Programmable Robotics Set. Building and Coding the PRIZM TaskBot...
- Page 37 PRIZM controller ........
-
Page 38: Hardware Overview
Use the centimeters ruler at the bottom of this spread to measure part lengths. Structural Elements 32 mm Channel 39065 96 mm Channel 39066 160 mm Channel 39067 288 mm Channel 39068 Building and Coding the PRIZM TaskBot... - Page 39 Flat Bracket 39061 288 mm Flat Bar 39070 144 mm Angle 39072 288 mm Angle 39071 Flat Building Plate 39073 L Bracket 39062 Inside Corner Bracket 39281 Inside C Connector 39270 Adjustable Angle Corner Bracket 41790 Building and Coding the PRIZM TaskBot...
- Page 40 Adjustable Angle Flat Bracket 41791 Flat Round Spacer 39387 Stand-Off Post 6-32 x 1" 39102 Stand-Off Post 6-32 x 2" 39103 Stand-Off Post 6-32 x 32 mm 39107 Stand-Off Post 6-32 x 16 mm 41253 Building and Coding the PRIZM TaskBot...
- Page 41 Gear 80-Tooth 39086 Gear 120-Tooth 39085 Axle Hub 39172 Motor Hub 39079 Axle Set Collar 39092 100 mm Axles 39088 Bronze Bushing 39091 Gear Hub Spacer 39090 Axle Spacer 1/8" 39100 Axle Spacer 3/8" 39101 Building and Coding the PRIZM TaskBot...
- Page 42 DC Gear Motor 39530 4" Wheel 39055 4" Omni Wheel Pack/Assembly 36466 Kep Nut 39094 Socket Head Cap Screw 6-32 x 1/2" 39097 Socket Head Cap Screw 6-32 x 5/16" 39098 Button Head Cap Screw 3/8" 39111 Building and Coding the PRIZM TaskBot...
- Page 43 Single Standard-Scale Servo Motor Bracket 39060 Standard-Scale Pivot Arm with Bearing 39593 180° Standard-Scale HS-485HB Servo Motor 39197 Servo Extension 39081 Servo Y Connector 39082 Standard Servo Mounting Kit 41789 Adjustable Servo Bracket 39280 Building and Coding the PRIZM TaskBot...
- Page 44 Power, Tools, and Accessories Elements Battery Clip 38009 12-volt 3,000 mAh Battery 39057 12-volt Battery Charger 39830 2-in-1 Screwdriver 42991 4-in-1 Screwdriver 36404 Wrench Set 38001 Hex Key Pack 39104 Miniature Ball-Point Hex Driver 40341 Zip Tie 31902 Building and Coding the PRIZM TaskBot...
- Page 45 Control Elements PRIZM™ Controller 43000 TETRIX Motor Cable with Powerpoles 41352 PRIZM Controller On/Off Battery Switch Adapter 43169 3 foot Type A-B USB Cable 40967 Line Finder Sensor Pack 43056 Ultrasonic Sensor Pack 43055 Building and Coding the PRIZM TaskBot...
- Page 46 PRIZM™ Controller Wiring Illustrated Detail Building and Coding the PRIZM TaskBot...
- Page 47 In the figure above, both structures have similar building surfaces to work from but have different accessibility for fastening the Kep Nuts on the screws. Easy access is preferred. Avoid difficult access if possible. Building and Coding the PRIZM TaskBot...
- Page 48 2. Tool Use Proper use of the basic tools makes the building process smoother and more enjoyable and saves time. Building and Coding the PRIZM TaskBot...
- Page 49 While either screw in the image above would work, the best use of resources would dictate using the one shown on the right. Building and Coding the PRIZM TaskBot...
- Page 50 Hub. Notice the difference in size between the outer diameter of the axle and the inside diameter of the Motor Hub. The image on the right shows an axle in the center of the Axle Hub. Notice the elements are sized correctly to fit together and function properly. Building and Coding the PRIZM TaskBot...
- Page 51 Omni Wheel Setup Parts Needed 4" Omni Wheel Pack/ Omni Wheel Bronze Bushings Button Head Cap Assembly 36466 Spacer 36466 39091 Screw 3/8" 39111 Step 1.0 Step 1.1 (front view) Step 1.1 (back view) Building and Coding the PRIZM TaskBot...
- Page 52 Step 1.2 Step 1.3 Tip: To get proper offset of rollers between the two wheels, remove screws from Step 1.3 and rotate the wheel shown in either direction. Reattach screws. Building and Coding the PRIZM TaskBot...
-
Page 53: Activity 6: Build The Taskbot
Activity 6: Build the TaskBot Teacher note: Many factors We need a robot. Because the focus of this guide is on working with PRIZM and the can affect building time, Arduino Software (IDE), we do not need a complicated robot. With that in mind, we including such things as set created the PRIZM TaskBot. - Page 54 Socket Head Cap Screw 6-32 x 5/16" 39098 288 mm Channel 39068 Kep Nut 39094 Tip: See page 36 for help with identifying Channel elements. Remember, we identify by length. Partial assembly should look like this. Building and Coding the PRIZM TaskBot...
- Page 55 Step 1.0 Step 1.1 Tip: It’s a good idea to only snug the nuts and screws until all four Channels are connected. Building and Coding the PRIZM TaskBot...
- Page 56 Step 1.2 Step 1.3 Building and Coding the PRIZM TaskBot...
- Page 57 Rotate build to match this view. Step 1.4 Building and Coding the PRIZM TaskBot...
- Page 58 Step 1.5 Step 1.6 Tip: After all four Channels are connected and the square frame is created, don’t forget to go back and tighten all the screws and nuts. Building and Coding the PRIZM TaskBot...
- Page 59 Kep Nut 39094 L Bracket 39062 PRIZM Controller On/Off Battery Switch Adapter 43169 Socket Head Cap Screw Socket Head Cap Screw 6-32 x 1/2" 39097 6-32 x 5/16" 39098 Partial assembly should look like this. Building and Coding the PRIZM TaskBot...
- Page 60 Rotate build to match this view. Step 2.0 Building and Coding the PRIZM TaskBot...
- Page 61 Step 2.1 Rotate build to match this view. Building and Coding the PRIZM TaskBot...
- Page 62 Tip: This step uses Socket Head Cap Screws (39097). Tip: It does not matter in which direction the On/Off Power Switch is mounted in the plate. It is strictly a matter of personal preference. Step 2.3 Building and Coding the PRIZM TaskBot...
- Page 63 Axle Set Collar 39065 39088 39092 4" Omni Wheel Pack/Assembly 36466 Bronze Bushing 39091 Socket Head Cap Screw Kep Nut 39094 Axle Spacer 1/8" 39100 6-32 x 5/16" 39098 Partial assembly should look like this. Building and Coding the PRIZM TaskBot...
- Page 64 Step 3.0 Step 3.1 Building and Coding the PRIZM TaskBot...
- Page 65 Step 3.2 Step 3.3 Building and Coding the PRIZM TaskBot...
- Page 66 Step 3.4 Step 3.5 Tip: Refer to Omni Wheel Setup on pages 49-50 to see how to assemble the Omni Wheel. Building and Coding the PRIZM TaskBot...
- Page 67 Step 3.6 Step 3.7 Building and Coding the PRIZM TaskBot...
- Page 68 Step 3.8 Building and Coding the PRIZM TaskBot...
- Page 69 Socket Head Cap Screw Kep Nut 39094 6-32 x 1/2" 39097 Finished assembly should look like this. Tip: See the setup tips on page 48 for help distinguishing between the Motor Hub and Axle Hub. Building and Coding the PRIZM TaskBot...
- Page 70 To insert the motor and move it into position, you must keep the screw loose. Don’t forget to go back and tighten this screw after the motor has been inserted and moved into the desired position. Step 4.1 Building and Coding the PRIZM TaskBot...
- Page 71 Step 4.2 Step 4.3 Tip: This step uses the Motor Hub (39079). Don’t forget to tighten the set screw. Building and Coding the PRIZM TaskBot...
- Page 72 To insert the motor and move it into position, you must keep the screw loose. Don’t forget to go back and tighten this screw after the motor has been inserted and moved into the desired position. Step 4.5 Building and Coding the PRIZM TaskBot...
- Page 73 Step 4.6 Step 4.7 Building and Coding the PRIZM TaskBot...
- Page 74 Step 4.8 Tip: This step uses the Motor Hub (39079). Don’t forget to tighten the set screw. Step 4.9 Building and Coding the PRIZM TaskBot...
- Page 75 Flat Building Plate 39073 Battery Clip 38009 Flat 160 mm x 16 mm Stand-Off Post 6-32 x 1" Socket Head Cap Screw 39272 39102 6-32 x 5/16" 39098 Finished assembly should look like this. Building and Coding the PRIZM TaskBot...
- Page 76 Step 5.0 Tip: This step uses 6-32 x 1" Stand-Off Posts (39102). Step 5.1 Building and Coding the PRIZM TaskBot...
- Page 77 Step 5.2 Tip: This step uses 6-32 x 1" Stand-Off Posts (39102). Step 5.3 Building and Coding the PRIZM TaskBot...
- Page 78 Step 5.4 Step 5.5 Building and Coding the PRIZM TaskBot...
- Page 79 Step 6 Parts Needed Socket Head Cap Screw Kep Nut 39094 6-32 x 5/16" 39098 Finished assembly should look like this. Building and Coding the PRIZM TaskBot...
- Page 80 Step 6.0 Step 6.1 Building and Coding the PRIZM TaskBot...
- Page 81 Step 6.2 Step 6.3 Building and Coding the PRIZM TaskBot...
- Page 82 Step 7 Parts Needed PRIZM controller 43000 Socket Head Cap Screw Kep Nut 39094 6-32 x 1/2" 39097 Finished assembly should look like this. Building and Coding the PRIZM TaskBot...
- Page 83 Step 7.0 Step 7.1 Building and Coding the PRIZM TaskBot...
- Page 84 Step 7.2 Step 7.3 Building and Coding the PRIZM TaskBot...
- Page 85 Finished assembly should look like this. Building and Coding the PRIZM TaskBot...
-
Page 86: Activity 7: Drive Forward
Before we open our next example sketch, be sure to save any sketch you want to reference later. Open the sketch by selecting File > Examples > TETRIX_PRIZM > TaskBot_ Act7_Drive_Forward. A new sketch window will open titled TaskBot_Act7_Drive_ Forward (Figure 20). Figure 20 Building and Coding the PRIZM TaskBot... - Page 87 Executing the Code Tip: Remember that you Before we can upload the sketch to the PRIZM, remember to check our connections. can print and use the TETRIX PRIZM Arduino Library Upload the sketch. The green LED will light up, indicating the code is ready to Functions Cheat Sheet within execute.
- Page 88 Using the data you have collected, program the TaskBot to get as close to the guide, you can simply copy specified distance as possible without going over. and paste the sample code for each activity into your sketch window. A digital download can be found at www.TETRIXrobotics.com/ PRIZMdownloads. Building and Coding the PRIZM TaskBot...
-
Page 89: Activity 8: Drive In A Circle
Before we open our next example sketch, be sure to save any sketch you want to reference later. Open the sketch by selecting File > Examples > TETRIX_PRIZM > TaskBot_Act8_ Drive_Circle. A new sketch window will open titled TaskBot_Act8_Drive_Circle (Figure 21). Figure 21 Building and Coding the PRIZM TaskBot... - Page 90 Before we can upload the sketch to the PRIZM, remember to check our connections. Tip: You will need about Upload the sketch. The green LED will light up indicating the code is ready to five to six feet of empty execute.
- Page 91 Challenge yourself to add behaviors. What would it take to make your robot drive in for each activity into your an oval or a figure eight? sketch window. A digital download can be found at www.TETRIXrobotics.com/ PRIZMdownloads. Building and Coding the PRIZM TaskBot...
-
Page 92: Activity 9: Drive In A Square
Before we open our next example sketch, be sure to save any sketch you want to reference later. Open the sketch by selecting File > Examples > TETRIX_PRIZM > TaskBot_Act9_ Drive_Square_1. A new sketch window will open titled TaskBot_Act9_Drive_ Square_1 (Figure 22). Figure 22 Building and Coding the PRIZM TaskBot... - Page 93 Executing the Code Tip: This program is one that Before we can upload the sketch to the PRIZM, remember to check our connections. could be affected by the charge level of the battery. Upload the sketch. The green LED will light up, indicating the code is ready to Why? The pattern of this execute.
- Page 94 A digital download can be found at www.TETRIXrobotics.com/ PRIZMdownloads. Note: Keep this activity in mind. We will revisit this behavior in the next activity in order to flex our coding muscles. Building and Coding the PRIZM TaskBot...
-
Page 95: Activity 10: Simplify The Square
Before we open our next example sketch, be sure to save any sketch you want to reference later. Open the sketch by selecting File > Examples > TETRIX_PRIZM > TaskBot_Act10_ Drive_Square_2. A new sketch window will open titled TaskBot_Act10_Drive_ Square_2 (Figure 23). Figure 23 Building and Coding the PRIZM TaskBot... - Page 96 Executing the Code Tip: A function can be Before we can upload the sketch to the PRIZM, remember to check our connections. defined in one area of your sketch and then referenced, Upload the sketch. The green LED will light up, indicating the code is ready to or “called, ”...
- Page 97 A digital download can be found at www.TETRIXrobotics.com/ PRIZMdownloads. Building and Coding the PRIZM TaskBot...
-
Page 98: Building Interlude: Make The Taskbot Smart
In the next coding examples, we will attach sensors to the PRIZM TaskBot. We will work though two examples using the Line Finder Sensor and two examples using the Ultrasonic Sensor. - Page 99 Step 1.0 Tip: This step uses 6-32 x 32 mm Stand-Off Posts (39107). Step 1.1 Tip: This step uses 6-32 x 32 mm Stand-Off Posts (39107). Building and Coding the PRIZM TaskBot...
- Page 100 Step 1.2 Step 1.3 Building and Coding the PRIZM TaskBot...
- Page 101 Step 1.4 Step 1.5 Building and Coding the PRIZM TaskBot...
- Page 102 Step 2 Parts Needed Socket Head Cap Screw 6-32 x 5/16" 39098 Finished assembly should look like this. Building and Coding the PRIZM TaskBot...
- Page 103 Step 2.0 Building and Coding the PRIZM TaskBot...
-
Page 104: Activity 11: Drive To A Line And Stop
Before we open our next example sketch, be sure to save any sketch you want to reference later. Open the sketch by selecting File > Examples > TETRIX_PRIZM > TaskBot_Act11_ Drive_To_Line. A new sketch window will open titled TaskBot_Act11_Drive_To_ Line (Figure 24). Figure 24 Building and Coding the PRIZM TaskBot... - Page 105 Executing the Code Troubleshooting: Be sure Before we can upload the sketch to the PRIZM, remember to check our connections. to check that the Line The Line Finder Sensor should be in digital sensor port 3. Finder Sensor is plugged into the correct sensor Upload the sketch.
- Page 106 “while” loop that locks the sketch into blinking the red LED orange when the syntax is until the sketch is reset. correct. For more detailed information about the sketch process and the PRIZM library www.arduino.cc functions involved in using the DC motors, refer to and the...
-
Page 107: Activity 12: Follow A Line
This will enable the TaskBot to follow a line. Parts Needed • Contrasting light and dark surface • Fully assembled PRIZM TaskBot complete with sensor module • USB cable • A charged TETRIX 12-Volt Rechargeable NiMH Battery Pack •... - Page 108 Executing the Code Troubleshooting: Be sure Before we can upload the sketch to the PRIZM, remember to check our connections. to check that the Line The Line Finder Sensor should be in digital sensor port 3. Finder Sensor is plugged...
- Page 109 This creates a progressive series of turns that the TaskBot uses to follow the line. The second action of the “if” statements deals with the red LED on the PRIZM. The Tip: Want to see this in “if” statement tells the red LED to turn on or off based on the condition of the action? You can by watching Line Finder Sensor.
-
Page 110: Activity 13: Drive Toward A Wall And Stop
With this activity we will continue to build on what we have learned and apply it to the Ultrasonic Sensor. This will enable the TaskBot to drive toward a wall and stop a specified distance away. Parts Needed • Fully assembled PRIZM TaskBot complete with sensor module • USB cable • A charged TETRIX 12-Volt Rechargeable NiMH Battery Pack •... - Page 111 Executing the Code Troubleshooting: Be sure Before we can upload the sketch to the PRIZM, remember to check our connections. to check that the Ultrasonic The Ultrasonic Sensor should be in digital sensor port 4. Sensor is plugged into the correct sensor port and Upload the sketch.
- Page 112 PRIZMdownloads. Challenge yourself by changing the direction, range, or speed. You can also test what size and shape of object the Ultrasonic Sensor is more likely to detect and at what range. Building and Coding the PRIZM TaskBot...
-
Page 113: Activity 14: Avoiding Obstacles
Before we open our next example sketch, be sure to save any sketch you want to reference later. Open the sketch by selecting File > Examples > TETRIX_PRIZM > TaskBot_Act14_ Avoid_Obstacle. A new sketch window will open titled TaskBot_Act14_Avoid_ Obstacle (Figure 27). Figure 27 Building and Coding the PRIZM TaskBot... - Page 114 Executing the Code Troubleshooting: Be sure Before we can upload the sketch to the PRIZM, remember to check our connections. to check that the Ultrasonic The Ultrasonic Sensor should be in digital sensor port 4. Sensor is plugged into the correct sensor port and Upload the sketch.
- Page 115 Challenge yourself and experiment with different objects or make an obstacle course with multiple objects to detect. We can experiment and modify the example code as needed to change the reaction and behavior of our robot’s obstacle avoidance skills. Building and Coding the PRIZM TaskBot...
-
Page 116: Building Interlude: Give The Taskbot Attitude
Building Interlude: Give the TaskBot Attitude! Before we create more code, we are going to add a servo motor to the PRIZM TaskBot. This will bring everything together that we used in the getting started activities. All the different kinds of motors and sensors will be used on the TaskBot to give our robot some attitude. - Page 117 Step 1.0 Step 1.1 Building and Coding the PRIZM TaskBot...
- Page 118 Step 1.2 Step 1.3 Building and Coding the PRIZM TaskBot...
- Page 119 Step 1.4 Step 1.5 Building and Coding the PRIZM TaskBot...
- Page 120 Step 1.6 Step 1.7 Building and Coding the PRIZM TaskBot...
- Page 121 Finished assembly should look like this. Building and Coding the PRIZM TaskBot...
-
Page 122: Activity 15: Combining The Sensors
Parts Needed • Contrasting light and dark surface • Obstacle • Fully assembled PRIZM TaskBot complete with sensor module • USB cable • A charged TETRIX 12-Volt Rechargeable NiMH Battery Pack •... - Page 123 Executing the Code Troubleshooting the Line Before we can upload the sketch to the PRIZM, remember to check our connections. Finder Sensor: Be sure to The Line Finder Sensor will be in digital sensor port 3, and the Ultrasonic Sensor will check that the Line Finder be in digital sensor port 4.
- Page 124 Tip: Want to see this in of line following. action? You can by watching For more detailed information about the sketch process and the PRIZM library our RoboBench video series www.arduino.cc functions involved in using the DC motors, refer to...
-
Page 125: Build, Code, Test, Learn
Build, Code, Test, Learn . . . Go! You have built a robot, you have programmed PRIZM, and you have tested and tweaked your design, so where do you go from here? This guide was intended to teach the essentials of building and coding a TETRIX MAX robot using the PRIZM controller and the Arduino Software (IDE). -
Page 126: Tetrix Prizm Robotics Controller Technical Specifications
TETRIX® PRIZM™ Robotics Controller Technical Specifications Microcontroller: ATmega328P with Arduino Optiboot bootloader installed Memory: 32 KB flash programmable memory (ATmega328P) Power: 9-18 volts DC 2 Powerpole connections; H-bridge PWM controlled; 10 amps continuous DC motor ports: current each channel, 20-amp peak Recommended motor: TETRIX®... - Page 127 PRIZM Robotics Controller Functional Overview The PRIZM controller is connected to a computer using a standard USB cable connection. Power is supplied from an external TETRIX 12-Volt Rechargeable NiMH Battery Pack. The controller has a dual high-current DC motor drive system, each motor having quadrature encoder support for implementing precise PID DC motor velocity and position control.
-
Page 128: Prizm Controller Component Overview And Pinout Diagrams
The PRIZM controller uses Arduino UNO-compatible pin assignments. The sensors that are supported in the Arduino PRIZM coding library are set up automatically using the library functions. Support for different types of sensors will be added as they become available. - Page 129 Table 5: Digital Sensor Port (D2) Function Arduino Software (IDE) pin assignment ( ) Note: Digital Pin 1 Ground Port D2 can also Pin 2 +5 volts, 100 mA be configured as a software- Pin 3 Digital input/output Digital I/O (9) implemented serial Pin 4 Digital input/output Digital I/O (2)
- Page 130 (Labeled as SERVOS 1-6) Pin 1: Servo PWM signal. It is usually the yellow or white wire. Pin 2: Servo power supply wire. It is the red wire. PRIZM supplies +6 volt power. Pin 3: Servo ground wire. It is the black wire.
- Page 131 Although the connector socket is “keyed” to prevent reverse polarity, take care to not force the connector into the socket in the opposite direction. Damage to the encoder or PRIZM controller could occur if the connector is forcibly inserted in the reverse polarity direction.
- Page 132 For example, the Arduino Software (IDE) includes a built-in serial monitor display window used to display data values received from the PRIZM controller. This feature can be used to display sensor or encoder data or even other types of program data as needed.
- Page 133 Figure 36: PRIZM Start button. Press down to activate. PRIZM DC Motor Ports The PRIZM controller has two DC motor connection ports labeled Motor 1 and Motor 2. Each motor channel is used to control the speed and direction of TETRIX DC Motors via software commands defined in the PRIZM Arduino Software (IDE) Library.
- Page 134 The battery pack can be plugged into either the top or bottom row of the port. The extra port is intended to be used to daisy-chain power to additional motor controllers that can be optionally added to PRIZM via the expansion port.
-
Page 135: Tetrix Prizm Arduino Library Functions
The statement above creates a library object named “prizm” used in code when calling a function from the PRIZM class in which the object was created. In our code, whenever we want to call a PRIZM library function, we will need to prefix each function with the defined object name. - Page 136 Analog sensors are connected to PRIZM using ports A1-A3. The analog sensor ports can be configured for analog input or digital outputs. There is also one I2C sensor port. The I2C port is connected to the PRIZM I2C communication bus.
- Page 137 Example: int x; // set up an integer variable x x = prizm.readSonicSensorCM(2); // read and store in variable x the distance in // centimeters of an object that is detected to be // in front of the Ultrasonic Sensor connected to // digital port (D2) Serial.print(prizm.readSonicSensorCM(2));...
- Page 138 This function reads and returns the voltage of the TETRIX battery pack plugged into the PRIZM battery connection port. The value returned is an integer and can be divided by 100 to scale to actual battery voltage. For example, a value of 918 is equal to an actual battery voltage of 9.18 volts.
- Page 139 Onboard LEDs The PRIZM controller has two onboard LEDs that can be controlled in code and used as indicators. The red and green LEDs are switched on and off by setting each HIGH or LOW. myname.setGreenLED(HIGH); // turns on the onboard green LED indicator myname.setGreenLED(LOW);...
- Page 140 This function can precisely control the speed of a TETRIX DC Motor using a TETRIX quadrature encoder with PID control. An encoder must be installed on the DC motor and plugged into the PRIZM encoder socket “ENC1” or “ENC2” that matches the motor being controlled in order for this function to work.
- Page 141 PID control for both DC motor channels. Encoders must be installed on both motors and plugged into their matching encoder connection ports ENC1 and ENC2 on the PRIZM controller. This function will spin both DC motors to make their current encoder values become equal to their target values. The motors will rotate toward the commanded targets at rotation rates set in speed1 and speed2 (degrees per second).
- Page 142 “1”, the command motor channel is busy (moving to the target). When the target has been reached, the readMotorBusy() function will return “0”. The encoder degrees resolution is 1 degree. Example: prizm.setMotorDegree(1, 360, 180); // spin DC Motor Channel 1 clockwise at // 360 degrees per second to target position...
- Page 143 “1”, the command motor channel is busy (moving to the target). When the target has been reached, the readMotorBusy() function will return “0”. The encoder degrees resolution is 1 degree. Example: prizm.setMotorDegrees(360, 360, 180, -360); // spin Motor 1 clockwise at 360 // degrees per second and stop at // encoder target position of 360 // degrees;...
- Page 144 DC motor to heat and eventually might result in failure. This function can be used to set a limit on how much current a motor can be allowed to draw. See the example program that came with the PRIZM library for a full code example of how to implement current limiting.
- Page 145 The TETRIX quadrature motor encoders enable precise speed and position control of TETRIX DC Motors. The PRIZM controller will read the counting data of the encoder and implement an internal PID algorithm. The PRIZM controller’s PID control algorithm has been tuned for TETRIX DC Motors in combination with the TETRIX quadrature encoders. TETRIX quadrature encoders (38000) produce 360 counts per revolution (CPR) and 1,440 pulses per revolution (PPR).
- Page 146 A CR motor can be helpful when we want a DC motor to fit into a small space or for light-duty loads. When you are plugging servos into a PRIZM servo port, the servo red wire matches the “+” mark, and the black wire matches the “-” mark.
- Page 147 0-180. Example: int x; // set up an integer variable named x x = prizm.readServoPosition(1); // read the current rotation position of Servo // channel 1 and store it in variable x Serial.print(prizm.readServoPosition(2));...
-
Page 148: Tetrix Prizm Arduino Library Functions Chart
Terminate a PRIZM program and reset a program and resets the PRIZM Data Type: None controller. controller. Set Red LED setRedLED(state); setRedLED(HIGH); Sets the PRIZM red indicator LED to on Data Type: setRedLED(1); or off. state = integer Turn red LED on. setRedLED(LOW); Data Range: state = 1 or 0 setRedLED(0);... - Page 149 TETRIX encoders installed. Both speed2 = integer hold position in a servo-like mode. target2 = long setMotorTargets(360, 1440, 180, PRIZM Motor 1 and Motor 2 channel parameters are set with a single 2880); statement. The speed parameter Data Range:...
- Page 150 TETRIX encoders installed. Both degrees1 = long hold position in a servo-like mode. setMotorDegrees(360, 720, 90, 360); PRIZM Motor 1 and Motor 2 channel speed2 = integer parameters are set with a single degrees2 = long Spin Motor 1 at a constant speed of 360 statement.
- Page 151 Read Encoder Count readEncoderCount(enc#); readEncoderCount(1); Reads the encoder count value. The Read the current count value of encoder PRIZM controller uses encoder pulse Data Type: 1 (ENC 1 port). readEncoderCount(2); data to implement PID control of a enc# = integer...
- Page 152 Read Start Button State readStartButton(); readStartButton(); Reads the state of the green PRIZM Read the Start button. A value of 1 Start button. A returned value of “1” Data Type: None means button is pressed. A value of 0 indicates a pressed state.
- Page 153 25); This function sets the speed of a servo Set the speed of servo channel 1 to 25%. motor connected to a PRIZM servo Data Type: setServoSpeed(2, 50); port 1-6. The speed parameter can be servo# = integer Set the speed of servo channel 2 to 50%.
- Page 154 Read the most recent commanded position of a servo motor connected Data Type: position of Servo 1. readServoPosition(2); to PRIZM servo ports 1-6. The value servo# = integer returned will be 0-180. Read the most recent commanded Data Range: position of Servo 2.
-
Page 155: Tetrix Prizm Arduino Library Functions Cheat Sheet
TETRIX® PRIZM™ Arduino Library Functions Cheat Sheet Tip: When using these Below is a reference of each function statement in the TETRIX PRIZM Robotics functions in our code, be Controller Library for Arduino. sure to prefix each function with the PRIZM object name that we choose using the PrizmBegin();... -
Page 156: Tetrix Prizm Sample Code Library
* Blink the PRIZM red LED at a 1-second flash rate. * author PWU on 08/05/2016 #include <PRIZM.h> // include the PRIZM library PRIZM prizm; // instantiate a PRIZM object “prizm” so we can use its functions void setup() { prizm.PrizmBegin(); // initialize the PRIZM controller void loop() { // repeat this code in a loop prizm.setRedLED(HIGH);... - Page 157 * This program will read the digital signal of the Line Finder Sensor attached to digital port D3. * If the sensor is facing a reflective surface and receiving a reflected IR beam, the PRIZM red LED * will switch on. If the sensor is facing a dark surface or is too far away from a reflective surface, * the red LED will be switched off.
- Page 158 // slow down the loop. wait for 200 ms to keep from printing to serial monitor too fast Example 6: TaskBot_Act7_Drive_Forward /* PRIZM controller example program * This program will move the PRIZM TaskBot forward for 3 seconds, stop, and end program. * author PWU 08/05/2016 #include <PRIZM.h> // include PRIZM library PRIZM prizm;...
- Page 159 Example 7: TaskBot_Act8_Drive_Circle /* PRIZM controller example program * This program will cause the PRIZM TaskBot to drive in a continuous circle. * Press the red Reset button to stop the program. * author PWU 08/05/2016 #include <PRIZM.h> // include PRIZM library PRIZM prizm;...
- Page 160 Example 8: TaskBot_Act9_Drive_Square_1 /* PRIZM controller example program * This program will move the PRIZM TaskBot in a square driving pattern. * author PWU 08/05/2016 #include <PRIZM.h> // include PRIZM library PRIZM prizm; // instantiate a PRIZM object “prizm” so we can use its functions void setup() { prizm.PrizmBegin();...
- Page 161 * This program will move the TaskBot in a square driving pattern using a forward and right turn function. * author PWU 08/05/2016 #include <PRIZM.h> // include PRIZM library PRIZM prizm; // instantiate a PRIZM object “prizm” so we can use its functions void setup() { prizm.PrizmBegin(); // initialize PRIZM prizm.setMotorInvert(1,1);...
- Page 162 Example 10: TaskBot_Act11_Drive_To_Line /* PRIZM controller example program * This program will move the PRIZM TaskBot forward on a white surface until it detects a black * line. When the line is detected, the robot will stop. * Connect the Line Finder Sensor to digital port D3.
- Page 163 Example 11: TaskBot_Act12_Follow_A_Line /* PRIZM controller example program * This program implements line following with the PRIZM TaskBot. Using the Line Finder Sensor * on sensor port D3, the robot will follow the edge of a black stripe on a white surface.
- Page 164 * for the object blocking its path to be cleared. * author PWU 08/05/2016 #include <PRIZM.h> // include PRIZM library PRIZM prizm; // instantiate a PRIZM object “prizm” so we can use its functions void setup() { prizm.PrizmBegin(); // initialize PRIZM prizm.setMotorInvert(1,1);...
- Page 165 * driving path. When an object is detected, the robot will stop, back up, make a right turn, and continue. * author PWU 08/05/2016 #include <PRIZM.h> // include PRIZM library PRIZM prizm; // instantiate a PRIZM object “prizm” so we can use its functions void setup() { prizm.PrizmBegin(); // initialize PRIZM prizm.setMotorInvert(1,1);...
- Page 166 * sonic Sensor status. * author PWU 08/05/2016 #include <PRIZM.h> // include PRIZM library PRIZM prizm; // instantiate a PRIZM object “prizm” so we can use its functions void setup() { prizm.PrizmBegin(); // initialize PRIZM prizm.setMotorInvert(1,1); // invert the direction of DC Motor 1...
- Page 168 TETRIX® PRIZM™ Robotics Controller Programming Guide Call Toll-Free Visit Us Online at 800•835•0686 TETRIXrobotics.com...
Need help?
Do you have a question about the PRIZM and is the answer not in the manual?
Questions and answers