Table of Contents
Advertisement
Available languages
Available languages
Quick Links
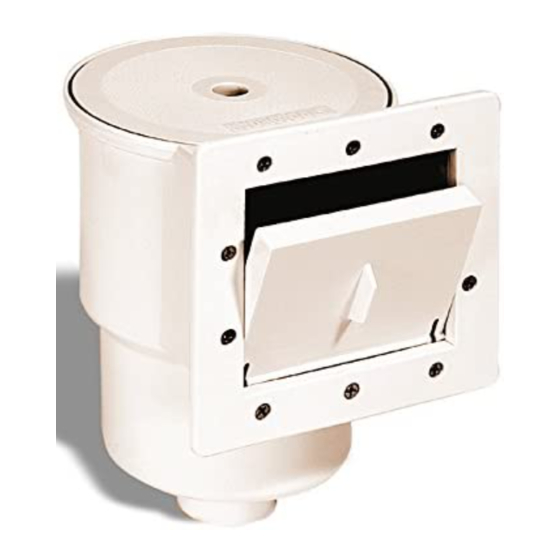
8940H IN-WALL FULLY AUTOMATIC SKIMMER
AND HYDROSTREAM RECIRCULATION SYSTEM
by ILP
NOTE:
IMPORTANT: Location of skimmer and return.
Ideal
should be considered before installation.
Water
Accessibility of skimmer will be limited if
Level
installed under a deck or walk-around patio,
maintenance and vacuuming can be done
through front skimmer opening.
Combo Front / Top / Front Access
Automatic Surface Skimmer
FEATURES
•
Rugged, tamperproof, full sized built-in automatic skimmer
for removing leaves and surface debris _ complete with
patented weir which adjusts automatically to a 4" variation
in water level.
•
Large capacity skimmer basket prevents leaves and other debris
from clogging hose lines and loading up lter - gives longer
lter cycle!
•
Vacuuming connection inside skimmer for 1-1/4" or 1-1/2" hose
sizes.
OPERATING INSTRUCTIONS
1. To adjust inlet ow direction - Loosen knurled outer ring of "eyeball" tting, move ball to desired position and
tighten knurled ring hand tight.
2. To clean skimmer basket - Remove top cover; or fold weir forward and squeeze pins toward center to remove.
Remove basket.
3. To attach vacuum cleaner hose - Remove top cover; or fold weir forward and squeeze pins toward center to remove.
Remove basket. Fill hose with water and insert vacuum hose cu into skimmer outlet. Some vacuum hoses may
require use of a separate hose adapter which your dealer can provide.
RECOMMENDED WINTERIZING PROCEDURE
Drain pool level approximately 2" below skimmer opening. Remove Hydrostream tting and securely plug wall tting
(1-1/2" threaded plugs are available from your dealer). Disconnect lter hoses from skimmer and wall tting. Be sure that
skimmer is kept free from water accumulation. Warranty does not include damage caused by formation of ice in skimmer.
Optional winter plate is recommended in climates where freezing may occur.
PARTS LIST
(1) SKIMMER HOUSING
(1) 8942 TOP COVER
(1) 8943 BASKET
(1) 8944 VAC ADAPTER PLATE & ELBOW
(1) 8946 GASKET SET
(1) 8947 SS SCREW SET
8949 Return Fitting
•
Through-the -wall locknut tting with adjustable Hydrostream
directional inlet tting... Flow direction can be easily set for
proper, e cient circulation pattern.
•
Completely eliminates cumbersome, unattractive "hangover"
hoses, and loss of pump prime caused by irregular
sucking action of oat-type attachment skimmers.
•
All parts completely corropsion-free. Quality built to give years
of dependable service.
•
All parts available and sold separately.
(1) 8945 FRONT PLATE
(1) 8941 FLAP WEIR
(1) 8949 RETURN FITTING
(1) 8905 HOSE ADAPTERS
(1) 8948 TEFLON TAPE
(10) HOLES
8940H
7-1/4"
AUTOMATIC SKIMMER
DIMENSIONS
2-11/32"
2-11/32"
5-5/8"
1-3/64"
2-3/32"
5-7/8"
8"
5-9/16"
2-3/32"
1-3/64"
5-3/4"
2-3/32"
7/8"
7/8"
8-1/4"
METAL WALL PANEL INSTALLATION INSTRUCTIONS
CUT-OUT FOR SKIMMER MODEL 8940H SERIES (If pool wall is not factory pre-cut)
1. Locate skimmer face plate against metal wall at desired position (Average water level should be approximately at
the mid point of the face plate). Make sure that the face plate and the skimmer will not interfere with top coping or
lip border of the pool structure.
2. Drill or punch twelve 1/4" holes per template guide.
3. Make rectangular cut-out per template enclosed.
CUT-OUT FOR 8949 RETURN FITTING (If pool wall is not factory pre-cut)
1. Cut 2-7/16" circle at desired location. Cut-out should be approximately 8" below desired water level.
INSTALL LINER AND FILL POOL TO APPROX. 2" BELOW LOWEST WALL OPENING
Note: Be sure skimmer and return inlet are not located at a pool vertical (upright)
SKIMMER INSTALLATION
1. Screw one hose adapter (with pipe tape) into skimmer outlet.
2. Place one gasket on skimmer face, making sure holes in gasket align with holes in skimmer face. (A very light
application of adhesive cement will assist in holding gasket in place).
3. Align skimmer face and gasket with drilled panel holes and fasten to wall panel at center of each side with the two
(2) pan head securing screws.
4. Install Vinyl liner.
5. Align second gasket and face plate and fasten tightly to skimmer face with ten (10) 12-24 x 1" screws (pierce liner
through face plate holes one at a time prior to inserting each screw). Screws secure through: 1. Face Plate; 2. Gasket;
3. Vinyl liner; 4. Wall panel; 5. Gasket; 6. Into skimmer face.
6. Connect lter suction hose to skimmer hose adapter and secure with clamp.
7. Cut out vinyl liner along inside edges of face plate with razor blade or sharp knife.
FITTING INSTALLATION
1. Gently press vinyl liner at circular wall tting opening to locate exact opening. Make a circular cut-out in the vinyl
liner approx. 3/4" smaller than the circular opening in the wall.
2. Screw one hose adapter (with pipe tape) into small end of wall tting.
3. Place one gasket on the tting and insert through the vinyl liner and wall panel. Place other gasket over tting hub
and screw locknut, with washer, up tightly.
4. Screw adjustable directional ball tting into face of wall tting. Opening should face away from wall skimmer opening.
5. Connect lter return hose to tting hose adapter and secure with clamp.
9-3/64"
(2) GASKETS REQ'D
COVER
7-1/8"
WEIR
12-3/4"
12-3/4"
PERF
PLASTIC
BASKET
MOUNTING
FLANGE
Advertisement
Table of Contents

Subscribe to Our Youtube Channel
Related Manuals for HydroTools 8940H


Summary of Contents for HydroTools 8940H
- Page 1 • of dependable service. Vacuuming connection inside skimmer for 1-1/4” or 1-1/2” hose CUT-OUT FOR SKIMMER MODEL 8940H SERIES (If pool wall is not factory pre-cut) sizes. • 1. Locate skimmer face plate against metal wall at desired position (Average water level should be approximately at All parts available and sold separately.
- Page 2 5-7/8” WIDE X 5-5/8” HIGH HOLE IN STEEL WALL POSITION FOR 5/8” PAN HEAD ALLIGNMENT SCREWS (READ ALL INSTRUCTIONS BEFORE DRILLING ANY HOLES!) HOLE TEMPLATE GUIDE...
- Page 3 MONTAGE SUR PAROI MÉTALLIQUE type ottant. durée de vie du ltre ! DÉCOUPE POUR MODÈLE DE SKIMMER DE LA SÉRIE 8940H (si la paroi ne présente pas de pré-découpe e ectuée en usine.) • • Raccords d’aspiration à l’intérieur du skimmer pour tuyaux de Toutes les pièces sont inoxydables.
- Page 4 HAUT OUVERTURE DE 14,92 CM (5-7/8”) DE LARGE X 14,28 CM (5-5/8”) DE HAUT DANS LA PAROI EN ACIER POSITION DES VIS D’ALIGNEMENT DE 5/8” À TÊTE CYLINDRIQUE LIRE TOUTES LES INSTRUCTIONS AVANT DE PERCER DES TROUS GUIDE D’ESPACEMENT DES TROUS...
- Page 5 La cesta del recolector de gran capacidad evita que las hojas y otros pérdida de cebado de la bomba causada por la acción de succión RECORTE DEL RECOLECTOR MODELO DE LA SERIE 8940H (si la piscina no venía cortada de fábrica) irregular de recolectores accesorios del tipo otantes.
- Page 6 ARRIBA ORIFICIOS EN LA PARED DE ACERO DE 5-7/8” ANCHO x 5-5/8” ALTO POSICIÓN DE LOS TORNILLOS DE CABEZA PLANA 5/8” ALINEADOS (¡ LEA TODAS LAS INSTRUCCIONES ANTES DE REALIZAR CUALQUIER ORIFICIO!) GUÍA DE PLANTILLAS DE ORIFICIOS...
Need help?
Do you have a question about the 8940H and is the answer not in the manual?
Questions and answers