Audio Technica 3000 Series User Manual
Uhf synthesized diversity wireless system.
uhf synthesized diversity receiver, uhf transmitter
Hide thumbs
Also See for 3000 Series:
- Quick start manual ,
- Installation and operation manual (125 pages) ,
- User manual (72 pages)

Related Manuals for Audio Technica 3000 Series


Summary of Contents for Audio Technica 3000 Series
- Page 1 3000 Series User Manual UHF synthesized diversity wireless system ATW-R3210 UHF Synthesized diversity receiver ATW-T3201 UHF transmitter ATW-T3202 UHF transmitter...
-
Page 2: Package Contents
Package contents Before use, check to make sure that all of the following items are contained in the package. If any of the items is missing from your package or damaged, contact your local Audio-Technica dealer. • ATW-R3210 • ATW-T3201 •... - Page 3 Important information Warning: For customers in the USA • To prevent fire or shock hazard, do not expose this apparatus to rain or moisture. FCC Notice Caution: Warning: • Do not expose this apparatus to drips or splashes. This device complies with Part 15 of the FCC Rules. Operation is •...
- Page 4 Informations importantes Avertissement: Pour les clients aux États-Unis • Pour éviter tout risque de choc électrique ou d’incendie, n’exposez pas cet Avis de la FCC appareil à la pluie ou à l’humidité. Avertissement: Attention: Cet appareil est conforme à la Partie 15 du règlement de la FCC. Son •...
-
Page 5: Safety Precautions
Safety precautions • When using the product, also read the user manuals supplied with the devices that are to be connected. • When not using the product, remove the power plug from the power outlet. • Turn the product off before connecting or disconnecting cables. •... -
Page 6: Part Names And Functions
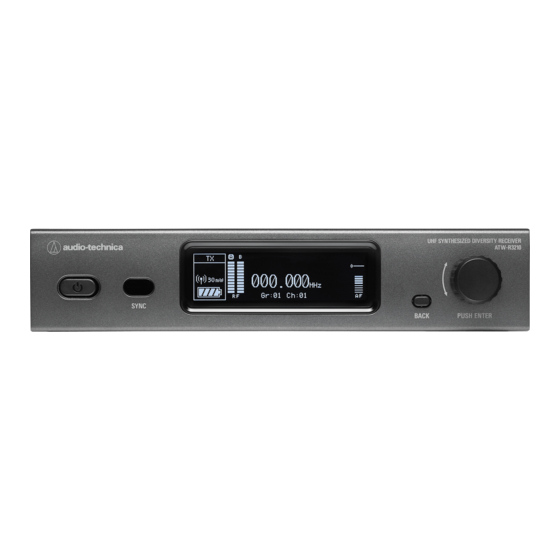
Part names and functions ATW-R3210 Front panel ❶ ❷ ❸ ❹ ❺ ❶ Power switch ( Press the switch to turn the power on. ❷ IR sync window Use when syncing transmitter (ATW-T3201/ATW-T3202) to the product. ❸ Display Displays the product state and setting menus. ❹... - Page 7 Part names and functions Rear panel ❶ ❷ ❸ ❹ ❺ ❶ Antenna input jack Attach the antenna directly, or extend it with a low-loss antenna cable. ❷ Unbalanced output jack (6 3 mm (1/4")) ❸ Balanced output jack (XLR 3-pin male) COLD ❹...
- Page 8 Part names and functions ATW-T3201 ❶ ❺ ❷ ❹ ❸ ⓮ ❻ ❽ ❾ ❿ ⓯ ❼ ⓫ ⓬ ⓰ ⓭ ❶ ❽ Transmission antenna UP button Used for selecting various settings. ❷ ❾ MUTE switch BACK button Press to switch audio mute on and off. Returns to the previous operation.
- Page 9 Part names and functions ATW-T3202 ❶ ❷ ❸ ❹ ❺ ❻ ❼ ❽ ❾ ❿ ⓫ ⓬ ⓭ ❶ ❽ Grip case Power switch Turns the power on/off. ❷ ❾ UP button Technical standard conformity certification sticker Used for selecting various settings. Using the product without this sticker may cause legal violation.
-
Page 10: Inserting Batteries
Inserting batteries ATW-T3201 ATW-T3202 Slide the battery cover latches inward as shown by the arrows. Rotate the grip case. Open the battery cover located on the back side. With the latches pressed in, open the battery cover. Insert the batteries according to the plus (+) and minus (-) marks found inside the battery compartment Insert the batteries according to the plus (+) and minus (-) marks found inside the battery compartment... -
Page 11: How To Install
Installing and removing a microphone (only for ATW-T3202) How to install Install the microphone to the product. Rotate and tighten the microphone. How to remove Rotate and tighten the microphone. Remove the microphone from the product. - Page 12 Display ATW-R3210 Transmitter ❺ ❻ ❼ ❽ ❾ ❶ information display area ❷ ❸ ❹ ❿ ⓫ ⓬ ⓭ ⓮ ❶ ❽ Key lock status (transmitter) Mute indicator A mark is displayed when muted. ❷ ❾ High pass filter (transmitter) AF level indicator Displays the received audio signal level.
- Page 13 Display Level meter screen ❶ ❷ ❸ ❹ ❺ ❻ ❶ ❹ RF power output (transmitter) Gain indicator (transmitter) ❷ ❺ Marker (when the minimum hold function is on) Audio setting (receiver) The RF level is held at a minimum value. ❸...
- Page 14 Display ATW-T3201 / ATW-T3202 The main screen is displayed when the power is switched on. Pressing the UP / DOWN button on the main screen switches the screen display. ❶ ❻ ❼ ❽ ❷ ❸ ❹ ❺ ❸ ❹ ❷ ❸...
-
Page 15: Basic Operation
Basic operation About settings Turn the receiver (ATW-R3210) power on. The various settings of this product can be made from the main menu. • Display lights and the main screen appears. ATW-R3201 Press the control dial. • The main menu is displayed. Set the operating frequency. - Page 16 Setting NAME ATW-R3201 Settings The following characters can be entered: • The maximum number of characters that can be entered is 8. • The following characters can be entered: Setting the operating frequency Alphabetical characters Numbers (upper case) Setting manually Symbols (+, -, #, &, period) Space From the main menu, turn the control dial, select [Frequency]...
-
Page 17: Setting The Audio Output Level
Setting the audio output level Setting transmitters via IR sync From the main menu, turn the control dial, select [Audio] and This function allows you to make transmitter settings on the product and then automatically configure the transmitter via IR sync. Setting then press the control dial. -
Page 18: Setting The Squelch Level
Setting the squelch level Setting the system-related functions Setting automatically Setting the key lock From the main menu, turn the control dial, select [Squelch] and Set this function to prevent the product settings from being changed. then press the control dial. •... - Page 19 Setting group/channel editing Setting frequency back-up From the main menu, turn the control dial, select [System] and From the main menu, turn the control dial, select [System] and then press the control dial. then press the control dial. Turn the control dial to select [Gr/Ch Edit] and then press the Turn the control dial to select [Back-Up Ch] and then press the control dial.
- Page 20 Setting main screen level mater Resetting factory defaults From the main menu, turn the control dial, select [System] and This returns the settings to their factory defaults. then press the control dial. From the main menu, turn the control dial, select [System] and then press the control dial.
-
Page 21: Setting The Transmission Frequency
Setting NAME ATW-T3201/ATW-T3202 settings The following characters can be entered: • The maximum number of characters that can be entered is 8. • The following characters can be entered: Setting the transmission frequency Alphabetical characters Numbers (upper case) From the main menu, press the UP/DOWN button to select Symbols (+, -, #, &, period) Space [FREQUENCY] and then press the SET button. -
Page 22: Setting Rf Output
Setting RF output Setting button mode From the main menu, press the UP/DOWN button to select [RF The function is assigned when RECALL/Multi function button is pressed POWER] and then press the SET button. and hold. From the main menu, press the UP/DOWN button to select [BUTTON MODE] and then press the SET button. - Page 23 Setting user access level Setting the system-related functions From the main menu, press the UP/DOWN button to select Setting battery [System] and then press the SET button. Set the type of batteries used. Press the UP/DOWN button to select [ACCESS] and then press From the main menu, press the UP/DOWN button to select the SET button.
-
Page 24: Making Connections (Basic Connections)
Attaching the product to user's body (ATW-T3201) The product is equipped with a clip. Use that to attach the product to a belt, pocket or other piece of clothing that will hold it. You can reverse the direction that the input connector faces Pull both sides of the clip firmly to the outside to remove by attaching the clip in the opposite direction.
Need help?
Do you have a question about the 3000 Series and is the answer not in the manual?
Questions and answers