Loupedeck + Manual
Adobe photoshop cc 2019
Hide thumbs
Also See for Loupedeck+:
- User manual (31 pages) ,
- User manual (11 pages) ,
- User manual (17 pages)
Table of Contents
Advertisement
Advertisement
Table of Contents

Related Manuals for Loupedeck Loupedeck+


Summary of Contents for Loupedeck Loupedeck+
- Page 1 ADOBE PHOTOSHOP CC 2019 (v.20.0 or later)
-
Page 2: Table Of Contents
UPDATING LOUPEDECK ......................... 26 MORE QUESTIONS?........................26 PRODUCT AND SAFETY INFORMATION ..................28 THIRD PARTY TRADEMARKS AND ITEMS................... 28 WARNINGS AND CAUTIONS ...................... 28 LOUPEDECK LTD ONE YEAR LIMITED WARRANTY ..............29 WAIVER ............................29 Copyright (c) 2017 Loupedeck Ltd. All rights reserved. -
Page 3: Using Photoshop With Loupedeck
How do I power Loupedeck +? At this point you might think, hold on, where’s the power cable? Well, the simple answer is that there is no need for one, as Loupedeck+ is powered from its USB cable. Disconnecting from your computer When you want to disconnect the console from your computer, there’s no need to go through... -
Page 4: Working With Loupedeck
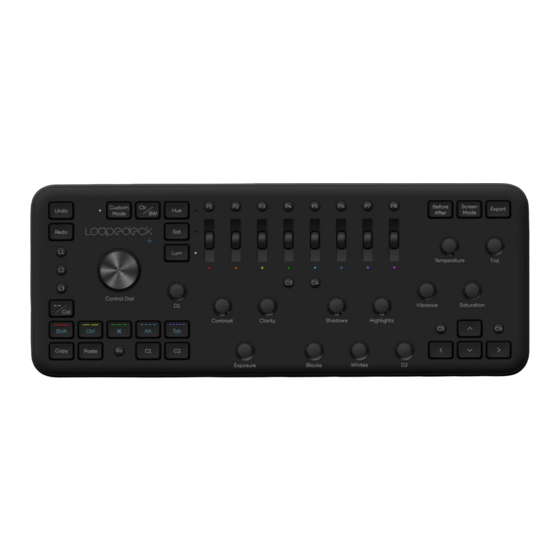
WORKING WITH LOUPEDECK+ Loupedeck+ has been preconfigured so that it would be easy to learn! 1. Undo / Redo commands. With FN -button (12) they function as area selection buttons:: Select All / Deselect All 2. Custom mode that opens new customizable layer for dials (9) and P1-P8 buttons (5). -
Page 5: Basic Functions
Basic functions There are some basic functions that can be found in almost every software. The most useful functions are printed on Loupedeck console(s) as they are also functions that are used on daily bases (like copy & paste). Keyboard Modifiers are also included in Basic functions as they are some of the most used buttons in Photoshop. - Page 6 Press --/Col again to use functions assigned to rating buttons (see Layer management for functions assigned under rating buttons). (R1) Shift When Keyboard Modifiers are activated: (R3) ⌘ (R2) Ctrl Press R1 for Shift Press R2 for Ctrl Copyright (c) 2017 Loupedeck Ltd. All rights reserved.
-
Page 7: Tools & Filters
Secondary (not as common) tools are assigned to P1-P8 buttons and Filters are located under FN+P1-P8 buttons. P1-P8 also includes some functions for layer control. Copyright (c) 2017 Loupedeck Ltd. All rights reserved. - Page 8 If you prefer fast area blending we suggest you swap the L3 function with P3 (Patch Tool). C1 & C2 Press C1 to use Hand Tool for moving a zoomed area. Press C2 to switch between current and previous tool. * Copyright (c) 2017 Loupedeck Ltd. All rights reserved.
-
Page 9: Controlling Brush -Type Of A Tool
Brush tool is paired with Eraser Tool (FN+L1)since they are most commonly used together. Tools with similar attributes to Brush Tool can be controlled with LUM Scrolls. LUM Scrolls are activated when LED light is illuminated next to the LUM button. Copyright (c) 2017 Loupedeck Ltd. All rights reserved. - Page 10 *. Press Scroll 1 or Control Dial to reset brush tip size to 25. * On Windows OS cursor must be moved at the same time when size is adjusted to see the change in real time. Scroll 2 (orange) Copyright (c) 2017 Loupedeck Ltd. All rights reserved.
- Page 11 Press Shadow to reset flow to 100%. Rotate Highlights to set brush smoothening. Press Highlights to reset smoothening to 0%. Rotate FN+Blacks to set brush hardness. Press FN+Blacks to reset brush hardness to 0%. Copyright (c) 2017 Loupedeck Ltd. All rights reserved.
-
Page 12: Layer Controlling
Tolls used for grouping such as, merging, clipping masks, layer visibility and layer or mask creating are located on the left side of the Loupedeck+ Mapped functions are grouped as pairs with using FN (like Group Layers <-> Ungroup Layers). - Page 13 These functions can be activated easily with a mouse when working with the Loupedeck+ & mouse combination. Some functions can be located within in the middle of Loupedeck+. These are multi-functions that can be used in several different workflows, including layer management (such as delete and invert).
- Page 14 Rotate D2 to adjust layer opacity amount. Press D2 to set And Fill FN+D2 layer opacity to 100%. Rotate FN+D2 to adjust layer fill amount. Press FN+D2 to set layer fill to 100%. Copyright (c) 2017 Loupedeck Ltd. All rights reserved.
-
Page 15: Adjustment Layers
Vertical by moving a mouse pointer over a slider or a control point and rotating Clarity (Horizontally) or Shadows (Vertically). There are some values which are not identically named with the Loupedeck+’s dials however, you can still use a corresponding dial if the effect resembles the dial’s name (e.g. Exposure Adjustment Layer’s Offset is adjusted with Blacks dial and Gamma Correction is adjusted by... - Page 16 Release FN button after target points have been set. Color Lookup Whites Press Whites dial to create adjustment layer. Use mouse to select and change parameters. Curves Highlights, Press Highlights dial to create an adjustment layer. Clarity, Shadows Copyright (c) 2017 Loupedeck Ltd. All rights reserved.
- Page 17 FN+Red scroll for: Yellow/Blue balance Selective Color Tint, Press Tint dial to create adjustment layer. Clarity When Adjustment Layer is active and selected from the layer list: Move mouse pointer over a slider and use Copyright (c) 2017 Loupedeck Ltd. All rights reserved.
-
Page 18: Color Control
Rotate Orange Scroll to adjust saturation. Rotate Yellow Scroll to adjust luminance. Background color: Rotate FN+Red Scroll to adjust hue. Rotate FN+Orange Scroll to adjust saturation. Rotate FN+Yellow Scroll to adjust luminance. Copyright (c) 2017 Loupedeck Ltd. All rights reserved. - Page 19 Press C4 to invert colors inside selected area Note! Area must be selected or invert will affect something else (for example layer). FN+C4 Press FN+C4 to reset foreground color to black and background color to white. Copyright (c) 2017 Loupedeck Ltd. All rights reserved.
-
Page 20: Custom Mode
CUSTOM MODE Loupedeck+ has a new Custom Mode where you can modify all the basic dials to your own personal preferences. The Little LED light next to the Custom Mode button indicates when Custom Mode has been activated. Press Custom Mode again to jump back to normal mode, so you can use Loupedeck in the classic way. -
Page 21: Configuring Loupedeck
In Photoshop, basic dials and some buttons are fixed so that they cannot be configured, while everything else is opened to be configured to fit your workflow. In Custom mode, Loupedeck offers all the basic dials that are fixed for adjustment layers in normal mode - to be assigned for different purposes. - Page 22 10. Global Settings (e.g. Export/Import Loupedeck mapping layouts). 11. Press Done to close configuring software. After selecting a button or dial group, a lit box will appear on top of Loupedeck software, allowing specific button configurations (e.g. selecting L1-L3 & C1-C6 group to be configured):...
- Page 23 When a function is assigned to a button or a dial the effect occurs immediately (no need to press “close” and “done” to apply changes). Note! There are some general Loupedeck functions for buttons and dials that are available on every supported software.
-
Page 24: Taskbar Options
Within Windows taskbar icon or macOS menu bar icon, you can find more options for your Loupedeck. OPTION NAME ITEM WHAT CAN YOU DO WITH IT? Loupedeck Setup Click Loupedeck Setup (Win) or Open Setup… (Mac) to (Win) access Loupedeck configuration software. Open Setup… (Mac) Download Loupedeck Opens Loupedeck’s set-up web page where you can... - Page 25 Loupedeck’s Support web page where answers to the most commonly asked questions by our customers can be found. Also provided on this page is access to Loupedeck’s support form, which is located at the bottom of the page. Please fill out the support form if you are in need of technical assistance.
-
Page 26: Updating Loupedeck
Loupedeck+ to work. My Lightroom doesn’t seem to work with Loupedeck+. What is your Lightroom version? Loupedeck is compatible with Adobe® Lightroom (version 6) and Lightroom® Classic CC (version 7.4 or later). Cloud based version, Lightroom CC, is not supported by Loupedeck. - Page 27 Loupedeck software is not specifically developed for Windows 7 or 8, but it might work normally as OS base is very similar. You can find FAQs and support at www.loupedeck.com/support. Copyright (c) 2017 Loupedeck Ltd. All rights reserved.
-
Page 28: Product And Safety Information
PRODUCT AND SAFETY INFORMATION Please read this important safety information before you use the Loupedeck device. It is important that you follow the warning and caution information to prevent injury to yourself or others and to prevent damage to your device. The term “device” refers to the Loupedeck product and the items supplied with the product. -
Page 29: Loupedeck Ltd One Year Limited Warranty
Loupedeck™. Use of the Loupedeck™ product means you agree to all provisions in this Legal Guide and the Loupedeck Ltd Terms and Conditions. If you do not agree and consent to all the provisions in the Legal Guide and Terms and Conditions, please return Loupedeck™ for a refund in accordance with the above- noted instructions. - Page 30 Cet appareil numérique de la classe B est conforme à la norme NMB-003 du EUROPEAN COMPLIANCE The manufacturer of this product confirms that this product complies with the European Union regulations for safety, health, environmental and consumer protection (ECM = Electromagnetic Compatibility 2014/30/EU). Copyright (c) 2017 Loupedeck Ltd. All rights reserved.
- Page 31 A copy of the EU Declaration of Conformity is available online at Loupedeck Ltd website (www.loupedeck.com/legal). RECYCLE Always return your used electronic products, batteries, and packaging materials to dedicated collection points. This way you help prevent uncontrolled waste disposal and promote the recycling of materials.
- Page 32 Copyright (c) 2017 Loupedeck Ltd. All rights reserved.
Need help?
Do you have a question about the Loupedeck+ and is the answer not in the manual?
Questions and answers