
Subscribe to Our Youtube Channel
Related Manuals for Hoshizaki RM-10


Summary of Contents for Hoshizaki RM-10
- Page 1 Glass Door Merchandiser Models RM-10 RM-26 RM-49 Number: MAN-227-R Issued: 02-22-2017 Revised:...
- Page 2 RM-10 RM-26 RM-49...
- Page 3 Hoshizaki provides this manual primarily to assist qualified service technicians in the installation, maintenance, and service of the appliance. Should the reader have any questions or concerns which have not been satisfactorily addressed, please call, send an e-mail message, or write to the Hoshizaki Technical Support Department for assistance.
-
Page 4: Table Of Contents
TABLE OF CONTENTS Introduction ............... Important safety information ........Know your equipment ..........Check for shipping damage ........Handling the cabinet ..........Remove the crate and skid ........Level the cabinet ............Electrical installation ..........Installing the shelves ..........Start up the cooler ............. Use of your cooler with Carel electronic thermostat... -
Page 5: Introduction
INTRODUCTION This manual contains instructions for installation, operation and general maintenance of your unit. It also includes a Troubleshooting Chart to diagnose problems along with corrective actions. Important Safety Information Throughout this manual, notices appear to bring your attention to situations which could result in death, serious injury, damage to the appliance, or damage to property. - Page 6 WARNING, continued • 115VAC Models: THIS APPLIANCE MUST BE GROUNDED: This appliance is equipped with a NEMA 5-15 three-prong grounding plug to reduce the risk of potential shock hazards. It must be plugged into a properly grounded, independent 3-prong wall outlet. If the outlet is a 2-prong outlet, it is your personal responsibility to have a qualified electrician replace it with a properly grounded, independent 3-prong wall outlet.
- Page 7 WARNING, continued • Be careful not to pinch fingers when opening and closing the doors. Be careful when opening and closing the doors when children are in the area. • Open and close the doors with care. Doors opened too quickly or forcefully may cause injury or damage to the appliance or surrounding equipment.
- Page 8 WARNING, continued • Do not store gasoline or other flammable liquids or gases, near this or other electrical equipment. • Keep your fingers away from grills; the spaces between doors and cabinet are small, so be careful when closing doors when children are around. •...
-
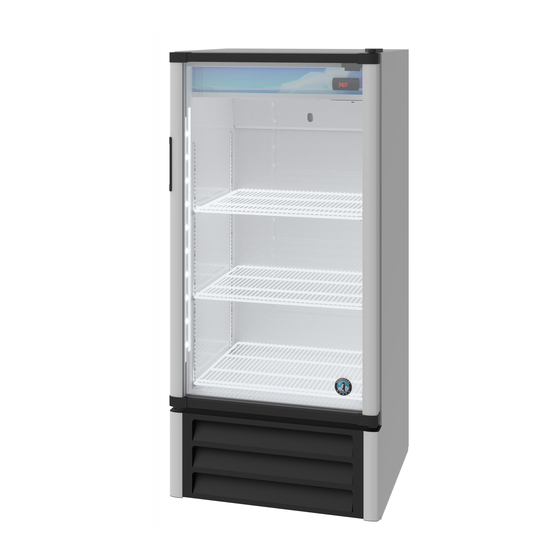
Page 9: Know Your Equipment
KNOW YOUR EQUIPMENT DOOR ELECTRONIC SHELF THERMOSTAT BACK GRILL LIGHT SWITCH METAL CLIP CONDENSER POWER CORD SKID FRONT GRILL LEVELING LEG... -
Page 10: Check For Shipping Damage
CHECK FOR SHIPPING DAMAGE Prior to leaving the factory, each cabinet is throughly inspected and performance tested to assure proper operating temperatures. Check the crate thoroughly for signs of shipping damage. If external damage exists, internal damage is also probable. Uncrating should be done while the carrier´s representative is present. -
Page 11: Handling The Cabinet
HANDLING THE CABINET 1. Always move the unit in an upright position. Do not set it on its side or upside down as you may damage the cabinet and spill the compressor oil. 2. If lifting the unit, hold it from its base. It is recommended to use a dolly. 3. -
Page 12: Remove The Crate And Skid
REMOVE THE CRATE AND SKID 1. Remove the external packaging (corrugated board and plastic wrapping). Check for concealed damage. If any damage is identified, immediately forward a complaint to the transportation company. 2. Move the cooler the closest possible to its final location, before removing the skid. -
Page 13: Electrical Installation
To install casters: Casters are supplied as optional equipment. Only use genuine casters or the base of the cooler might suffer damages. When installing the casters it is important to hand tighten securely against the base rail reinforcement assembly (see image). The top edge of the caster must make firm contact with the reinforcement assembly. - Page 14 ELECTRICAL INSTALLATION WARNING The power cord has a ground prong. Do not under any circumstance cut or remove the ground prong from the cord. Removal of ground prong invalidates product warranty. Ground prong NEVER USE AN ADAPTER PLUG! Because of potential safety hazards under certain conditions, we strongly recommend against the use of an adapter plug.
-
Page 15: Installing The Shelves
INSTALLING THE SHELVES Shelves and shelf clips (4 clips per shelf) are packed inside the cabinet prior to shipment. After selecting the appropriate spacing inside the cabinet, install shelf clips by inserting top of clip inside the pilaster and then press the lower section of the clip while pushing inwards until it snaps into place. -
Page 16: Start Up The Cooler
START UP THE COOLER 1. Plug in the electrical cord of the unit to a wall outlet, following the recommendations about electrical installation in this manual. 2. Let the cooler run with no product load for 2 hours, or let the compressor complete three on/off cycles to assure that the temperature inside is appropriate for the products before loading them into the refrigerator. - Page 17 Note: The sound alarm can be turned off by pressing the red button ”set mute” on the right side of the display. In case the alarm is not turned off by the actions suggested, or you have any questions regarding the cooler performance, please contact to the Hoshizaki Technical Support.
-
Page 18: Cleaning And Preventive Maintenance
ATTENTION After an interruption of the electrical power supply, the compressor will take approximately 3 minutes to start working. CLEANING AND PREVENTIVE MAINTENANCE Your unit requires very little maintenance. However, periodic cleaning can help maintain efficiency and prolong product life. Remember to disconnect the power source before cleaning. -
Page 19: Troubleshooting Chart
TROUBLESHOOTING CHART Compressor will not 1. Power disconnected 1. Check cord for proper start, no noise connection 2. Blown fuse or 2. Replace fuse or breaker reset breaker 3. Defective or broken 3. Repair or replace wiring 4. Defective overload 4.
Need help?
Do you have a question about the RM-10 and is the answer not in the manual?
Questions and answers