Table of Contents
Advertisement
Quick Links
- 1 Connecting the Helialux Smartcontrol
- 2 Establishing a Connection to the User Interface Using Access Point Mode
- 3 Establishing a Connection to the Home Network
- 4 Helialux Smartcontrol in Home Networks
- 5 Switching from Home Network to Access Point Mode
- 6 Troubleshooting in the Event of Problems
- Download this manual
Advertisement
Table of Contents

Summary of Contents for juwel HeliaLux SmartControl
- Page 1 INSTRUCTION MANUAL HeliaLux SmartControl www.juwel-aquarium.com...
-
Page 2: Model List
Introduction We are pleased that you have decided to purchase a JUWEL Aquarium product and thank you for the trust that you have placed in us. First of all, please read through all chapters of these operating instructions carefully and check that your JUWEL product is complete. -
Page 3: Scope Of Delivery
Connecting the HeliaLux SmartControl The HeliaLux SmartControl can be used to control the HeliaLux Spectrum light unit. It is also possible to control the HeliaLux LED light unit with the optionally available splitter. The optionally available splitter allows up to two HeliaLux lamps to be used with one SmartControl. - Page 4 HeliaLux Control + 1x HeliaLux Spectrum (4 colours) 1. Connect both plugs on the HeliaLux SmartControl to those on the HeliaLux LED Spectrum and the power supply unit in accordance with the illustration and screw the locking rings completely on to the screw connectors.
- Page 5 The splitter allows you to operate one or two lamps with the HeliaLux SmartControl. 1. Connect the plugs on the HeliaLux SmartControl, the splitter and the power supply unit as well as the lamp in accordance with the illustration and screw the locking rings completely on to the screw connectors.
-
Page 6: Establishing A Connection To The User Interface Using Access Point Mode
Establishing a connection to the user interface using Access Point Mode 1. In the delivered state, the HeliaLux SmartControl will start in Access Point Mode (AP Mode) when it is switched on. Access Point Mode creates its own wireless network to which Wi-Fi capable devices are able to connect (smartphone, tablet and computer). -
Page 7: Basic Settings
Access Point Mode ' . • Via the home network, please refer to ' HeliaLux SmartControl in home networks ' . 2. Select the main ' Settings ' menu item. 3. Navigate to ' General Settings ' and select your preferred language from the ' Language ' selection list. -
Page 8: Setting The Date And Time
Info The time and date can be obtained automatically over the Internet. The HeliaLux SmartControl must be connected to the home network and have access to the Internet to this end (please refer to ‘HeliaLux SmartControl in home networks ’). -
Page 9: Lighting Profiles
Notice One light profile (Profile 1) is already preconfigured and assigned to all 7 days in the HeliaLux SmartControl's factory settings. This profile may be changed at any time. Please refer to ‘ Configuration of the Light Profiles ’ to this end. -
Page 10: Configuring Light Profiles
Access Point Mode ' . • Via the home network, please refer to ' HeliaLux SmartControl in home networks ' . 2. Select the main ' Profiles ' menu item. 3. Select one of the 8 profiles by pressing the ' Edit ' button. -
Page 11: Lighting Phase With Constant Light Intensity
Notice One light profile (Profile 1) is already preconfigured and assigned to all 7 days in the HeliaLux SmartControl's factory settings. This profile may be changed at any time. Please refer to ‘ Configuration of the Light Profiles ’ to this end. -
Page 12: Lighting Graph For The Selected Profile
Access Point Mode ' . • Via the home network, please refer to ' HeliaLux SmartControl in home networks ' . 2. Select the main ' Status ' menu item. 3. Enable the sliding controller for the manual simulation of the time of day. -
Page 13: Manual Control Of Light Colours
Access Point Mode ' . • Via the home network, please refer to ' HeliaLux SmartControl in home networks ' . 2. Select the main ' Status ' menu item. 3. Activate the sliding controller for manually controlling the light colours. -
Page 14: Helialux Smartcontrol In Home Networks
HeliaLux SmartControl in home networks It is possible to connect the device to the home network for easy access to the HeliaLux SmartControl. Manually connecting to the HeliaLux SmartControl via Access Point Mode is no longer necessary with this type of connection. - Page 15 If it is no longer possible to connect to the user interface in the home network (the blue network LED does not light up permanently even after 30 seconds), you can return your HeliaLux SmartControl to Access Point Mode using the following key combination and then repeating Steps 1 to 11.
-
Page 16: Launching The User Interface When A Connection To The Home Network Has Been Established
Solution 2: Alternatively, it is also possible to assign a fixed IP address to your SmartControl through which it is possible to permanently access the HeliaLux SmartControl. Please refer to 'Assigning a static IP address in home networks' to this end. Please also make sure in this event that the selected IP address is supported by your network. -
Page 17: Other Settings
Via AP mode, please refer to ' Establishing a connection to the user interface via • Access Point Mode ' . Via the home network, please refer to ' HeliaLux SmartControl in home networks ' . • 2. Select the main ' Settings ' menu item. -
Page 18: Assigning A Static Ip Address In Your Home Network
4. Disable the checkbox for DHCP mode. Info Disable DHCP mode to assign your own IP address to the HeliaLux SmartControl by which it can be accessed. Your router must support the manual assignment of a separate IP address. Please refer to your router's user manual for more information in this regard. -
Page 19: Using Several Helialux Smartcontrols In A Home Network
Using several HeliaLux SmartControls in a home network Please ensure that you are connected to the home network. Please refer to ' HeliaLux SmartControl in home networks ' to this end. Alternative 1: Accessing the individual SmartControls through individual IP addresses Each HeliaLux SmartControl can be manually assigned an individual IP address. -
Page 20: Firmware Update
1. Establish a connection through your home network to the HeliaLux SmartControl's user interface. Please refer to ' Connecting the HeliaLux SmartControl to home networks ' . Notice Please ensure that your home network has access to the Internet. -
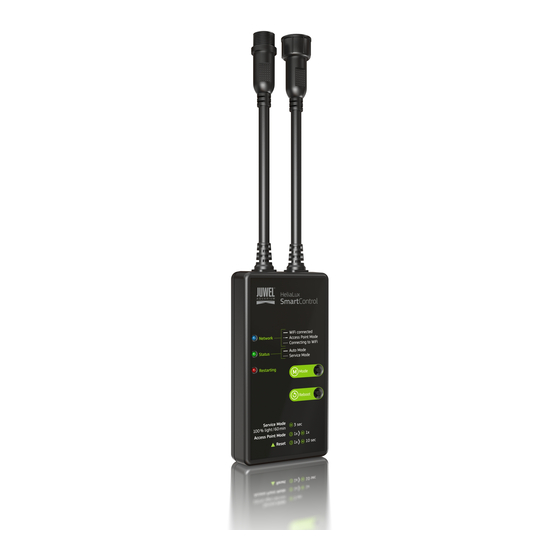
Page 21: Status Lights And Function Keys On The Helialux Smartcontrol
Status lights and function keys on the HeliaLux SmartControl Status lights on the HeliaLux SmartControl LED blue: Network • Lights up continuously after successfully connecting to a Wi-Fi home network. • Briefly lights up twice and once long in Access Point Mode •... -
Page 22: Functions Using The Buttons On The Device
Activation: Press and hold the ' Mode ' button for 20 seconds. Deactivation: Press and hold the ' Mode ' button for 3 seconds to exit Demo Mode. The HeliaLux SmartControl will then switch back to Auto Mode (operating mode). Info The SmartControl will also start in Demo Mode after a restart when Demo Mode has been activated. -
Page 24: Troubleshooting In The Event Of Problems
Possible cause: Start the HeliaLux SmartControl on the device in It is not possible to - The selected Wi-Fi network Access Point Mode. To do so, press launch HeliaLux is not available or is out of... - Page 25 IP address is supported by your network. Solution 3: Check your router's administration interface to see whether a new IP address has been assigned to your HeliaLux SmartControl. ____________________________ Please ensure that your end device is ___________________________...
- Page 26 Proper disposal Proper disposal • When your light fitting comes to the end of it’ s life or you choose to update or upgrade it by replacing it. Please do not dispose of it with your normal household waste. Please recycle where facilities exist. When you need to dispose of this fitting, check with your retailer or local authority for suitable options.
- Page 27 Guarantee We guarantee the performance of the JUWEL-Aquarium product or its accessories to the purchaser for a period of 24 months from the date of purchase according to the following conditions: § 1 Extent of the guarantee (1) This guarantee extends to the JUWEL-Aquarium product and its components excluding items subject to wear and tear such as T5 and T8 light tubes and filter media.
Need help?
Do you have a question about the HeliaLux SmartControl and is the answer not in the manual?
Questions and answers