Table of Contents
Advertisement
Advertisement
Table of Contents

Subscribe to Our Youtube Channel
Related Manuals for HiFiMAN R2R2000


Summary of Contents for HiFiMAN R2R2000
- Page 1 Owner’s Guide...
- Page 2 Welcome Thank you for purchasing the HIFIMAN R2R2000 HD Streaming Audio Device HIFIMAN is a leading designer and manufacturer of high performance audio products. Please read this owner’s guide to get a useful overview of the player and its features.
-
Page 3: Table Of Contents
Contents Quick Guide Overview Function Buttons Touch Sensitive Controls Display Operations 4.4mm Balanced Line Output Wiring Specifications Set up Specifications Supported Music Formats Accessories Safety Instructions Warranty & Customer Service... -
Page 4: Quick Guide
Quick Guide The R2R2000 supports a Micro SD card capacity of up to 256GB. The Micro SD card slot on the side can be accessed by inserting a pin or paper clip into the small hole. Connect a pair of headphones or earphones to the appropriate socket. -
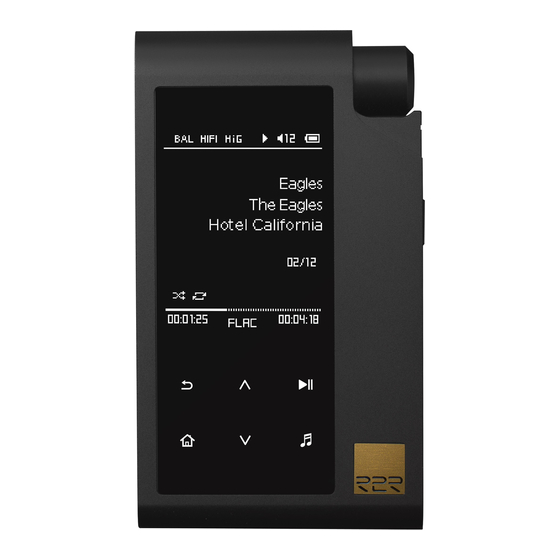
Page 5: Overview
Overview Volume Micro SD Slot Power OLED Screen Play / Enter Back Now Playing Home Down 4.4mm 3.5mm Headphone Sockets USB Type-C Connector... -
Page 6: Function Buttons
Function Buttons Power 1. Long press for 3 seconds to turn on / o the player. 2. Long press for 10 seconds to force restart the player. 3. Quick press once to lock the screen, again to unlock. Volume 1. Rotate the volume clockwise to increase the volume up to a maximum of 32. -
Page 7: Touch Sensitive Controls
3 seconds. 5. When using the HIFIMAN APP via Bluetooth mode, it has the same functionality as the “Now Playing” view. - Page 8 2. In “Now Playing”, long press to fast forward. 3. In “Now Playing”, quick press to play next track. 4. When using the HIFIMAN APP via Bluetooth mode, it has the same functionality as the “Now Playing” view. Please note: Changing tracks is only in order during normal playback.
-
Page 9: Display Operations
Display Operations Screen Display content, mode and information etc. Type-C Interface 1. Connect the Type-C USB cable to a computer to copy / delete files. 2. Connect the Type-C USB cable to a computer or 5V1A Power to charge. 3. Connect the Type-C USB cable to a computer or phone to enable the USB DAC function. -
Page 10: Mm Balanced Line Output
4.4mm Balanced Line Output Wiring Specifications 4.4mm Balanced Plug schematic is as follows: 19.5mm L- R+ R- For 4.4mm Balanced to dual XLR connections the balanced output should be as wired as follows: 19.5mm L- R+ R-... - Page 11 4.4mm Balanced Line Output Wiring Specifications For 4.4mm Balanced to single-ended RCA connections should be as wired as follows: L- R+ R-...
- Page 12 4.4mm Balanced Line Output Wiring Specifications For 4.4mm Balanced to dual mono 6.3mm connections should be as wired as follows: L- R+ R-...
- Page 13 4.4mm Balanced Line Output Wiring Specifications For 4.4mm balanced to dual stereo 6.3mm connections should be as wired as follows: L- R+ R-...
- Page 14 4.4mm Balanced Line Output Wiring Specifications For 4.4mm Balanced to single-ended 3.5mm connections should be as wired as follows: L- R+ R-...
- Page 15 4.4mm Balanced Line Output Wiring Specifications Please note: Do not connect the 4.4mm line output with a 2.5mm, 3.5mm balanced, or XLR balanced (ungrounded) plug. It may cause damage or distortion to the devices.
-
Page 16: Set Up
Set up Sound Quality 1. Eco mode: Power consumption is reduced for longer battery life. 2. HiFi mode: High power consumption for the best possible sound quality, at the expense of shorter battery life. Headset Output 1. Normal output mode: applies to headphones with 3.5mm plug. - Page 17 Set up USB DAC Connect the Type-C USB cable to a computer or phone to enable the USB DAC function. Your phone must support the USB AUDIO and OTG function. For iOS device, we recommend to connect to the Apple's o cial Lightning to USB Camera Converter (Lightning to USB3 Camera Converter, Type-C to Lighting cables can not be used.
- Page 18 Set up Type-C Type-A Type-A Lightning...
- Page 19 This driver supports Windows XP and Windows 7-10 system. (No driver is needed for MAC operating system.) Download and install the R2R2000 USB DAC Driver 1. Go to http://hifiman.com/services and select "R2R2000" under the "Driver" dropdown to down load the driver.
- Page 20 2. Standard Bluetooth SBC can also be used. 3. Connect a pair of headphone or earphone to the appropriate sockets. 4. Turn on the R2R2000 and select Bluetooth Mode to pair. 5. Once paired, you can stream on board music or Tidal using the HIFIMAN App.
- Page 21 Set up Volume Tuner Lock 1. If the "Volume Tuner Lock" is on, the volume will be adjustable to a maximum of 25 when the player screen is turned o . It should be subject to the current volume if the volume is over 25 before the player screen is turned o .
- Page 22 Set up Language Settings Simplified Chinese / Traditional Chinese / English / Japanese / French / German. System Version Check the serial number and firmware version etc. Certification This shows all certifications. Reset settings This will reset all settings.
-
Page 23: Specifications
Specifications Dimensions: Height 97.4mm Width 56mm Depth (min) 13.1mm Depth (max) 18.8mm Weight: 142g Battery Life: HiFi Mode: Up to 8 hours* Eco Mode: Up to 35 hours* *Please note, will vary depending on volume, file types and file complexity. Frequency Response: 20Hz –... -
Page 24: Supported Music Formats
Supported Music Formats AIFF FLAC ALAC (aif-f) √ √ √ √ √ 16bit 44.1kHz √ √ √ √ √ 16bit 48kHz √ √ √ √ √ 16bit 88.2kHz √ √ √ √ × 16bit 96kHz √ √ √ × √ 16bit 176.4kHz √... -
Page 25: Accessories
Accessories (1) Type-C USB cable (1) Type-C OTG cable (1) Warranty Card Note: A Micro SD card is not included. NB: Contents are advisory only and may be subject to change. -
Page 26: Safety Instructions
Safety Instructions Warning 1. Do not expose the player to water or other solvents. 2. Do not expose the player to humid, dusty, smoky or other harsh environments. 3. A suitable operating temperature environment should be between -6℃ To 40℃. Storage should be at normal room temperature. - Page 27 Safety Instructions Disposal and Recycling The disposal of your player should be separated from household waste because the player contains electronic parts and battery. When your player reaches its end of life, please contact your local environmental department for disposal and recycling information or you could simply send it back to us.
-
Page 28: Warranty & Customer Service
Warranty & Customer Service HIFIMAN warrants this product to be free of defects in material or workmanship for a period of one year from the date of original retail purchase. If your product is found to be defective during the warranty period,... - Page 29 7. Damage caused by self-repair or if the unit has been disassembled or modified in any way. HIFIMAN greatly desires your satisfaction and will do everything reasonable to achieve that. If you have any questions or concerns with your product, simply contact...
- Page 30 Should a return be required, an RMA# will be issued. Return shipping to HIFIMAN or authorized service facility will be at the owner’s expense. The warranty applies to the first purchaser and is not transferable.
- Page 31 Customer Service Tel: +1 201-443-4626 E-mail: customerservice@HIFIMAN.com Website: www.hifiman.com...
Need help?
Do you have a question about the R2R2000 and is the answer not in the manual?
Questions and answers