Essence WeR@Home Installation Manual
Hide thumbs
Also See for WeR@Home:
- User manual (63 pages) ,
- User manual (15 pages) ,
- Quick setup manual (37 pages)
Table of Contents
Advertisement
Quick Links
Advertisement
Table of Contents

Related Manuals for Essence WeR@Home


Summary of Contents for Essence WeR@Home
- Page 1 WeR@Home™ Installation Guide ESUGSL019 Version 2.6 December 2018...
-
Page 2: Table Of Contents
Table of Contents Introduction ............................3 Installing WeR@Home .......................... 5 ™ 2.1. Preparing the Required Equipment .................... 5 2.2. Downloading the WeR@Home ™ App ..................6 2.3. Installing the WeR@Home Hub ....................6 ™ 2.3.1 Choosing a Location ..................... 7 2.3.2... -
Page 3: Introduction
Z-Wave® Plus Extender HD Cameras Smoke Alarm Smart Repeater For information about the maximum number of each peripheral device allowed in a WeR@Home hub’s system configuration, refer to Maximum System Configuration per Hub on page ™ WeR@Home™ Installation Guide... - Page 4 Introduction NOTE: Some features described in this guide may be disabled depending on your service package. For information about different service levels, or to change your service package, contact your service provider. WeR@Home™ Installation Guide...
-
Page 5: Installing Wer@Home
WeR@Home ™ Smoke Alarm User Guide. 2.1. Preparing the Required Equipment Ensure you have the following before you install WeR@Home ™ AA alkaline batteries for the devices, as listed in Battery Quantities and Specifications on page 62. Remember to recycle your used batteries. -
Page 6: Downloading The Wer@Home ™ App
WeR@Home hub. The hub manages ™ ™ the peripheral devices, acts a gateway to the Essence Cloud, and communicates with the Essence servers which provide data to the app. You can install one or more hubs in WeR@Home ™... -
Page 7: Choosing A Location
1. Remove the back cover. 2. If you are using a cellular channel, ensure that the SIM card is securely installed. 3. Tap . The WeR@Home™app Login screen appears. 4. Tap Register. The installation tutorial appears. 5. Follow the instructions in the tutorial:... - Page 8 Review the EULA & Privacy Notice screen. Tap Accept License to agree to the license and continue registration. The New User screen appears. b. Enter the user's personal details, as defined in the table below, and tap NEXT. The Email Confirmation screen appears. WeR@Home™ Installation Guide...
- Page 9 13. Tap Continue to App. A quick guide appears. To advance through the quick guide, tap . The PIN CODE screen appears with your default PIN - 1234. 14. To keep the default PIN and start using WeR@Home™, tap Cancel. 15. To personalize your PIN, tap OK. Refer to ESUGSL018 WeR@Home ™...
-
Page 10: Activating The Remote Control
Installing WeR@Home™ 2.4. Activating the Remote Control The remote control is used to arm and disarm WeR@Home , and as an SOS button. ™ To activate the remote control: 1. Remove the battery compartment cover by inserting a coin into the slot and turning counter- clockwise until the two dots align. -
Page 11: Installing The Peripheral Devices
Choosing a suitable location Adding each device to WeR@Home™ by pairing the device with the hub. Pairing allows the device to communicate with the hub. Devices included in a kit are pre-paired. Installing the device in the chosen location NOTE: ... -
Page 12: Installing A Motion Detector
Within 12 m (39.4 ft.) of the desired coverage area 2. Release the motion detector mounting-base by lifting the tab and pushing it forward. 3. If the motion detector is not included in the WeR@Home kit, pair the motion detector as ™... - Page 13 For installing on a flat wall 9. Press the mounting-base into place. 10. If you have a pet on the premises, install a pet immune lens. Refer to Appendix E Installing a Pet Immune Lens on page 57. WeR@Home™ Installation Guide...
-
Page 14: Installing A Camera Detector
The camera detector is an indoor sensor combining a battery-operated, bi-directional, wireless passive infrared motion detector with a JPEG-image-capturing camera. To install the camera detector: 1. Choose a location according to the following recommendations: On a smooth surface, on either a flat wall or in the corner WeR@Home™ Installation Guide... - Page 15 2. Release the camera detector mounting-base by lifting the tab and pushing it forward. 3. Open the battery compartment by pushing the tab and lifting the cover up and off. 4. If the camera detector is not included in the WeR@Home kit, pair the camera detector as ™...
- Page 16 10. Press the mounting-base into place. 11. If you have a pet on the premises, install a pet immune lens. Refer to Appendix E Installing a Pet Immune Lens on page 57. 12. Close the battery compartment. WeR@Home™ Installation Guide...
-
Page 17: Installing A Door/Window Sensor
The door/window sensor is a magnetic sensor for detecting opening and closing of doors, windows, cabinets, and other similar items. Optionally, the sensor may include a tamper switch. This sensor device consists of two parts: The magnet The transmitter Magnet Transmitter WeR@Home™ Installation Guide... - Page 18 2. Release the transmitter from its mounting base by inserting and twisting a coin to separate the cover from the base. 3. If the door/window sensor is not included in the WeR@Home kit, pair the door/window sensor as ™...
- Page 19 6. If you want a chime to sound when the door/window opens: d. Tap Configure e. Tap f. Tap OK 7. Insert the transmitter into the mounting base: With tamper switch: align the tamper switch with the opening. Tamper Opening switch WeR@Home™ Installation Guide...
- Page 20 8. Clean and dry the mounting location surfaces. 9. Peel off the mounting-tape protective strips from both parts. 10. Mount the parts, as follows: Within 2.5 - 3 cm (1 - 1.2 in.) of each other when closed. Aligned using the dots. WeR@Home™ Installation Guide...
-
Page 21: Installing A Siren
The siren is a battery-operated, wireless, acoustic warning device. You can also use the siren as a door bell. To install the siren: 1. Choose a location according to the following recommendations: A smooth surface on a flat wall Accessible for maintenance yet not easily found by intruders WeR@Home™ Installation Guide... - Page 22 Installing WeR@Home™ 2. Release the siren mounting-base by lifting the tab and sliding the base in the tab’s direction. 3. If the siren is not included in the WeR@Home ™ kit, pair the siren as described in Appendix B Pairing a Device on page 49.
-
Page 23: Installing A Tag Reader And Tag
8. Clean and dry the mounting location surface. 9. Peel off the mounting-tape protective strips. 10. Press the siren into place. 2.5.5 Installing a Tag Reader and Tag The tag reader is a battery operated, wireless, access control and system arming device. WeR@Home™ Installation Guide... - Page 24 Installing WeR@Home™ Use your tag to arm and disarm your WeR@Home™. You can configure the tag reader for indoor or outdoor use. Outdoor use also allows you to use the tag reader as a doorbell. By default, the tag reader is configured for outdoor use.
- Page 25 Press the tamper switch several times. Tamper switch h. Insert three AA alkaline batteries, observing the correct polarity. If the tag reader is included in the WeR@Home ™ kit, skip to step 4. When pairing is successful, a window appears prompting you to configure the tag reader.
- Page 26 Configuring the Tag Reader for an Access Code You can configure your tag reader to require an access code together with the tag to disarm WeR@Home ™ To enable an access code: 1. Open the WeR@Home app. ™ WeR@Home™ Installation Guide...
- Page 27 To disable the access code, select None and tap 2.5.5.3 Activating Tags Assign the tag to a user defined in WeR@Home . To add a user, refer to the section on user ™ management in the ESUGSL018 WeR@Home™ User Guide.
-
Page 28: Installing A Flood Detector
A flat smooth vertical surface for the transmitter A flat smooth horizontal surface for the sensor 2. If the flood detector is included in the WeR@Home™ kit, skip to step 2g. Otherwise, add the flood detector to WeR@Home™: a. Open the WeR@Home™ app. b. Tap . - Page 29 Insert one AA alkaline battery, observing the correct polarity. Insert the transmitter into its mounting base. If the flood detector is included in the WeR@Home™ kit, skip to step 3. When pairing is successful, a window appears prompting you to enter the device name.
-
Page 30: Installing A Universal Transmitter
The universal transmitter enables you to detect changes in the state of third-party or legacy devices. To install the universal transmitter: 1. Choose an installation location. Find a flat, smooth, vertical surface at the location. 2. If the universal transmitter is included in the WeR@Home kit, skip to step 2l. ™... - Page 31 Insert one AA alkaline battery, observing the correct polarity. n. Insert the transmitter into the mounting base. If the universal transmitter is included in the WeR@Home™ kit, skip to step 3. When pairing is successful, a window appears prompting you to enter the device name.
-
Page 32: Installing A Z-Wave Plus Extender
™ Z-Wave User Guide. 2.5.9 Installing an Essence HD Camera You can integrate HD network cameras with WeR@Home ™ For information about installing the Essence HD camera, refer to the ESUGSL073 WeR@Home Essence HD Camera User Guide. WeR@Home™ Installation Guide... -
Page 33: Installing A Smart Repeater
™ which could not otherwise connect to the hub. The repeater manages the peripheral devices connected to it, acts as a gateway to the Essence Cloud, and communicates with the Essence servers which provide data to the app. You install a repeater by adding it to an existing WeR@Home ™... - Page 34 Installing WeR@Home™ To set up the repeater: 1. Open the WeR@Home app. ™ 2. Tap . The main menu appears. 3. Tap DEVICES. The Devices screen appears. 4. Tap Add device. The Add New Devices screen appears. 5. Select Repeater. The installation tutorial appears.
-
Page 35: Adding Peripheral Devices To The Repeater
Refer to Pairing a Device on page 49. 2.7. Testing the Signal Strength of Peripheral Devices Once you have added a peripheral device to your WeR@Home™, you can test the signal strength. NOTE: You cannot check the signal coverage for a tag or a remote control. - Page 36 2. Tap DEVICES. The Devices screen appears. 3. Tap the device whose signal strength you want to check. Device settings are displayed. 4. Tap Test Signal Strength, and follow the on-screen instructions. WeR@Home™ tests the signal strength and displays the result as one of the following: ...
-
Page 37: Setting-Up Your Wer@Home
Setting-Up Your WeR@Home™ 3. Setting-Up Your WeR@Home ™ To set up the way you use WeR@Home ™ , you can configure the following: Customizing PIN protection Arming and disarming WeR@Home ™ Working with multiple places Configuring devices ... -
Page 38: Technical Specifications
Maximum System Configuration per Hub FCC and IC Safety Notice NOTE: The full part number is required when ordering components. Contact your Essence account manager or professional services personnel to receive the part numbers. Table 3: Hub (ES8000CP) Category Specifications ... - Page 39 Operating ambient temperature range with battery: -5°C to 55°C (23°F to 131°F) RF operating humidity: up to 95% non-condensing Compliance FCC: Y4I-M801EKFB IC: 11061A-ES800KF NOTE: The FCC and IC Safety Notice applies to this device WeR@Home™ Installation Guide...
- Page 40 Modulation and frequency: DSSS, 2.4 GHz Data security: 128-bit AES encryption Security Tamper alarm: when unit is tilted Detection range: up to 12 m (39.4 ft.) Power Two AA-size alkaline batteries Consumption Three-year battery life WeR@Home™ Installation Guide...
- Page 41 Operating ambient temperature range with battery: 0°C to 50°C (32°F to 122°F) RF operating humidity: up to 95% non-condensing Compliance FCC: YXG-ES800MGL IC: 11061A-ES800MGLI NOTE: The FCC and IC Safety Notice applies to this device WeR@Home™ Installation Guide...
- Page 42 Weight: 135 g (0.3 lb.) + 45 g (0.1 lb.) batteries Size (H x W x D): 47 x 33 x 10 mm (1.9 x 1.3 x 0.4 in.) Weight: 10 g (0.02 lb.) WeR@Home™ Installation Guide...
- Page 43 Operating ambient temperature range with battery: 0°C to 50°C (32°F to 122°F) RF operating humidity: up to 95% non-condensing Compliance FCC: YXG-ES800FL IC: 11061A-ES800FL NOTE: The FCC and IC Safety Notice applies to this device WeR@Home™ Installation Guide...
- Page 44 Multi-level switches (For example, dimmers) Thermostats Door locks Multi-channel devices (For example, power strips) RGBW LED bulbs Controller Capacity The maximum capacity for a single Z-Wave Plus Extender is up to 232 Z-Wave devices. WeR@Home™ Installation Guide...
- Page 45 Maximum RF range: 600 m (1,968 ft.) open air ECOP bi-directional radio protocol Modulation and frequency: DSSS, 2.4 GHz Communications Maximum transmission: 25 mW (14 dBm) Data security: 128 bit AES encryption Cloud (internet): 3G/4G (HSPA+) WeR@Home™ Installation Guide...
- Page 46 ETSI EN 301 489-1 V1.9.2 Compliance ETSI EN 301 489-3 V1.6.1 EN 61000-6-3: 2007/A1: 2011 CE – Radio: ETSI EN 300 440 V2.1.1:2017 CE – Safety: EN 60950-1: 2006/A11: 2009/A1: 2010/A12: 2011/A2: 2013 WeR@Home™ Installation Guide...
- Page 47 This device complies with Part 15 of the FCC Rules. Operation is subject to the following two conditions: 1. This device may not cause harmful interference, and 2. This device must accept any interference received, including interference that may cause undesired operation. WeR@Home™ Installation Guide...
- Page 48 Changes or modifications to this equipment not expressly approved by the party responsible for compliance (Essence Security International Ltd.) could void the user’s authority to operate the equipment. WARNING! To comply with FCC and IC RF exposure compliance requirements, the device should be located at a distance of at least 20 cm from all persons during normal operation.
-
Page 49: Pairing A Device
6. Place the device close to the hub or smart repeater. 7. If the device has a tamper switch, activate the tamper. 8. Insert the batteries. 9. When prompted by the app, enter the device’s system name and/or location and other device attributes. 10. Tap OK. WeR@Home™ Installation Guide... -
Page 50: The Wer@Home ™ Kit
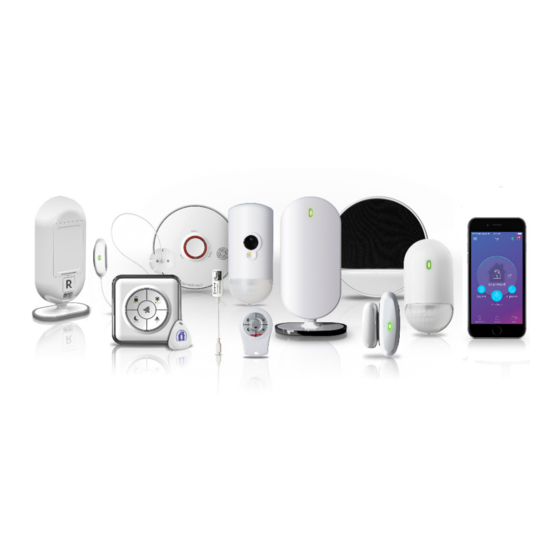
The WeR@Home™ Kit The WeR@Home ™ WeR@Home ™ products are usually sold as boxed kits which include a predefined set of devices similar to the one shown in in the figure below. The components included in the kit, except for the remote control, are pre-paired with the hub in the kit. -
Page 51: Installing With Screws
3 x 35 DIN 7982 C screws and wall anchors. The number of the screws and wall anchors is determined by the device being installed. Screws and wall anchors are not provided. The table below is a summary of Essence recommendations regarding screws and wall anchors. Table 15: Screws and Wall Anchors... - Page 52 Remove the punch-outs 1 and 2 using a flat screwdriver. b. Place and hold the base on the desired mounting location and mark the drilling spots. c. Drill the holes. d. Insert the wall anchors, if needed. WeR@Home™ Installation Guide...
- Page 53 2. Remove punch-outs 1 and 2 using a flat screwdriver. 3. Place and hold the base on the desired mounting location. 4. Mark the drilling locations of the punch-outs 1 and 2. 5. Drill the holes. WeR@Home™ Installation Guide...
- Page 54 1. Release the siren mounting base by lifting the tab and sliding the base in the tab’s direction. 2. Remove the punch-outs using a flat screwdriver. 3. Place and hold the base on the desired mounting location. WeR@Home™ Installation Guide...
- Page 55 To install the tag reader using screws: 1. Release the tag reader mounting base by lifting the tab and sliding the base in the tab’s direction. 2. Place and hold the base on the desired mounting location. WeR@Home™ Installation Guide...
- Page 56 3. Mark the drilling locations according to the specific holes. 4. Drill the holes. 5. Insert the wall anchors, if needed. 6. Place the base over the wall anchors. 7. Screw in the screws. 8. Insert the tag reader into its mounting base. WeR@Home™ Installation Guide...
-
Page 57: Installing A Pet Immune Lens
Perform this procedure with special care since the top part of the front panel is breakable. 1. Release the device from the mounting base. 2. For the camera detector: Unscrew the two screws above the battery compartment at the top of the back cover. WeR@Home™ Installation Guide... - Page 58 Caution: When working within the inner compartment of the camera detector, be careful not to damage the circuit board and other parts of the device. 3. Use a flat screwdriver to release the three latch tabs. WeR@Home™ Installation Guide...
- Page 59 5. Insert the lens in the groove surrounding the lens opening, placing the lens on top of the pet immune lens. 6. Insert the latch tabs at the bottom center and at the side of the lens into the latch tab slots on the lens opening. WeR@Home™ Installation Guide...
- Page 60 Position the top of the back cover onto the top of the front cover, while aligning the holes for the screws. b. Attach the front panel to the back cover using the two screws. 9. Insert the batteries. WeR@Home™ Installation Guide...
- Page 61 Installing a Pet Immune Lens 10. Return the device onto the mounting-base such that the lens is facing downward. WeR@Home™ Installation Guide...
-
Page 62: Battery Information
Battery Information Battery Information Only batteries thoroughly tested and approved by Essence should be used to meet the device’s specifications. The following battery manufacturers are approved by Essence: Energizer Duracell To comply with the UL certification standards, use GP International Limited batteries. - Page 63 Nothing contained herein shall be construed as conferring by implication, estoppels, or otherwise any license or right, either express or implied, under any patent or trademark of Essence or any third party. No use of any trademark may be made without the prior written authorization of Essence.
Need help?
Do you have a question about the WeR@Home and is the answer not in the manual?
Questions and answers