Table of Contents
Advertisement
Quick Links
Download this manual
See also:
User Manual
Advertisement
Table of Contents

Related Manuals for Abus TVCC34010


Summary of Contents for Abus TVCC34010
- Page 1 TVCC34010 User guide Version 09/2013 English translation of the original German user guide. Keep for future use!
- Page 2 The ABUS Security-Center GmbH assumes no liability for technical and typographical faults and reserves the right to make at any time modifications to the product or user manual without a previous announcement.
- Page 3 The warranty will expire for damage due to non-compliance with these operating instructions. ABUS will not be liable for any consequential loss! ABUS will not accept liability for damage to property or personal injury caused by incorrect handling or non-compliance with the safety-instructions.
- Page 4 English Safety information Power supply: power supply unit 100–240 V AC, 50/60 Hz / 12 V DC, 1,5 A (included in the scope of delivery) Only operate this device on a power source which supplies the power specified on the type plate. If you are unsure which voltage is supplied at the installation location, contact your power supply company.
-
Page 5: Table Of Contents
English Table of contents Intended use ......................18 Scope of delivery ..................... 18 Features and Functions ..................18 Camera description ....................19 Mounting / installation .................... 19 Mounting the camera ................... 19 Aligning the camera..................20 Power supply ....................21 Installing the video cable ................ -
Page 6: Intended Use
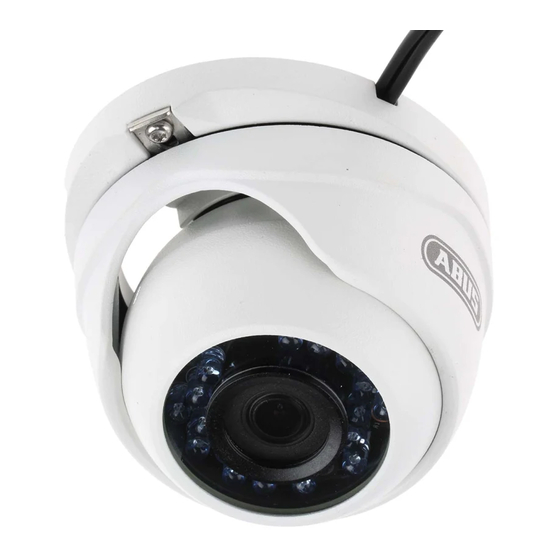
English 1. Intended use The dome camera is designed for both daytime and night-time use. Thanks to its protection class IP66 it can used both inside and outside. The day/night outdoor dome camera is equipped with a high-quality image sensor. It is used for video surveillance in conjunction with a recording device or surveillance monitor. -
Page 7: Camera Description
English 4. Camera description Camera cap Base plate Camera body IR LEDs Lens Power supply Video signal 5. Mounting / installation 5.1 Mounting the camera IMPORTANT! The camera must be disconnected from the power supply during installation. Loosen the fixing screws for the camera cap and remove them. Use the accompanying drilling template for drilling the mounting holes. -
Page 8: Aligning The Camera
English Guide the cable through the base plate, and when necessary, through the side opening. Then screw on the camera cap and secure with the fixing screws. 5.2 Aligning the camera Loosen the fixing screws in order to align the camera. The camera can now be aligned in 3 axes. -
Page 9: Power Supply
English 5.3 Power supply IMPORTANT! Before starting installation, ensure that the power supply system voltage and the rated voltage of the camera are identical. (1) Video signal (BNC) (2) Power supply 12 V DC (5.5 x 2.1 mm) The cameras have a 12 V DC power supply. Ensure correct polarity when connecting. A plug-in power supply unit (round plug, 5.5 mm x 2.1 mm) is provided for the connection. -
Page 10: Cleaning
(also for non-European countries) can be obtained at your local authority. Separate collection and recycling saves natural resources and ensures that all the provisions for protecting health and environment are observed when recycling the product. 8. Technical Data Model number TVCC34010 Image sensor 1/3" DIS Camera type Day/night outdoor camera...
Need help?
Do you have a question about the TVCC34010 and is the answer not in the manual?
Questions and answers