Table of Contents
Advertisement
Advertisement
Table of Contents

Related Manuals for Jorvet J1060Q


Summary of Contents for Jorvet J1060Q
- Page 1 INFUSION PUMP User Manual Version: 3.1...
-
Page 2: Table Of Contents
CONTENTS Introduction................................- 3 - Safety Tips................................. - 3 - Chapter 1 Overview..............................- 5 - 1.1 Scope of application............................ - 5 - 1.2 Technical Parameters...........................- 5 - 1.3 Product specifications..........................- 6 - 1.4 Work environment............................- 6 - Chapter 2 Components description........................- 7 - Exterior components names description...................... - Page 3 Pre-alarm setting of infusion completion......................- 29 - Bottom occlusion pre-alarm setup........................- 29 - key lock (auto)..............................- 29 - key lock (manual)............................- 29 - Chapter 7 History record check..........................- 32 - Check history records in machine........................- 32 - Export history record............................- 32 - Chapter 8 Security characteristic and alarm......................
-
Page 4: Introduction
Introduction Thank you for choose our company product Infusion Pump. Please carefully read and understand this manual before use. Regularly check and maintain the pump to avoid possible injury or risks. Safety Tips 1. Infusion Pump is not explosion proof type or portable device. 2. - Page 5 24 The infusion pump is apply to 20d/ml, 60d/ml tubing, if the tubing type was set in Abnormal, there is a big risk of accuracy deviation. Please make sure the tubing type settings are correct! 25. If not be adjusted based on different tubing type and different drug liquid, it may cause large deviations in infusion accuracy.
-
Page 6: Chapter 1 Overview
Chapter 1 Overview 1.1 Scope of application It is applicable to accurate, constant and continuous intravenous infusion in medical institutions. 1.2 Technical Parameters IV Set Options /Size: Open System for common widely-used brand of 10d/ml、15d/ml、20d/ml、60d/ml (3.4mm~4.5mm), Also can be customized for dedicated IV set Infusion Mode: Infusion mode Description... -
Page 7: Product Specifications
Bolus: Two way: 1) Short Press Bolus Key to into setup menu (adjustable from 1.0~1200ml/h) 2) Long Press Bolus key to automatic running last time setup rate. Accuracy: Infusion rate accuracy: ±2% (after drops 150 drips) Infusion Flow rate accuracy: ±5% (using calibrated standard PVC IV set) Occlusion Pressure: Up position: -100mmhg~-300mmgh;... -
Page 8: Chapter 2 Components Description
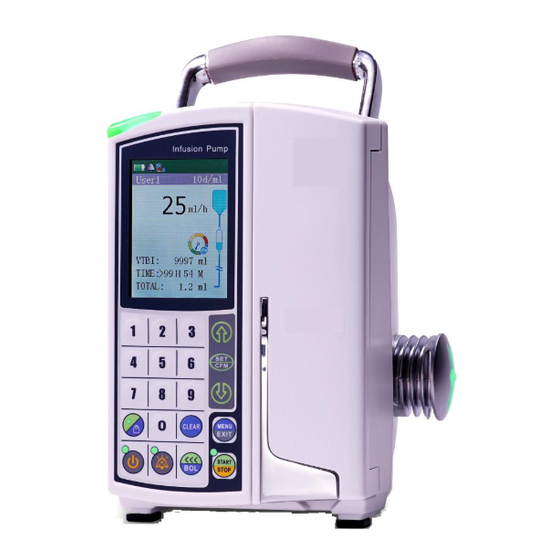
Chapter 2 Components description Exterior components names description Handle Fluid warmer Door latch Infusion tube parts description Infusion set guide slot Up pressure Bubble sensor Peristaltic pump Roller clamp Bottom pressure senso Infusion set guide slot - 7 -... -
Page 9: Main Information Displayed On Lcd
Main information displayed on LCD Battery status Working status Machine status bar Keypad lock status Infusion set info AC status Flow rate Sound status Infusion status VTBI Pressure status Time needed Volume infused (1) Machine status bar: battery status icon, sound status icon, networking status icon, AC supply status icon, infusion status icon, pressure status icon, IV Set brand, specification, and fluid warmer temperature. -
Page 10: Chapter 3 Assembling Packing List
Chapter 3 Assembling Packing list Please check the follow contents when unpacking: Infusion pump body……………………………... 1 set (1) Drop sensor……………………………………… 1 set (2) Power cord………………………………………. 1 set (3) User’s manual…………………………………... 1 copy (4) Pump Installation Horizontal installation on bracket Figure 5 - 9 -... - Page 11 Vertical installation on bracket Installation on cylinder - 10 -...
- Page 12 Installation on square tube Tips: infusion pump can be placed and used on a flat top, such as bedside cabinet top; do not move a working pump. Infusion pump socket description (1) Plug the corresponding plugs into the rear sockets of infusion pump according to the icon shown on pump back.
-
Page 13: Set Installation
IV Set Installation (1) Under normal conditions, insert an ordinary PVC IV set into the outlet of infusion bottle/bag. (2) Slightly squeeze Murphy’s dropper with fingers, to make its 1/3 volume fill with liquid (see figure 9) Notes:To ensure normal drip, never fill the dropper with water, otherwise the infusion pump cannot detect drip drops and will cause alarm;... -
Page 14: Chapter 4 Operation
Chapter 4 Operation Function key description Function keys concentrate upon the front housing, operated easily, the functions are as follows: Description Function key On/Off Used for boot and shutdown, long press for 1 second to boot, and long press 1 second to shut down on the condition of no infusion. -
Page 15: Operation Flowchart
Operation Flowchart Infusion operational processes Pump installation Power on IV Set installation Parameters setting Purge bubbles Venous puncture Start infusion Power On Connect the power wire, then the light indicator lights up, the AC power is connected, long press the power button for 3 seconds to start up. -
Page 16: Volume Mode Operation
Volume Mode Infusion Mode Selection Press in stop, display infusion mode interface. If the present mode is volume mode, so not need to select mode. Choose “volume mode” with up or down key. Press , then return to infusion interface after volume mode is chosen. ... -
Page 17: Rate/Time
Rate/Time Move the cursor to corresponding input boxes of rate and time with the up or down key. Set rate. Set time. Press Simple Rate Move the cursor to VTBI input box with the up or down key, long press for 1 seconds. -
Page 18: Program Mode
Program Mode Custom can himself define 8 stages of program mode to infuse automatically. Allow to suspend programming in process of infusion, but KVO would be launched during programming pause. If the rate of previous program is less than 1ml/h, then the KVO begins according to the rate of previous program; if the rate of previous program is greater than 1ml/h, then the KVO begins according to the rate of 1ml/h. - Page 19 Pause stage program Move the cursor to corresponding input boxes of time, VTBI and rate with the up or down keys. Set time needed to pause. Set VTBI to zero. Set rate to zero. Press ...
-
Page 20: Dose/Weight Mode
Dose/weight mode Infusion mode selection Press in starting up status, display infusion mode interface. Use the up and down keys to choose “weight mode”. Press key. Notes:If the present interface is weight mode, can press directly to enter parameters input interface of weight mode. -
Page 21: Drug Library Mode
Drug Library Mode The infusion pump with drug library can be exported and imported the drug library through computer, the operation as follow. Import the drug library Connect the pump with PC by cable and use software to manage the drug library Export & Import ... - Page 22 Input drug concentration. Press down key. Input weight (if needed). Press down key. Input VTBI, Press key. Press to begin drug mode infusion. The operation of unknown drug concentration Drug selection. Use up or down keys to choose drug needed, press ...
-
Page 23: Chapter 5 Special Functions
Chapter 5 Special functions Bolus Auto Bolus Parameters setting of Bolus Bolus Press in process of infusion Set Bolus rate Set Bolus VTBI Press to begin Bolus. Return to normal infusion after Bolus completed. Manual Bolus ... -
Page 24: Set Management
IV Set Management IV set selection Infusion set management Infusion set selection Brand selection Choose infusion set type Exit to main interface Press Choose “IV Set” menu, press Choose “Brand” menu, press Choose IV Set brand needed, press ... - Page 25 IV Set Calibration Prepare for calibration Because there is a large size deviation among different brands or different types of infusion set, Our pump 3.4mm ~ 4.5mm IV set, and its working with diameter should employ 0.9% saline or pure water to calibrate, set the infusion rate to normal infusion rate, like certain department often employs the infusion rate as 60ml/h-120ml/h, then can take the median 90ml/h as the calibration rate, so can guarantee the accuracy in the condition of normal infusion after calibration, the steps for calibration as follows:...
- Page 26 Interface of calibration proceeds Input real output Press confirm key Press Choose “IV Set” menu, press Choose “Adjust” , press Choose “Current IV Set” or “Other”, press . (if choose other tube types, complete tube type selection according to the demands) ...
-
Page 27: Add Iv Set
Choose IV Set Input characteristic value and press confirm Long press the upward key. Input the code, press Input the characteristic value and press to complete calibration. Press to exit to calibration interface. Add IV set If the brand of tube type actually used is not in the brand list of machine, user can add infusion set brand by tube type add operation. -
Page 28: Remove Iv Set
Remove IV Set If need to remove needless tube type brands in the tube type list, user can remove infusion set brand through tube type remove operation. The operation as follows: Choose menu Choose brand need be deleted Prompt “delete or not” Prompt “deletion completed” Choose “Delete brand”... -
Page 29: Chapter 6 General Operation
Chapter 6 General operation Stop Press to stop infusion. Power off Press to stop infusion. Press until the screen off. Unplug the AC power cord. Standby Press “ ” in stop status, until the screen turns dark. ... -
Page 30: Clear The Vi
Clear the VI Move the cursor to the VI box, press . The VI is reset. Battery life check In process of infusion, can check the runtime of battery under present infusion rate. Press Choose “battery life”, press ... - Page 31 press key again.then the keypad will unlock, System parameters setup System parameters in pause status Press Choose “system parameters”, press Sensitivity setting of up 3 level options: high, median and low occlusion detection When not easy to prompt occlusion alarm but it please ...
- Page 32 Time setting Set system time of machine Can input year, month, date; hour, minute, second Brightness adjustment of Use up and down keys to adjust the brightness TFT setting - 31 -...
-
Page 33: Chapter 7 History Record Check
Chapter 7 History record check The machine can store as many as 3000 history records. History record allows to be checked in machine or export to computer. Check history records in machine Choose menu Choose item Input date Check results Check results Press ... -
Page 34: Chapter 8 Security Characteristic And Alarm
Chapter 8 Security characteristic and alarm Trouble shooting Infusion level Alarm message Possible failure Check and repair stop Door open High Pump door is open Close the pump door and lock. Infusion set is not properly Properly install the infusion set and make sure it is installed mounted to the slot of bubble detector Flick the infusion tube or press Bolus key to purge the... - Page 35 Can close pressure pre-alarm if not needed Check for strong electromagnetic interference Bottom pressure sensor is around, re-start infusion pump after removal of interfered Abnormal down High the source of interference pressure Bottom pressure sensor Pressure sensor damaged, contact ...
-
Page 36: Chapter 9 Routine Check
Chapter 9 Routine check In routine use, please perform routine maintenance and check according to the following table: Check Checkpoints Check procedure stage Cracks, broken, Check whether the housing of infusion pump is intact, whether cracks, broken Before use deformed and deformed exist. -
Page 37: Response Time Of Occlusion Alarm
Chapter 10 Machine performance parameter General specifications Item Detail Range remark Flow rate ml/h 0.1~1200 ml/h Infusion accuracy ml/h ±5% Dose rate ml/h 0.1~100 units Auto Bolus 0.1~1200 ml/h Default 600 ml/h Bolus 0.1~1200 ml/h Manual Bolus Program rate ml/h 0.1~1200 ml/h Could be set by user ml/h... -
Page 38: Chapter 11 Electrical Specification
Chapter 11 Electrical specification AC supply AC supply 100 V - 240 V ~/50-60 Hz Class I AC power Maximum power 25VA Fuse of protection 2 x 2A Fuse Battery power supply Battery specification 9.6V 2000mA –nickel-metal hydride battery Weight About 150g Battery runtime... -
Page 39: Chapter 12 Storage And Transport
Chapter 12 Storage and transport Product size & weight L x W x H 130 x120x195mm Weight 2.0Kg Screen size 3.2 inches Storage environment Environment temperature: -20℃~55℃; relative humidity: 10%~95%; atmospheric pressure: 70kPa~ 106kPa。 Forbidden to store in the following environments: ... -
Page 40: User's Guide And Manufacturer's Statement Of Anti-Electromagnetic Interference I
Appendix User's Guide and Manufacturer’s Statement of Anti-electromagnetic Interference I User's Guide and Manufacturer’s Statement of Anti-electromagnetic Interference: apply to all the equipments and systems Infusion Pump is intended to be used in the following specified electromagnetic environments. Buyers or users should ensure that the pump is used in such environments. - Page 41 <5% Ut (>95% drop) <5%Ut (> 95% drop) 0.5 cycle 0.5 cycle Network power quality should be qualified for typical hospital or 40% Ut (60% drop) 5 40% Ut (60% drop) Voltage drop, short commercial environments. If cycles circuit and voltage 5 cycles users need continuous infusion fluctuations...
- Page 42 Note 1: if the frequencies of communications device are 80MHz and 800MHz, the formula at a higher frequency band should be used. Note 2: this guide may not apply to all situations. Electromagnetic propagation is affected by absorption and reflection from buildings, objects and human bodies. a) As to RF transmitters, such as wireless (cordless/cellular) telephones and land mobile radio base stations, amateur radio, AM/FM radio and television broadcasting, the field strength is unpredictable in theory.
-
Page 43: Infusion Accuracy Characteristic
Infusion accuracy characteristic Horn-shaped curve represents the changes of maximum and minimum bias in infusion pump. The testing programs for these results have been included in EN60601-2-24 (IV set Drag Heart 20 drops/ml standard PVC set). The following graphs and curves show the overall characteristics of the infusion pump in tests. For more information, please contact the supplier. -
Page 44: System Statement
System statement The product can be attached to other medical electronic equipments, the person who composes this medical electronic system should be responsible for the requirement of compliance. The equipments connected with the pump should comply with their respective IEC or ISO standards (i.e. information processing equipment IEC60950), and the whole equipment should comply with the requirement of medical equipment system (see IEC60601-1-1 or IEC60601-1 Chapter 16 Version 3). -
Page 45: Product And Service Information
Product and service information Product name: Infusion Pump Product standard: EN/IEC 60601-1, 60601-2-24 EN/IEC 60601-1-2, 60601-1-8 Distributor By: - 44 -...
Need help?
Do you have a question about the J1060Q and is the answer not in the manual?
Questions and answers