Schlage L9000 Series Installation Instructions Manual
Lock with indicator
Hide thumbs
Also See for L9000 Series:
- Installation instructions manual (36 pages) ,
- Installation instructions (2 pages) ,
- Installation manual (2 pages)
Advertisement
Quick Links
*P516-908*
P516-908
L9000 Series Lock with Indicator Escutcheon Trim
Indicator trim is available for
either the inside or outside of the
door on allowable functions.
Non-indicator trim is furnished on
the opposite side of the door.
Indicator options:
Cylinder
Privacy
1
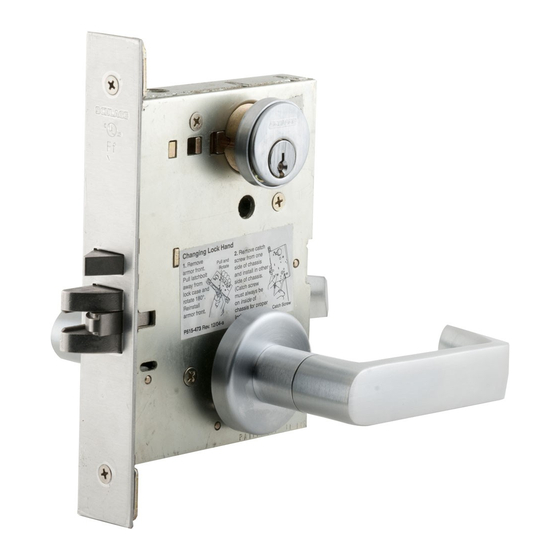
IMPORTANT! Check lock handing before installation.
To change handing:
1. Pull out the latch
and rotate 180°.
2. Remove the lock
handing screw
from one side of
the chassis and
install it on the
opposite side.
The lock handing
screw should
always be on the
interior side of the
door.
L9000 Lock with Indicator
Confirm desired placement
(inside or outside) before
installation.
Coin turn
Pull
Rotate
180°
Handing
screw
The L9000 lock with indicator
is not intended for exterior
door applications.
Check the
door preparation
dimensions with
the template
included in the
package.
Thumb turn
Thumb turn with indicator
inside x cylinder non-indicator
outside shown
Tools for installation:
Included:
2
Install lock chassis.
Installation Instructions
For retrofit, see page 9.
OR
OR
Not included:
DO NOT FULLY
TIGHTEN CHASSIS
MOUNTING
SCREWS
Advertisement

Related Manuals for Schlage L9000 Series


Summary of Contents for Schlage L9000 Series
- Page 1 *P516-908* L9000 Lock with Indicator P516-908 L9000 Series Lock with Indicator Escutcheon Trim Installation Instructions Indicator trim is available for Confirm desired placement The L9000 lock with indicator For retrofit, see page 9. either the inside or outside of the...
- Page 2 STEP 5 for OUTSIDE NON-INDICATOR TRIM ONLY. Install springs and spindles. For OUTSIDE INDICATOR trim, skip to STEP 6. Install outside trim. Cylinder Functions Install escutcheon assembly. Exterior Exterior Prepare outside lever assembly for installation. Install outside mounting posts. Insert key halfway into the cylinder, and install the cylinder with cylinder spring as shown.
- Page 3 Coin Turn Functions Cylinder Functions with Indicator Install escutcheon assembly. Unlock the door. Install the indicator/escutcheon assembly. Exterior Install the cylinder with cylinder spring as shown. For INSIDE INDICATOR trim, skip to step 7. For Outside Indicator Trim ONLY – Install outside indicator.
- Page 4 Privacy Functions with Indicator Install the indicator/escutcheon assembly. Unlock the door. Install the indicator/escutcheon assembly. Exterior Exterior Install inside spring cage and mounting plate. Interior Coin Turn Functions with Indicator Unlock the door. Assemble the coin turn faceplate and cam. L The spring cage arrow must point in direction of lever down rotation.
- Page 5 STEP 8 for INSIDE NON-INDICATOR TRIM ONLY. Thumb Turn Functions For INSIDE INDICATOR TRIM, skip to STEP 9. Install the escutcheon/lever assembly. Install inside cylinder or thumb turn trim. Cylinder Functions DO NOT Install the escutcheon/lever assembly. overtighten. DO NOT overtighten.
- Page 6 For Inside Indicator Trim ONLY – Install inside indicator. A. Trim the cam spindle if necessary (cylinder and privacy functions only). Cylinder Functions with Indicator Unlock the door. Break the spindle at the appropriate mark according to door thickness. (If necessary, remove clip.) Install the indicator/escutcheon assembly.
- Page 7 Thumb Turn Functions with Indicator Tighten bushing with spanner wrench. Unlock the door. Assemble the thumb turn faceplate and cam. Tighten cylinder mounting screw (if applicable). Place indicator and reinforcement plate on faceplate assembly. Cylinder Be sure to Indicator mounting position the cam according to door screw...
- Page 8 INDICATOR HANDING A. Determine the door's handing from outside. INSIDE Left Hand B. Check indicator handing with indicator positioned against top rim of reinforcement plate. Outside Inside OUTSIDE INSIDE Left Hand OUTSIDE Reverse Bevel INSIDE Right Hand Non-deadbolt RH/RR LH/LR Non-deadbolt LH/LR RH/RR...
- Page 9 INDICATOR LOCK RETROFIT INSTRUCTIONS Indicator options: Remove the outside cylinder. Insert the key halfway into the cylinder and rotate cylinder counterclockwise to remove. Key inserted halfway Cylinder Privacy Coin turn Thumb turn Remove armor front. Exterior Remove the inside cylinder (if applicable). Insert the key halfway into the cylinder and rotate cylinder counterclockwise to remove.
-
Page 10: Customer Service
Remove the inside lever. For indicator trim on outside of door, remove the inside mounting plate and spring cage. Then, remove the ouside trim. Mounting plate Spring cage Interior Interior Remove the inside escutcheon. Exterior Complete installation of indicator trim. Go to STEP 5 ON PAGE 2 and follow the instructions to complete the installation of the indicator trim. - Page 11 Cerradura L9000 con Indicador P516-908 Serrure L9000 avec Indicateur Cerradura Serie L9000 con borde de placa de seguridad con indicador Instrucciones de instalación Serrure de la série L9000 avec garniture d’indicateur d’entrée de serrure Notice d'installation El borde con indicador está La cerradura L9000 con La garniture d’indicateur est La serrure L9000 avec...
- Page 12 ¡IMPORTANTE! Compruebe el lado de la cerradura Instale los resortes y husillos. antes de la instalación. Installez les ressorts et les axes. IMPORTANT! Vérifiez si la serrure est pour droitier ou gaucher avant de l’installer. Para cambiar el lado: 1. Extraiga la cerradura y gire 180°. 2. Retire el tornillo del lado de la puerta de un lado del chasis y Extraiga Retirez...
- Page 13 Paso 5 para cerraduras SIN INDICADOR solo para Funciones de Privacidad EXTERIOR. Fonctions de D’Intimité Para cerraduras CON INDICADOR PARA EXTERIOR, Instale el ensamble de la placa de seguridad. vaya al paso 6. Installez l’ensemble de l’écusson. Étape 5 uniquement pour la garniture EXTÉRIEURE SANS INDICATEUR.
- Page 14 SOLO para cerraduras con indicador para exterior – instale el indicador para exterior. Pour la garniture de l’indicateur extérieur UNIQUEMENT – installez l’indicateur extérieur. A. Recorte el husillo de la leva si es necesario (funciones de cilindro y privacidad). Funciones de Cililndro con Indicador Fonctions de Cylindre avec Indicateur Rompa el husillo en la marca adecuada en función del grosor de la puerta.
- Page 15 Funciones de Privacidad con Indicador Funciones de Giro con Moneda con Indicador Fonctions de D’Intimité avec Indicateur Fonctions de Barrette à Fente avec Indicateur Desbloquee la puerta. Desbloquee la puerta. Déverrouillez la porte. Déverrouillez la porte. Instale el ensamble de la placa de seguridad/indicador. Monte la placa frontal de giro con moneda y la leva.
- Page 16 Instale el cilindro con el resorte del cilindro como Instale la jaula del resorte y la placa de montaje. se muestra. Installez la cage du ressort intérieur et la plaque de Installez le cylindre avec le ressort du cylindre montage. comme illustré. L La flecha de Llave insertada a la jaula del mitad de camino resorte debe Clé insérée à...
- Page 17 Funciones de Giro Manual Funciones de Palanca Fonctions de Barrette Tournante Fonctions de Fourchette Instale el ensamble de la placa de seguridad/manija. Instale el ensamble de la placa de seguridad/manija. Installez l’ensemble du levier et de l’écusson. Installez l’ensemble du levier et de l’écusson. NO ajuste NO ajuste demasiado. demasiado. NE PAS serrer NE PAS serrer excessivement.
- Page 18 SOLO para cerraduras con indicador para interior – instale el indicador para interior. Pour la garniture de l’indicateur intérieur UNIQUEMENT – installez l’indicateur intérieur. A. Recorte el husillo de la leva si es necesario (funciones de cilindro y privacidad). Funciones de Cililndro con Indicador Fonctions de Cylindre avec Indicateur Rompa el husillo en la marca adecuada en función del grosor de la puerta.
- Page 19 Fonciones de GIro Manual con Indicador Ajuste el cojinete con la llave expansora Serrez la bague avec la clef à écrous Fonctions Barrette Tournante avec Indicateur Desbloquee la puerta. Déverrouillez la porte. Monte la placa frontal de giro manual y la leva. Assemblez la plaque frontale avec barrette tournante et la came. Lave Came Coloque la placa de refuerzo y el indicador en el ensamble de la place frontal. Placez l’indicateur et la plaque de refort sur l’ensemble de la plaque frontale.
- Page 20 Ajuste el tornillo de montaje del cilindro (si corresponde). Instale el frente del blindaje. Serrez la vis de montage du cylindre (s’il y a lieu). Installez l’armure de serrure avant. Tornillo de montaje del cilindro Vis de montage du cylindre Ajuste los tornillos de montaje superior y inferior del chasis. Serrez les vis de montage en haut et en bas du bâti. Tornillos de montaje del chasis Vis de montage...
- Page 21 LADO DEL INDICADOR / SENS DE L’INDICATEUR A. Determine la orientación de la puerta desde afuera. INTERIOR Izquierda/Gauche Déterminez le type de montage de la porte depuis l’extérieur. B. Compruebe la orientación con el indicador posicionado contra la parte superior del borde de la placa de refuerzo.
- Page 22 ADAPTACIÓN DE LA CERRADURA CON INDICADOR / RÉNOVATION DE L’INDICATEUR DE VERROUILLAGE Opciones con indicador: Retire el (los) cilindro(s), si corresponde. Options d’indicateur : Enlevez le ou les cylindres s’il y a lieu. Afloje el tornillo de montaje del cilindro. Desserrez la vis de montage du cylindre. Cilindro Privacidad Giro con moneda Giro manual Cylindre D’Intimité Barrette à fente Barrette tournante Retire el frente del blindaje.
- Page 23 Retire la palanca interna. Para el borde con indicador en el exterior de la puerta, retire la placa de montaje interior y la jaula del resorte. Luego, retire el borde Enlevez la fourchette intérieur. externo. Pour la garniture d’indicateur à l’extérieur de la porte, retirez la plaque de montage et la cage du ressort. Puis, retirez la garniture extérieur. Placa de montaje Interior Plaque de montage Intérieur Jaula del resorte Cage du ressort...
- Page 24 Servicio al cliente Service à la clientèle © Allegion 2016 P516-908 Rev. 10/16-d 1-877-671-7011 www.allegion.com/us...
Need help?
Do you have a question about the L9000 Series and is the answer not in the manual?
Questions and answers