Table of Contents
Advertisement
Quick Links
Advertisement
Table of Contents

Related Manuals for MED-EL Mi1000


Summary of Contents for MED-EL Mi1000
- Page 1 Cochlear Implants Mi1000 CONCERTO PIN Surgical Guideline AW7694_6.0 (English EU)
- Page 2 Cochlear Implant System meet the requirements for AIMD 90/385/EEC and MDD 93/42/EEC. This Surgical Guideline describes proper techniques for implanting the Mi1000 CONCERTO PIN Cochlear Implant (hereafter referred to as the CONCERTO PIN). It serves as additional information for professionals and should not be used as an “Instructions for Use”.
-
Page 3: Table Of Contents
STEP 12: Insert the Electrode Array STEP 13-A: Seal Cochlear Opening STEP 13-B: Secure Electrode Lead STEP 14: Intra-operative Recordings STEP 15: Close Wound Appendix MRI Caution X-rays Explanting the Device Hearing Preservation Surgical Technique Literature MED-EL Surgical Videos MED-EL Contacts... -
Page 4: Patient Selection And Evaluation
Patient selection and evaluation I. Patient selection and evaluation Indication The MED-EL Cochlear Implant System is intended to evoke motivated and understand the importance of returning to auditory sensations via electrical stimulation of the auditory the implant centre for regular audio processor programming, pathways. -
Page 5: Technical Description Of The Implant
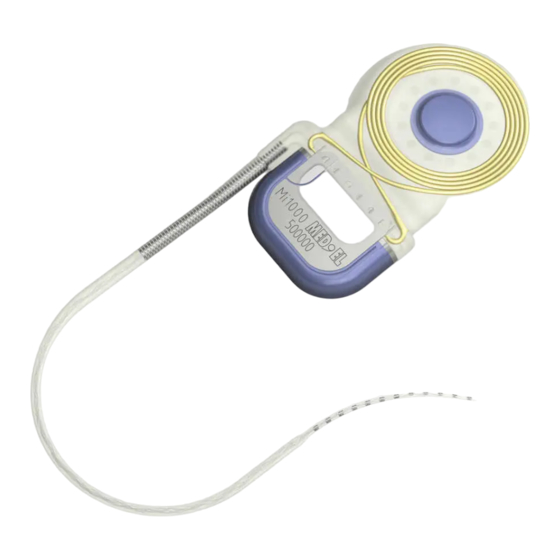
Technical description of the implant II. Technical description of the implant The CONCERTO PIN is the implantable part of the MED-EL Cochlear Implant System and can only be used together with compatible MED-EL external components. The device consists of a stimulator, a coil with a magnet... -
Page 6: Performance Characteristics
Maximum current amplitude: MED-EL offers the largest selection of electrode arrays for Median value = 1250 µA, range = 500 µA each implant variant. Please see Section V, Step 9, “Select Maximum pulse width: Appropriate electrode Variant”... - Page 7 Technical description of the implant FLEX28 Electrode Array FLEX24 Electrode Array Order number: 08841 Order number: 07679 The FLEX28 Electrode Array (see Figure 3) is 28 mm long The FLEX24 Electrode Array (see Figure 4) is 24 mm long featuring FLEX tip technology suitable for 96 % of all normal featuring FLEX tip technology and designed for combined cochlear duct lengths.
- Page 8 Technical description of the implant FLEX20 Electrode Array FORM 24™ Order number: 30969 Order Number: 30660 The FLEX20 Electrode Array (see Figure 5) is 20 mm long The FORM24 Electrode Array (see Figure 6) is 24 mm long featuring FLEX tip technology and designed for combined electrode array designed for open (no obliteration or Electric Acoustic Stimulation (EAS).
- Page 9 Technical description of the implant FORM 19™ Standard Electrode Array Order Number: 30661 Order number: 07676 The FORM19 Electrode Array (see Figure 7) is 19 mm long The Standard Electrode Array (see Figure 8) is 31.5 mm long electrode array designed intended to be used in cochleae and designed for long cochlear duct lengths.
- Page 10 Technical description of the implant Medium Electrode Array Compressed Electrode Array Order number: 07678 Order number: 07677 The Medium Electrode Array (see Figure 9) is 24 mm long The Compressed Electrode Array (see Figure 10) is 15 mm and designed for cases where deep insertion is not desired long and designed for partial ossification or malformation or is not possible due to anatomic restrictions.
-
Page 11: Surgical Tools
Surgical tools III. Surgical tools Note that the surgical tools supplied by MED-EL should not be modified in any way. Modification of any of the tools is done at the surgeon’s own risk. Detailed instruction of the reprocessing process and the individual preparation before cleaning the tools can be found in the appropriate Instruction for Use. - Page 12 Surgical tools PIN Drill Guide SI Order Number: 09906 The PIN Drill Guide SI is a re-usable surgical instrument for creation of defined holes on the skull for the fixation pins of the CONCERTO PIN Cochlear Implant. It consists of a PIN Drilling Template made of titanium and a Clamping Handle made of stainless chomate steel.
- Page 13 Surgical tools Surgical Claw Angled Order number: 00284 The Surgical Claw Angled can help to position and insert the electrode array into the cochlea. The tip of this instrument is slightly bent for better visualization during electrode insertion. This tool is a re-usable surgical instrument for transient use made from medical grade stainless steel.
- Page 14 Figure 17 FENTEXmedical Forceps 0.8 – 1.3 mm FENTEXmedical forceps have been successfully tested at headquarters with all MED-EL electrode arrays. This surgical tool is no MED-EL product and may therefore be ordered directly at your local FENTEXmedical distributor. http://www.fentexmedical.com/ Surgical Claw Straight...
- Page 15 Order number: 07613 Consisting of: Mi1000 PIN Stimulator Template: 07748 The Mi1000 PIN Drill Guide is a re-usable surgical instrument for creation of defined holes in the skull for the pins of MED-EL hearing implant housing variants with pins. It...
-
Page 16: Insertion Test Tools
Surgical tools Insertion Test Tools They are primarily used when ossification or fibrosis is suspected to aid the surgeon in determining which electrode variant to use (e.g. for detailed dimensions please see section II Implant Variants). Insertion Test Device (ITD) Insertion Electrode (IE) Order number: 02081 With the Insertion Electrode (IE) the surgeon can establish... -
Page 17: General Remarks About The Surgery
• Do not place sutures over the active electrode lead. • Only surgical instruments approved by MED-EL should be used during the insertion process, other instruments (probes, hooks, forceps, tweezers, etc.) can damage the electrode array. •... -
Page 18: Surgical Procedure
Surgical procedure V. Surgical procedure STEP 1: Prepare Patient The CONCERTO PIN Cochlear Implant can be implanted using a small incision, however, for demonstration purposes only, the following illustrations include an enlarged incision As a prophylactic measure, intravenous antibiotics should area. -
Page 19: Step 2: Mark Implant Position
STEP 2: Mark Implant Position Place the Processor Template behind the ear and position the Mi1000 Implant Template, PIN. There are various orientation options. A suggested orientation for each ear is shown in Figure 21 and Figure 22, but the orientation depends on various factors, like e.g. -
Page 20: Step 3: Plan Incision
Surgical procedure STEP 3: Plan Incision Choose the line of incision so that a well vascularised skin flap results. Make the incision 1-2 cm from the implant to ensure that the scar will not lie directly over the body of the implant. -
Page 21: Step 4-A: Open Skin Flap
Surgical procedure STEP 4-A: Open Skin Flap The incision is made and the wound is held open by retractors. At all times care should be taken to ensure that the flap is kept moist with damp surgical gauze. Either a single layer skin flap – all four layers, skin, subcutis, muscle and periosteum are incised in a single cut, or a double layer skin flap can be performed. -
Page 22: Step 4-B: Skin Flap Thickness
Surgical procedure STEP 4-B: Skin Flap Thickness In order to achieve good magnetic hold and optimal signal transmission, the skin flap or the muscle may need to be thinned out so it does not exceed 6 mm. Evaluate the portion of the flap over the magnet and receiving coil with the Skin Flap Gauge 6, as shown in Figure 26. -
Page 23: Step 5: Check Position Of Implant And Electrode Lead
Retractors may distort the actual position of the implant in relation to the pinna as the ear is retracted. The Mi1000 Implant Template, PIN should be placed on the skull in order to visually check its proper position. The bony ear canal should be identified and re-marking on the skull should be done if necessary (see Figure 27). -
Page 24: Step 6: Drill Mastoidectomy And Posterior Tympanotomy
Surgical procedure STEP 6: Drill Mastoidectomy and Posterior Tympanotomy CAUTION ANTERIOR Clear identification of the anatomical landmarks is required. When drilling, care should be taken to avoid exposing the dura inadvertently. If the dura is exposed as a landmark, exposure shall be kept to an absolute minimum. Inadequate large exposure or injury to the dura may reduce the barrier to future infection and may increase the potential risk for future meningitis. - Page 25 Surgical procedure The following should be visible after the posterior tympanotomy: the long process of the incus, the Long process of the incus incudostapedial joint, the stapes pyramid and stapedius Chorda tympani tendon, the promontory and the round window niche (see Short process Figure 29 and Figure 30).
-
Page 26: Step 7: Drill Stimulator Bed And Electrode Channel
Figure 31 Marking the implant position with the Implant The Mi1000 Implant Template, PIN can be used to mark the Template, PIN – right ear correct position of the stimulator and the electrode channel (see Figure 31). - Page 27 The two pins of the CONCERTO PIN Cochlear Implant should be recessed into the skull with the PIN Drill Guide SI or the Mi1000 PIN Drill Guide to a depth of 1.5 mm (see Figure 33). For drilling the holes into the flat area, the following methods can be used: Figure 33 CONCERTO PIN Cochlear Implant –...
- Page 28 Surgical procedure PIN Drill Guide SI and a diamond burr of 1.0 mm CAUTION • Ensure that the dura is not inadvertently damaged when drilling the holes. • Always use a slow turning drill, e.g. 2000 rpm. • Stop drilling when a depth of 1.5 mm is achieved. Use the diamond burr of 1.0 mm to mark both hole positions and drill through the PIN Drill Guide SI.
-
Page 29: Step 8 - Variant 1: Preparation For A Round Window Opening
Surgical procedure STEP 8 – VARIANT 1: Preparation for a Round Window opening CAUTION • Always use a slow turning diamond drill to avoid acoustic trauma when drilling the round window (RW) niche (approx. 1000rpm). • Try to keep the RW membrane intact until the insertion of the electrode. - Page 30 Surgical procedure To enter the middle portion of the scala tympani and to get visualisation of the RW membrane, the posterior- superior lip of the round window niche and the inferior Scala vestibuli margin of the round window should be drilled away. By Scala media doing this, the round window will be exposed for best insertion of the electrode array (see Figure 37).
-
Page 31: Step 8 - Variant 2: Preparation For A Cochleostomy
Surgical procedure STEP 8 – VARIANT 2: Preparation for a Cochleostomy CAUTION • For drilling the cochleostomy, always use a slowly turning diamond drill to avoid acoustic trauma (approx. 1000rpm). • Try to keep the endosteum intact until the insertion of the electrode. - Page 32 Surgical procedure The cochleostomy is drilled and the exposure of the endosteum should be big enough to comfortable fit the electrode. An appropriate cochleostomy size is dependent upon the type of electrode array chosen. Please refer to STEP 9, “Select Appropriate Electrode Variant”. The bony lip of the cochleostomy is slightly smoothed with a small diamond drill bit.
-
Page 33: Step 9: Select Appropriate Electrode Variant
An implant with a Split Electrode Array can be used, inserting one electrode array into the lower MED-EL Cochlear Implants are available with several cochleostomy and the other into the upper different electrode options. For hearing preservation with cochleostomy. - Page 34 ASR: . mm Diameter at basal end: 0.7mm A 15 mm electrode array designed for partial ossification or Diameter at apical end: 0.5mm Ø . mm Ø . mm malformation of the cochlea. Order number: 07677 Figure 41 MED-EL electrodes...
-
Page 35: Step 10: Immobilise The Implant
MED-EL recommends the use of different suture techniques (details on Figure 42, Figure 43). In the event that the placement of the implant led to the... -
Page 36: Step 11: Opening The Cochlea
Surgical procedure STEP 11: Opening the Cochlea Before inserting the electrode array into the cochlea, either the RW membrane for a RW insertion or the endosteum for a cochleostomy insertion, needs to be incised. Either a micro-lancette or a micro-hook can be used to open the cochlea (see Figure 44, Figure 45 and Figure 46). -
Page 37: Step 12: Insert The Electrode Array
(see Figure 48). Non-tangential insertion should be avoided. Surgical tools approved by MED-EL should be used to insert the electrode array into the cochlea. Either the Surgical Claw or the Micro Forceps Angled can be used to maneuver the electrode array. - Page 38 Surgical procedure The electrode lead is held very carefully at the proximal thicker part, just above the marker ring. If using a FLEX- style electrode array, orient the single contacts along the apical portion of the array toward the modiolus of the cochlea during insertion so that the marker dot at the base of the array will point toward the modiolus after insertion.
- Page 39 Surgical procedure If resistance is encountered before reaching the marker ring, the electrode array may buckle. In such cases, electrode insertion should be stopped. Excessive force should not be used, as it may result in intra-cochlear damage. The following measures may be helpful in such situations: •...
-
Page 40: Step 13-A: Seal Cochlear Opening
Figure 51 The marker ring of the Standard Electrode Array can seal the cochlear opening, aiding in its fixation – right For all MED-EL Electrode Arrays, small pieces of temporalis fascia placed around the electrode array at the entrance to the cochlea should be used to secure the electrode array and to seal the opening. -
Page 41: Step 13-B: Secure Electrode Lead
STEP 13-B: Secure Electrode Lead If you choose to secure the electrode lead in the posterior tympanotomy, fibrin glue or bone paté can be used. MED-EL offers a Fixation Clip to secure the electrode lead to the bony bridge (incus bridge). - Page 42 Surgical procedure First the larger clip (bone fixation clip) shall be placed on the bony bridge (see Figure 56). Figure 56 Placement of the Fixation Clip on the bony bridge Next, the bone fixation clip shall be properly crimped to the bony bridge (see Figure 57).
-
Page 43: Step 14: Intra-Operative Recordings
Software User Manual. It is not possible to electrode function. “High” values observed intra-operatively sterilise any component of the MED-EL hardware interface may be caused by air bubbles on the electrode contact system. When used in a sterile environment, the coil and surface. -
Page 44: Step 15: Close Wound
Implant during surgery, and they can also provide interesting electrode. information on the function of the whole auditory pathway. The MED-EL application software EABR parameters can be The rest of the wound should be closed in layers with adjusted to facilitate recording of early, middle and late staples or absorbable subcutaneous sutures. -
Page 45: Appendix
Appendix Appendix MRI Caution MRI is possible in patients with cochlear or auditory of 1.0 T or 1.5 T a supportive head bandage must be brainstem implants only with specified models of MRI placed over the implant. A supportive head bandage machines. - Page 46 Appendix • Image artifacts are to be expected (refer to Figure 61). • The above instructions also apply for patients with • The above instructions should also be followed if areas bilateral cochlear implants or bilateral auditory of the body other than the head are to be examined brainstem implants.
-
Page 47: X-Rays
• An explanted device should be placed in a leak-proof, disinfected (or sterile) container filled with saline and returned to MED-EL Headquarters. The device should be accompanied by written information including the reason for explantation. -
Page 48: Hearing Preservation Surgical Technique
Appendix Hearing Preservation Surgical Technique Hearing Preservation A special marked paragraph can be found in each Surgical Step showing details which are important for Hearing Surgical Technique Preservation for an EAS surgery. A summary on the additional EAS related surgical steps can be found in Figure 63. Round Window Insertion Cochleostomy Insertion Please ensure that corticosteroids (crystalline triamcinolone solution or dexamethasone), intravenous corticosteroids,... - Page 49 Appendix Hearing Preservation Surgical Technique Round Window Insertion Cochleostomy Insertion Using a micro-lancette or micro-hook, carefully incise the With a micro-lancette or micro-hook, carefully incise round window membrane in its inferior-anterior quadrant the endosteum to approximately . mm. to approximately . mm. Avoid suctioning in the open region of the cochlea.
-
Page 50: Literature
Appendix Literature The following is a list of references on general CI surgery: Cochlear implantation via the round window membrane minimizes trauma to cochlear structures: A histologically controlled insertion Evaluation of a minimally invasive surgical fixation technique for study. young children with the Concerto Pin cochlear implant system. Adunka O;... - Page 51 Appendix Cochlear implantation in a patient with bilateral temporal bone Scalar localization by computed tomography of cochlear implant fractures. electrode carriers designed for deep insertion. Simons, J., Whitaker, M. & Hirsch, B.; Otolaryngol Head Neck Surg , Helbig S, Mack M, Schell B, Bratzke H, Stöver T, Helbig M.; Otol 132, 809-811;...
- Page 52 Surgical Factors in Pediatric Cochlear Implantation and Their Early Electric Acoustic Stimulation (EAS) of the Auditory System: Effects on Electrode Activation and Functional Outcomes Experience and Results of Ten Patients Using MED-EL’s M and Francis HW;Buchman CA;Visaya JM;Wang NY;Zwolan TA;Fink NE;Niparko Flex Electrodes.
- Page 53 Appendix Cochlear implantation at under 12 months: Report on 10 patients ATTICOTOMY APPROACH Colletti V;Carner M;Miorelli V;Guida M;Colletti L;Fiorino F; Laryngoscope, Transepitympanic Approach in Cochlear Implantation. 115, 2005, p. 445–449 Nahler A; Böheim K; 5th European Congress of Oto-Rhino-Laryngology Head and Neck Surgery, Rodos-Kos Hellas 2004. (Poster) The following is a list of references on alternative approaches: Kombinierter Epitympanaler –...
-
Page 54: Med-El Surgical Videos
Appendix MED-EL Surgical Videos Please contact you local MED-EL office or distributor for the latest MED-EL Surgical Videos or visit the MED-EL Professional Webpage (www.medel.com/professionals). MED-EL Contacts For MED-EL Contacts please visit the MED-EL Webpage (www.medel.com/contact-offices). - Page 56 MED‑EL Elektromedizinische Geräte GmbH Worldwide Headquarters Fürstenweg 77a 6020 Innsbruck, Austria office@medel.com medel.com...
Need help?
Do you have a question about the Mi1000 and is the answer not in the manual?
Questions and answers