Table of Contents
Advertisement
Quick Links
GE22-NX
MULTI-STAGE 2 HEAT / 2 COOL
OPERATING INSTRUCTIONS
SEE REVERSE FOR
USER CONTROLS
(Cont'd)
OUTDOOR (ODT) BUTTON
When the outdoor temperature sensor is connected to your thermostat,
you can display the current outdoor temperature by pressing the
OUTDOOR button. If the sensor is not connected, the thermostat will
display -- t.
DAY/NIGHT BUTTON
When the thermostat initially is installed, the display will show the e
symbol for your day temperature. By pressing the DAY/NIGHT
button you may select an alternate or night temperature f (the
thermostat will remember this setpoint). Simply press the DAY/NIGHT
button to alternate between temperature settings.
CELSIUS / FAHRENHEIT
Simultaneously press c and d to switch between Celsius (˚C) and
Fahrenheit (˚F) temperature display.
COMMUNICATIONS (OPTION) X1 - X2
The thermostat is designed to accept any of the Net/X family of remote
communications controllers (available separately). The controllers allow
full functionality and control from a distance of up to 1000 feet away.
Your new electronic digital thermostat has been designed to provide
accurate control and display of room temperature. In addition, it
also will display all relevant information pertaining to your system.
The clearly marked buttons and informative display make it extremely easy
to understand and simple to use.
Please take a few moments to read the brief instructions and familiarize
yourself with the various functions in order to obtain maximum benefit
from this truly unique electronic control.
GENERAL INFORMATION
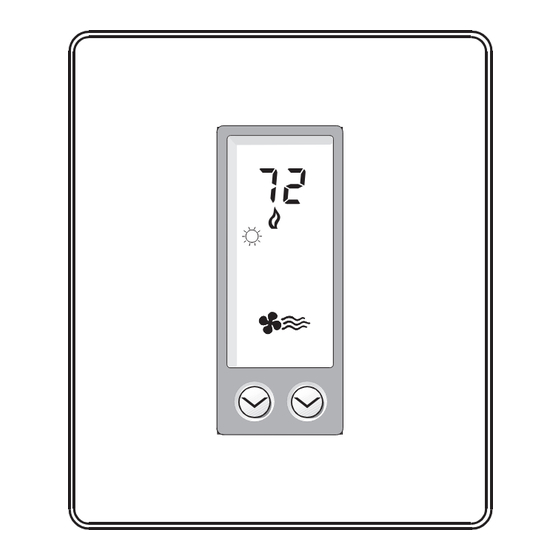
The thermostat normally displays room temperature, mode of operation
and whether cooling or heating is currently on. The six buttons on the
front of the unit allow complete control of your equipment.
You may select different heating and cooling setpoints for the system to
maintain, e.g., 70° in heating and 75° in cooling. Raising or lowering the
setpoints in heating or cooling is as simple as pushing a button. In addi-
tion, you may choose to display the temperature in °F or °C.
The thermostat also allows you to select continuous fan operation (useful
when using an air cleaner), or have the fan come on with the equipment.
5
REMOTE SENSOR (OPTION)
RS1 – RS2 – RS+V
The thermostat is designed to accept the electronic remote sensor, which
will allow you to locate your thermostat in an area away from view. Indoor
and outdoor sensors are available separately.
CLOCK TERMINALS (OPTION) CLK1 – CLK2
Your thermostat is equipped with a dry contact closure input. By
connecting to any relay-based controller or clock timer, the thermostat
can be alternated between the day and night (setback) temperature
setpoints automatically.
Upon initial power up of the thermostat, or after a power failure, the ther-
mostat will check the clock terminals and apply the day (open
contact) or night (closed contact) temperature setpoints accordingly.
2
USER CONTROLS
MODE – Select the desired mode of operation by repeatedly pressing
the MODE button:
j
– indicates cooling system only (the word COOL is displayed for
5 seconds)
i
– indicates heating system only (the word HEAT is displayed for
5 seconds)
i j
– indicates both the heat and cool systems (the word AUTO is
displayed for 5 seconds)
j
Blinking – indicates cool ON
i
Flickering – indicates heat ON
OFF – disables thermostat so equipment will not operate (fan operation is still
possible in this mode)
j
COOLING
Select the temperature you want your equipment to maintain while in the
cooling mode by pressing and holding the c or d button. The control set-
point temperature is displayed for 5 seconds.
i
HEATING
Select the temperature you want your equipment to maintain while in the
heating mode by pressing and holding the c or d button. The control
setpoint temperature is displayed for 5 seconds.
6
TEMPERATURE ACCURACY
Full temperature accuracy will be realized only after the thermostat has
been installed and powered for at least one (1) hour.
THERMOSTAT AND SENSOR CALIBRATION
Simply press and hold the FAN button for 10 seconds and adjust with
the c or d button.
POWER FAILURES
Your thermostat employs the latest in solid state electronic technology.
One of the unique features of your thermostat is that no battery is
required to maintain your selected setpoints in the event of a power loss
as the memory is unaffected by power failures of any duration.
When power is restored, the thermostat will continue operating as if the
power had never been off.
3
k
FAN
The fan will come on automatically when the system is operating, but
there is no indication of this on the display. To select continuous fan
operation, press the FAN button and the display will show k. This is
recommended
for
electronic
air
cleaners
ventilation requirements.
OFF
To turn off the heating or cooling system, press the MODE button until the
word OFF appears on the LCD. It will remain displayed until the mode is
changed. The OFF mode prevents the system from being energized.
Avoid using the OFF mode during extremely cold weather to prevent
damage to the equipment from freezing.
AUTO CHANGEOVER
You may set the thermostat to switch automatically from heating to cool-
ing mode by pressing the MODE button until the word AUTO and both the
heating i and cooling j icons appear on the LCD. The thermostat will
energize the heating or cooling system based on the temperatures estab-
lished for both modes.
TEMPORARY TEMPERATURE OVERRIDE
WITH KEYPAD LOCKED
(The keypad may be locked to prevent tampering by selecting the ON
position of DIP switch #2.)
If the keypad is locked to prevent tampering you may temporarily adjust
the setpoint by ±3°F of the programmed day setpoint. Press the c or d
button to raise or lower the setpoint for a 1 or 3 hour period, depending
on DIP switch settings.
7
1 (One) Year Limited Warranty
The manufacturer warrants to the original purchaser that its product and component
parts will be free from defects in workmanship and materials for a period of 1 (one) year
from the date of purchase. Return to the original point of purchase for replacement of
your product.
Warranty Limitations
This warranty begins at date of purchase.
Warranty is Void if:
The date code is defaced or removed.
The product has a defect or damage due to product alteration, connection to an
improper electrical supply, shipping and handling, accident, fire, flood, lightning, or
other conditions beyond the control of the manufacturer.
The product is not installed according to the manufacturers instructions and specifica-
tions.
The product has been installed near sources of electromagnetic interference (EMI)
such as arcing relay contacts.
Owner's Responsibility
Provide proof of purchase.
Provide normal care and maintenance.
Pay for freight, labor and travel.
Pay for service calls related to product installation.
Return any defective product.
In no event shall the manufacturer be liable for incidental or consequential damages.
This warranty gives you specific legal rights and you may have others which vary by
state and/or province. For example, some states and/or provinces do not allow the
exclusion or limitation of incidental or consequential damages, so this exclusion may
not apply to you.
The manufacturer's continuing commitment to quality products may require a change
in specifications without notice.
This equipment, if installed in strict accordance with the manufacturer's instructions,
complies with the limits for a Class B computing device pursuant to Subpart J of Part
15 of FCC rules.
4
and
continuous
Advertisement
Table of Contents

Related Manuals for Network Thermostat GE22-NX


Summary of Contents for Network Thermostat GE22-NX
- Page 1 GE22-NX Your new electronic digital thermostat has been designed to provide USER CONTROLS accurate control and display of room temperature. In addition, it The fan will come on automatically when the system is operating, but MULTI-STAGE 2 HEAT / 2 COOL also will display all relevant information pertaining to your system.
- Page 2 Y1....Energizes on a call for first stage cooling DIP switch options. Current per output with surges to 3 Amps Max. GE22-NX G....Fan operates with a call for heating or cooling or by DIP Switch DIP Switch OFF DIP Switch ON Control .
Need help?
Do you have a question about the GE22-NX and is the answer not in the manual?
Questions and answers