
Subscribe to Our Youtube Channel
Related Manuals for Bistos BT-550


Summary of Contents for Bistos BT-550
- Page 1 BT-550 Operation Manual Keep this manual for future reference P/N : 550-ENG-OPM-EUR-R01...
- Page 2 Information furnished by Bistos Co., Ltd is believed to be accurate and reliable. However, no responsibility is assumed by Bistos for its use, or any infringements of patents or other rights of third parties that may result from its use. No license is granted by implication or otherwise under any patent or patent rights of Bistos Co., Ltd.
-
Page 3: Table Of Contents
2.5 Skin temperature sensor ···························································································· 34 2.6 Prepare to use ············································································································· 35 2.7 Operation ···················································································································· 36 2.8 SpO2 Monitor(option) ······························································································· 39 3. Placing infant and moving BT-550 ································································ 46 3.1 Placing infant ·············································································································· 46 3.2 Move the BT-550 ········································································································ 46 3.2.1 Precautions ········································································································ 46 3.2.2 Stand caster lock ·································································································... - Page 4 6. Manufacturer’s declaration on EMC ·································································· 51 6.1 Electromagnetic emissions ····························································································· 51 6.2 Recommended separation distances between portable and mobile RF communications equipment and the BT-550 ···························································································· 52 6.3 Electromagnetic immunity ······························································································ 53 7. Technical specifications ···················································································· 55 Product Warranty ·································································································· 57 Figure 1-1: Front View ···············································································································...
-
Page 5: Safety Information
BT-550 Operation manual Safety information Before using BT-550 Infant warmer, read this entire manual and be fully understood the following safety information to prevent injury of patient and user. Symbols Used The following symbols identify all instructions that are important to safety. Failure to follow these instructions can lead to injury or damage to the infant warmer. - Page 6 BT-550 Operation manual This symbol indicates the temperature limitation for operation, transport and storage. This symbol indicates the humidity limitation for operation, transport and storage. This symbol indicates the packing material is recyclable. This symbol indicates the compliance with the essential requirements and provisions of the Medical Device Directive 93/42/EEC as amended by 2007/47/EEC.
-
Page 7: General Precautions, Warnings And Cautions
Perform periodic safety testing to insure proper patient safety. This should include leakage current measurement and insulation testing. The recommended testing interval is once per year. Do not operate the BT-550 infant warmer if it fails to pass the power on self-test procedure. • WARNING Thoroughly read and understand the manual prior to use of the BT-550. - Page 8 Failure to do so could result in personal injury or equipment damage. Prior to placing the infant in the infant warmer, pre-warm the BT-550 to the temperature prescribed by the attending physician, or according to nursing protocol.
- Page 9 An operator may only perform maintenance procedures specifically described in this manual. Do not remove the covers of a BT-550 yourself to avoid damage to the equipment and unexpected electrical shock. Only qualified Bistos service engineer must repair or replace components.
-
Page 10: Shock Hazards
To prevent equipment damage or accidental power disconnections, do not plug a BT-550 power cord directly to an AC wall socket when the BT-550 is mounted on a pedestal /stand. Always provide power to the BT-550 by using the power cord coming directly from the pedestal /stand. -
Page 11: General Precautions On Environment
Power off when the Do not disjoint or equipment is not fully disassemble the device. ready to operate. Bistos Co., Ltd. does not Otherwise, the have liability of it. equipment could be damaged. P/N : 550-ENG-OPM-EUR-R01 Bistos Co., Ltd. -
Page 12: System Basics
System basics 1.1 Intended use The BT-550 Infant Warmer is intended to emit controlled, evenly distributed overhead heat to the body of premature infant and other newborns that cannot effectively regulate their body temperature. This device can be used before any treatment or operation of an infant. The device has two operating functions;... -
Page 13: System Configurations
BT-550 Operation manual 1.3 System configurations Basic configuration of BT-550 • Main body with fixed height stand • Mattress & Power cable • 2 skin temperature sensor Options of BT-550 • Motor-driven height adjustable stand (Lift stand) • Intravenous(IV) pole •... - Page 14 BT-550 Operation manual Picture Name Description Fixed Stand Movable warmer cradle with wheels (Standard) Mattress Accommodate infant stably with (Standard) bouncy mattress Skin temperature Measures infant’s skin temperature sensor (Standard) AC power code AC Power cord(AC Power cord for (Standard)
-
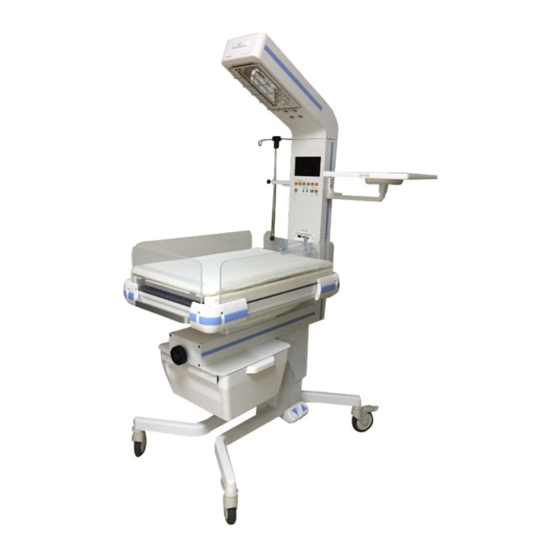
Page 15: Product Outlook
BT-550 Operation manual 1.4 Product outlook Basic configuration Configuration with full Options Figure1-1: Front view Figure1-2 : Side view P/N : 550-ENG-OPM-EUR-R01 Bistos Co., Ltd. 2018.03... -
Page 16: Description Of System Components
Supporting the whole BT-550 system. Basic stand has fixed height. Height adjustable stand is available as option. Stand It has equipped with caster to move the BT-550 easily and can be ③ fitted with drawer and bed tilting mechanism when options are selected. -
Page 17: Figure 1-4: Head
BT-550 Operation manual Figure1-4: Head Name Description Alarm light Flashing red light in alarm status ① Composed with heating element, reflecting plate and Heat source ② protection guard to prevent touch the heating element Examination Provide added illumination of the mattress area ③... -
Page 18: Figure 1-5: Column
BT-550 Operation manual Figure1-5: Column IV Pole ① Display LCD ② uttons ③ B Power switch ④ onnector for SpO sensor and weighing scale ⑤ C Connector for Skin temperature sensor ⑥ late for auxiliary equipment (IV Plate) ⑦ P Speaker ⑧... -
Page 19: Figure 1-6: Bassinet
BT-550 Operation manual Mattress X-ray cassette tray ① ② Bed tilting mechanism Tilting handle ③ ④ Protective barriers Weighing scale ⑤ ⑥ Figure1-6 : Bassinet WARNING Do not place heavy objects on the X-ray cassette tray to prevent the device ... -
Page 20: Figure 1-7: Stand Part
BT-550 Operation manual Foot switch Drawer ① ② AC power socket inlet Caster ③ ④ Figure 1-7: Stand part (Height adjustable stand) WARNING Do not place any items taller than the caster diameter of device to prevent any disturbance of stability of stand and damage to the device Keep vacant surrounding stand about 30 cm. -
Page 21: Understanding The Display
BT-550 Operation manual 1.6 Understanding the display Figure 1-8: Display when SpO option not installed Figure 1-9: Display when SpO option installed ① Measured temperature ② Set temperature ③ Selected operation mode ④ Alarm mute indicator ⑤ Examination lamp status indicator ⑥... -
Page 22: Buttons
Button for APGAR Timer Start and Stop. *The APGAR timer provides tones at 1, 5 and 10 mins set [APGAR*] intervals to prompt the assessment on infants nursed under the BT-550 infant warmer. P/N : 550-ENG-OPM-EUR-R01 Bistos Co., Ltd. 2018.03... - Page 23 BT-550 Operation manual [APGAR Button for APGAR Timer Reset. RESET] S1 : The first sensor to be attached to the abdomen Skin of infant (The heater power in baby mode is temperature controlled by the temperature measure from S1.) sensor...
-
Page 24: Alarm And Warning Indication
BT-550 Operation manual 1.8 Alarm and warning indication Figure Description POWER Fail • When the supply power are interrupted the ‘POWER FAIL’ warning message are displayed in white and red and audio alarm stays for 10 minutes Figure1-11 : POWER Fail Sensor Disable •... -
Page 25: Figure 1-17: Masimo Check Alarm
BT-550 Operation manual Masimo Check Alarm • Alarm will be activated upon following situations: Alarm message Situation Open LEDs LED opened Shorted LEDs LED shorted Interference detected Interference between Figure1-17: Masimo Check Alarm transmitting LED and detector Low SpO2 Measured SpO... -
Page 26: Essential Performance
BT-550 Operation manual 1.9 Essential performance 1) Accuracy of baby mode operation The temperature as measured by the skin temperature sensor shall not differ from the control temperature by more than 0.5 ℃, 2) Generation of visual and audible alarm After steady temperature condition have been achieved, any sensed temperature deviation exceeding ±1°C compared with the control temperature shall cause an auditory and visual alarms to operate, and... -
Page 27: Operation Of Bt-550
BT-550 should not be used adjacent to or stack with other equipment. The AC power plug is a means to isolate its circuits electrically from the supply ... -
Page 28: Assembling Bt-550
BT-550 Operation manual 2.2 Assembling BT-550 2.2.1 Repositioning the column Figure 2-1: Repositioning the Column (1) Remove the package. Remove the four M6X25 Hexagon head bolt (number ② in figure) from column (hold the column securely to prevent declining) with 5 mm hexagon wrench enclosed. -
Page 29: Figure 2-2: Repositioning The Column (2)
BT-550 Operation manual Figure2-2: Repositioning the column (2) Push up the column and align with the fixing hole as indicated in the figure with red arrow Fix with four M6x15 bolts (number ② in figure) which removed above procedure. Hold column tightly until bolting finished to prevent fall down. -
Page 30: Figure 2-3: Repositioning The Column (3)
BT-550 Operation manual Figure2-3: Repositioning the column (3) The assembling position is different for standard configuration and full option configuration. Be sure to fixing on the right position depending on the options. P/N : 550-ENG-OPM-EUR-R01 Bistos Co., Ltd. 2018.03... -
Page 31: Installing The Iv Pole To Column (Option)
BT-550 Operation manual 2.2.2 Installing the IV pole to column (Option) Figure2-4 : Installing IV pole Put the lower damper (number ⑤ in figure) to the lower part of column rail. Slip-in the two joint nuts (number ⑥ in figure) to the column rail above the lower damper. -
Page 32: Installing The Plate For Auxiliary Equipment To Column (Option)
BT-550 Operation manual Figure2-5 : Installing plate for auxiliary equipment to column Put the lower damper (number in figure) to the lower part of column rail. ⑥ Slip-in the two joint nuts (number in figure) to the column rail above the lower damper. - Page 33 BT-550 Operation manual Pull the barrier upward. Decline the barrier backward and detach upper locking pin. Pull the barrier upward again and detach lower locking pin. Figure2-6 : Separating barriers WARNING Do always for both ends together. Regularly inspect the latches and closing devices of barriers to prevent the ...
-
Page 34: Tilting Bed
BT-550 Operation manual The bed can tilted for 15°±2° to backward or forward Figure 2-7: Tilting handle CAUTION Do not press a bed with over pressure. Do not turn the tilting handle with excessive force. WARNING Tilting of the mattress from its horizontal position relative to the infant warmer ... -
Page 35: Skin Temperature Sensor
BT-550 Operation manual • Before adhere the sensor to infant, hold the metallic part of sensor end with fingers and check the temperature display relevant body temperature. • Attach the S1 sensor to the abdomen and S2 sensor (option) to the foot or ear lobe of infant using adhesive tape. -
Page 36: Operation
Check whether all the relevant information Figure 2-10: Product logo and initial screen are displayed 5. When the power on, BT-550 start to operate in ‘pre warm’ mode with 100% heater output (28 ㎽/㎠±20%) for five minutes. After then the heater output decrease to 60% for 10 minutes and further decrease to 25%. - Page 37 When the power switch turned on, initial logo screen displayed. (1) Measuring the skin temperature of infant The BT-550 start to measure the skin temperature of infant as the power switched on. When the skin temperature sensor does not connected to the connector in baby mode, sensor disable message displayed and audible alarm activated.
- Page 38 The SpO function only activated when the SpO module connected to BT-550. The measurement is started when the sensor is attached to infant’s index finger or other part (such as toe, ear lobe etc.). Use site appropriate according to each sensor’s individual direction for use.
- Page 39 BT-550 Operation manual Category Parameter Description Selection Time To set the current time AM/PM, Hour and minutes Temp. Unit To select the temperature ℃(Celsius)/ ℉(Fahrenheit) System unit Weight Unit To select the weight unit kg(kilogram)/lb(pound) Default set All parameters are reset to factory setting...
-
Page 40: Spo2 Monitor(Option)
Monitor(option) This symbol means that the Masimo product inside. BT-550 uses the Masimo SpO2 oximetry to monitor the oxygen saturation in the blood. You can find the detailed Masimo product information below. Patent information for Masimo product can be found at www.masimo.com/patents.htm. - Page 41 BT-550 Operation manual to the serial port. Leakage current must not exceed 100 microamperes. Connect the oximeter only to a three-wire, grounded, hospital-grade receptacle. The three-conducting plug must be inserted into a properly wired three-wire receptacle is not available, a qualified electrician must install one in accordance with the governing electrical code.
- Page 42 BT-550 Operation manual Do not autoclave or gas sterilize this oximeter. Do not soak or immerse the monitor in any liquid. Use the cleaning solution sparingly. Excessive solution can flow into the monitor and cause damage to internal components.
- Page 43 BT-550 Operation manual are suspected, laboratory analysis (CO-Oximetry) of a blood sample should be performed. Venous congestion may cause under reading of actual arterial oxygen saturation. Therefore, assure proper venous outflow from monitored site. Sensor should not be below heart level (e.g. sensor on hand of a patient in a bed with arm dangling to the floor).
- Page 44 The BT-550 MS board pulse oximeter assumes that arterio-venous shunting is highly variable and that fluctuating absorbance by venous blood is the major components of noise during the pulse. BT-550 MS board decomposes S(660) and S(905) into an arterial signal plus a noise component and calculates the...
- Page 45 BT-550 Operation manual The above equations are combined and a noise reference (N’) is determined: N’ = S(660) – S(905) x R If there is no noise N’ = 0: then S(660) = S(905) x R which is the same relationship for the traditional pulse oximeter.
- Page 46 BT-550 Operation manual Do not under any circumstances remove the grounding conductor from the power plug. Do not use extension cords or adapters of any type. The power cord and plug must be intact and undamaged. If there is any doubt about the integrity of the protective earth conductor arrangement, operate the oximeter on internal battery power until the AC power supply protective conductor is fully functional.
-
Page 47: Placing Infant And Moving Bt-550
BT-550 Operation manual Placing infant and moving BT-550 3.1 Placing infant (1) Pre-warm infant warmer. (2) Place the infant in the center of mattress. (3) Attach the skin temperature sensor to the appropriate part such as abdomen with adhesive tape. -
Page 48: Stand Caster Lock
BT-550 Operation manual 3.2.2 Stand caster lock At least two casters should be locked Caster unlocked before using. To lock the caster, depress the caster lock. To unlock the caster, raise above the caster lock. Caster locked Figure 2-11: Caster locks WARNING Always keep the caster locked for safety. -
Page 49: Maintenance And Cleaning
Service Department of Bistos when the device fault or malfunctioning. 4.2 Maintenance It is recommended to have a safety inspection every year regularly for the safe use of BT-550. Refer to the service manual for the inspection items and method. - Page 50 BT-550 Operation manual 4.3.1 Skin sensor - Clean the sensors with alcohol, or detergent or soap solution. - Apply the cleaning solution with a clean cloth or sponge, and dry all surfaces after cleaning with a clean soft cloth or paper towel.
-
Page 51: Trouble Shooting
Do not attempt to open the covers, disassemble or modify the infant warmer except the qualified person. It may cause safety hazard. Only the qualified Bistos service engineer must repair or replace the infant warmer or components. Please check before contact to Customer Service Department of Bistos for following cases... -
Page 52: Manufacturer's Declaration On Emc
EMC information provided in this user manual. Wireless communications equipment such as wireless home network devices, mobile phones, cordless telephones and their base stations, walkie-talkies can affect the BT-550 and should be kept at least 1 m away from the equipment. -
Page 53: Equipment And The Bt-550
6.2 Recommended separation distances between portable and mobile RF communications equipment and the BT-550 The BT-550 is intended for use in an electromagnetic environment in which radiated RF disturbances are controlled. The customer or the user of the BT-550 can help prevent... -
Page 54: Electromagnetic Immunity
BT-550 Operation manual Electromagnetic immunity The BT-550 is intended for use in the electromagnetic environment specified below. The customer or the user of the BT-550 should assure that it is used in such an environment. IEC 60601 Electromagnetic Immunity test... - Page 55 BT-550 Operation manual The BT-550 is intended for use in the electromagnetic environment specified below. The customer or the user of the BT-550 should assure that it is used in such an environment. Compliance Electromagnetic environment - Immunity test IEC 60601 test level...
-
Page 56: Technical Specifications
BT-550 Operation manual 7. Technical specifications Functional Characteristics Temperature Infrared Heater Operation Mode Manual Control 0 ~ 100%, 20levels -Prewarm (100% @28 ㎽/㎠) (Each of tolerance Range -Baby mode (100% @ 28 ㎽/㎠) range is ± 20%) -Manual (100% @ 8 ㎽/㎠) Skin Display Range 26 ~ 42°C ±0.3°C... - Page 57 BT-550 Operation manual Masimo Oximeter Saturation (% SpO 1% - 100% Range Pulse Rate (bpm) 25 - 240 Perfusion 0.02% - 20% Saturation (% SpO ) – During no motion conditions 70% - 100%, ± 3 digits Neonate 0% - 69%, unspecified Saturation (% SpO ) –...
-
Page 58: Product Warranty
Sales Agency Manufacture Bistos Co., Ltd. ※ Thank you for purchasing BT-550. ※ This product is manufactured and passed through strict quality control and inspection. ※ Compensation standard concerning repair, replacement, refund of the product complies with “Framework Act on Consumers” noticed by Fair Trade Commission of Republic of Korea.
Need help?
Do you have a question about the BT-550 and is the answer not in the manual?
Questions and answers