Table of Contents
Advertisement
Advertisement
Table of Contents

Related Manuals for Bush WO321


Summary of Contents for Bush WO321
- Page 1 Instruction manual WO321...
-
Page 2: Help And Guidance
You’ll soon be enjoying your new Stereo FM Radio. It all begins here, with your instructions. Don’t worry, there’s nothing too technical coming up. Just simple, step-by-step guidance to get you up and running quickly. Sound good? Then let’s get started. Help and Guidance We’re here to help you get the most from your Stereo FM Radio. -
Page 3: Table Of Contents
Contents Safety information Help and Guidance General safety information Power source Positioning the FM Radio Moisture and water Ventilation Heat sources and flames Getting to know your Stereo FM Radio Connection Inserting batteries (optional) Set the time Using headphones Using your Stereo FM Radio Power on Adjusting the volume Dim the display... - Page 4 Contents Snooze Sleep timer Cancel the Sleep timer Other information Technical specification Product support Troubleshooting Help and assistance Disposal Your Bush Guarantee...
- Page 5 This page is left intentionally blank section of these instructions, or online at www.argos-support.co.uk If you still require further assistance, call one of our experts on 0345 600 3021.
- Page 6 This page is left intentionally blank...
- Page 7 Safety information...
-
Page 8: General Safety Information
Safety information Important - Please read these instructions fully before installing or operating General safety information Keep the product and all its parts out of reach of small children. This product is not intended for use by persons (including children) with reduced physical, sensory or mental capabilities, or lack of experience and knowledge, unless they have been given supervision or instruction concerning the use of the appliance by a person responsible for their safety. -
Page 9: Positioning The Fm Radio
Safety information Important - Please read these instructions fully before installing or operating • The supply terminals are not to be short-circuited. • Remove the batteries from the Radio if they will not be used for an extended period of time. -
Page 10: Ventilation
Safety information Important - Please read these instructions fully before installing or operating Ventilation • Do not block or cover slots, holes or openings on the product by placing on soft furnishings such as carpets, rugs or beds as these are provided for functionality and/or ventilation to ensure safe operation of the product. - Page 11 This page is left intentionally blank section of these instructions, or online at www.argos-support.co.uk If you still require further assistance, call one of our experts on 0345 600 3021. Safety information...
- Page 12 This page is left intentionally blank...
-
Page 13: Getting To Know Your Stereo Fm Radio
Getting to know your Stereo FM Radio... - Page 14 Getting to know your Stereo FM Radio You’ll be up and running in no time Ready? Let’s begin... Please read these instructions carefully. They contain important information which will help you get the best from your product and ensure safe and correct installation and operation.
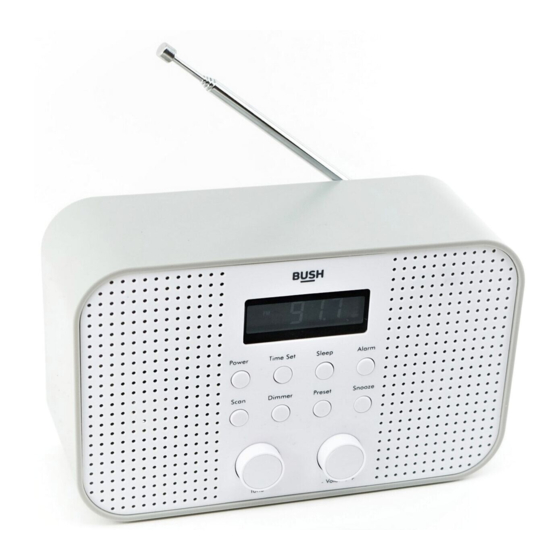
- Page 15 Getting to know your Stereo FM Radio You’ll be up and running in no time 1. Display 8. Scan 2. Rotary tune control • Short press: Scans up the FM frequency band. • Adjusts the FM frequency band in 0.05MHz steps •...
-
Page 16: Connection
Getting to know your Stereo FM Radio You’ll be up and running in no time Connection 1. Connect the mains power lead into the socket on the back of the Radio. 2. Plug the power adaptor into the mains power wall socket and switch on. The Radio display will turn on and 0:00 will be displayed. -
Page 17: Using Headphones
Getting to know your Stereo FM Radio You’ll be up and running in no time Using headphones You can connect headphones with a 3.5mm plug (not included) to your radio. The stereo headphone socket can be found on the back of the Radio, next to the power socket. When you have headphones connected the Radio speakers are switched off and all sound is via the headphones. - Page 18 This page is left intentionally blank...
-
Page 19: Using Your Stereo Fm Radio
Using your Stereo FM Radio... -
Page 20: Power On
Using your Stereo FM Radio Let’s get started Power on 1. Short press the Power button to switch on your Radio. An FM radio frequency, such as 87 . 5 will be displayed. Adjusting the volume • Turn clockwise to increase the volume. •... -
Page 21: Tuning To An Fm Station
Using your Stereo FM Radio Let’s get started Tuning to an FM station • Short press the Scan button to scan up the frequency band. • Long press the Scan button to scan down the frequency band. • Use the left hand rotary tune control to fine tune each frequency in 0.05MHz steps. Note: If reception is still poor try adjusting the aerial or moving the Radio to another location. -
Page 22: Setting Alarm 1 (Or 2)
Using your Stereo FM Radio Let’s get started Setting Alarm 1 (or 2) Note: Check that the Radio has the correct time before you set an alarm. Please remember to use 24 hour clock. 1. Long press the Alarm button. 0:00 or the time of the last alarm you set, will be displayed. -
Page 23: Snooze
Using your Stereo FM Radio Let’s get started Snooze When the alarm sounds you can short press the Snooze button. The Alarm 1 (or 2) bell symbol together with Zzz will flash in the display to indicate that the Snooze function has been activated. - Page 24 This page is left intentionally blank...
-
Page 25: Other Information
Other information... -
Page 26: Technical Specification
Other information Helpful technical information Technical specification Please use only the specified external adapter (OBELIEVE, Model name: 0501000B) Power adapter: Output DC 5V 1A Input AC 100-240V, 50/60Hz Batteries (not supplied): 4 x AA 1.5V, also known as LR-6 Headphone socket: 3.5mm Stereo Audio output: 2 x 2W RMS Frequency range:... - Page 27 This page is left intentionally blank section of these instructions, or online at www.argos-support.co.uk If you still require further assistance, call one of our experts on 0345 600 3021.
- Page 28 This page is left intentionally blank...
-
Page 29: Product Support
Product support... -
Page 30: Troubleshooting
Product support Help is always at hand Troubleshooting No sound / power: • Adjust the volume. • Check that the mains power wall socket is switched on and that your Radio is not in Standby mode. • If you have batteries fitted, they may be exhausted and need to be replaced. Please use only good quality AA size batteries. -
Page 31: Help And Assistance
Product support Help is always at hand Help and assistance If you require any technical guidance or find that your Stereo FM Radio is not operating as intended, a simple solution can often be found in the Troubleshooting section of these instructions or online at www.argos-support.co.uk If you still require further assistance, call one of our experts on 0345 600 3021*. -
Page 32: Disposal
Product support Help is always at hand Disposal • Disposal of your old product. Your product is designed and manufactured with high quality materials and components, which can be recycled and reused • When this crossed out wheeled bin symbol is attached to a product it means the product is covered by the European Directive 2012/19/EC. -
Page 33: Your Bush Guarantee
Call us now and activate your 12 month guarantee Thank you for choosing Bush. Your new product is guaranteed against faults and breakdowns for 12 months. Don’t forget to register it with us today so we can provide you with our best possible after-sales service and useful updates. - Page 34 This page is left intentionally blank...
- Page 35 This page is left intentionally blank...
- Page 36 Contact: www.argos-support.co.uk Helpline: 0345 600 3021...
Need help?
Do you have a question about the WO321 and is the answer not in the manual?
Questions and answers
my volume button is now freely spinning instead of making small clicks sounds while turning also not turning the volume down or up
If the volume button on your Bush WO321 is spinning freely and not adjusting the volume, the internal mechanism may be damaged or disconnected. In this case, the unit may require repair or replacement of the volume control component. If the device is still under warranty, contact the manufacturer or seller for support.
This answer is automatically generated