Epson R3000 Assembly Instructions Manual
Ink system
Hide thumbs
Also See for R3000:
- User manual (119 pages) ,
- Service manual (73 pages) ,
- Specifications (8 pages)
Advertisement
Quick Links
IMPORTANT
If your printer is new, set it up according to
the enclosed manufacturer's instructions.
This is a check to ensure your new printer
and drivers are working correctly before the
Eco-Flo System is installed.
It is ver y impor tant you r ead these instr uct ions car efully befor e you begin.
What you will need to Install the Eco-Flo R3000
Complete Eco-Flo R3000 kit
Scissors
Paper towels
Check Printer Condition
If you have a brand new printer, follow the Epson instructions for setting up your printer. Use the Epson cartridges
that came with the printer. Follow normal installation instructions for the software. Test the printer by printing
pictures. Learn how to use the Epson utilities to run a Nozzle pattern check and to run a Cleaning Cycle.
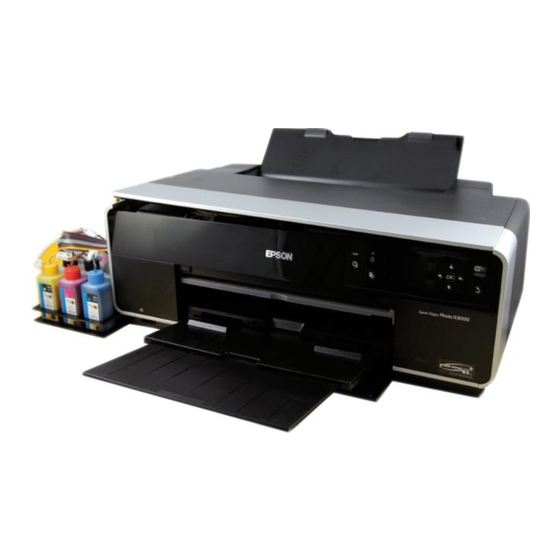
ECO-FLO CONTINUOUS INK SYSTEM
Assembly Instr uctions for
EPSON PRINTER
Make sure that the printer can produce a perfect nozzle pattern
before proceeding with Eco-Flo installation.
R3 0 0 0 Ink System
:
What is included in your Eco-Flo R3000 Kit
Injectors set with tubes and white clamps
Lid deactivation key
Set of 9 empty 100ml bottles
Set of 9 bottle caps & clear piping tubes
Bottle holder tray
1 grey tube clip with adhesive pad
2 lid support pads
Installation instructions and profiles CD
10ml syringe & wing adaptor
Pair of latex gloves
9x Image-life 125ml ink set
PermaJet A4 Media Test Pack
1
Per
maJet
Epson R3000
Part No. APJ28500
Version 3 – May 2013
Advertisement

Related Manuals for Epson R3000


Summary of Contents for Epson R3000
- Page 1 Check Printer Condition If you have a brand new printer, follow the Epson instructions for setting up your printer. Use the Epson cartridges that came with the printer. Follow normal installation instructions for the software. Test the printer by printing pictures.
-
Page 2: Step 3 Tube Preparation
If you have been using the printer in the past, just make sure it produces a perfect nozzle pattern before proceeding with the Eco-Flo installation. If the Nozzle pattern has any gaps whatsoever, then run cleaning cycles until it prints perfectly. - Page 3 Strip back all the tubes approximately 8 inches long. Please note when assembling the tubes to the bottle caps you may need to strip back more tubing in order for the bottles to be seated correctly within the bottle tray. Now that you have all the tubes stripped back, carefully cut 1cm off the ends of all the tubes...
- Page 4 Step 4 Bottle & Ink Preparation Locate the clear plastic piping and YELLOW coloured bottle cap, ensure that you locate and firmly push the piping inside the bottle cap as indicated below. Repeat this process for the rest of the bottle caps. Carefully fill all the bottles with the correct inks ensuring that this is cross referenced with the bottle labels and screw the caps firmly, do not over tighten.
- Page 5 Step 5 Positioning the Ink Bottles in the Tray You are now ready to position the ink bottles in the bottle holder as indicated below. Please note that all inks should be on the same level as the printer whilst printing. VLTM Assembling the Tubing to the Bottle Caps Feed the white tube clamp through the tube, starting with the Yellow...
- Page 6 Ensure that you push the tube flush against the surface of the bottle cap as illustrated, repeat the above and below process for the rest of the tubes so you finish up with a complete set of tubes connected to the correct ink bottles IMPORTANT Tube must be flush against the surface of...
- Page 7 Removing the R3000 cartridge lid Watch the video on the CD and carry out the action of cartridge lid removal on your Epson R3000 titled “PermaJet R3000 cartridge lid removal”. Remove all original Epson cartridges and store away for possible future use, they will ‘self-seal’ when removed and are best to keep in a plastic bag.
- Page 8 Install the lid de-activation key supplied to ensure complete deactivation of both the cartridge lid and the main printer lid. Locate the grey clip and attach this as per the diagram below along with the first foam strip - the purpose of this is to allow the printer lid to seat without putting pressure on the tubes.
- Page 9 Resetting the ink levels: This is very simple on the R3000 system; simply remove the lid deactivation key as mentioned on the previous page. Press and hold the relevant reset button for a count of 10, release the button and refit the deactivation key.
- Page 10 10cm, you may wish to re-prime the line using your syringe. Air gaps in R3000 tubing is not uncommon and not something to be overly concerned about. KEEP THE WHOLE UNIT, PARTICULARLY THE INKS, OUT OF DIRECT SOURCES OF HEAT FOLLOW EPSON’S ROUTINE MAINTENANCE ADVICE…...
- Page 11 There is a CD supplied with your kit containing; Eco-Flo Installation Instructions for all types of printers and systems Instructional videos and help files ICC Profiles for use with PermaJet Colour Ink and Paper combinations Ink Test Files and Purge pages Custom ICC Profiling target patches and instructions In order to use the PermaJet ink system to its full potential, you should now take the time to open the enclosed CD and proceed to read the full section on PROFILES and the...
Need help?
Do you have a question about the R3000 and is the answer not in the manual?
Questions and answers