Table of Contents
Advertisement
Quick Links
Advertisement
Table of Contents

Related Manuals for Meiji Techno MT-420 Series


Summary of Contents for Meiji Techno MT-420 Series
- Page 1 User Manual for MT - 420 and MT - 430 Series...
- Page 2 INTRODUCTION Thank you for purchasing the MT - 420 and MT - 430 Series. The MT - 420 and MT - 430 Series has been designed with all kinds of Life Sciences applications and great durability in mind. This resulted in a modern, robust and high-level microscope for advanced use, equipped with the best optical and mechanical components.
-
Page 3: Table Of Contents
INDEX Notes on handling the Safety ......................4 Components of the microscope ......................6 Preparing the MT - 420/MT - 430 for use .................... 7 Assembling Steps ............................8 Operation ............................. 9 Place the specimen slide ..........................9 Focusing and slide protection ........................10 Adjusting the focusing tension ........................ -
Page 4: Notes On Handling The Safety
NOTES ON HANDLING AND SAFETY Handle with care • This product is high quality optical instrument. Delicate handling is required. • Avoid subjecting it to sudden shocks and impact. • Impacts, even small ones, can affect the precision of the objective. Handling the LED Note: Always disconnect the power cord from your microscope before handling the LED bulb and power unit and allow the system approximately 35 minutes to cool down to avoid burns. - Page 5 Environment, storage and use (continued) • Make sure that the microscope system can dissipate its heat. • Keep the microscope approximately 15cm free from walls and obstructions. • Never turn the microscope on when the dust cover is in place or when items are placed on the microscope.
-
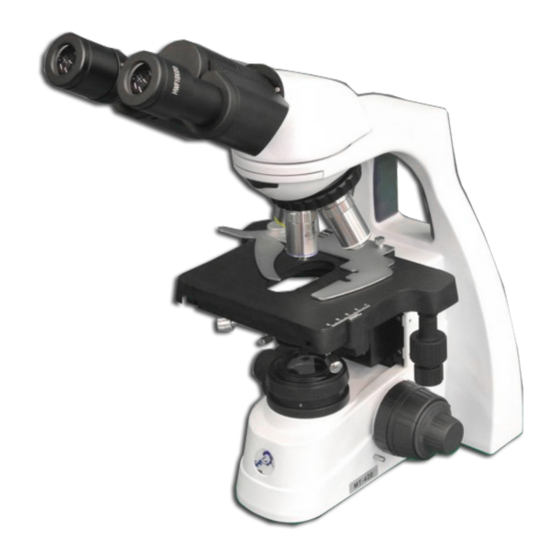
Page 6: Components Of The Microscope
COMPONENTS OF THE MICROSCOPE The names of the components are listed below and are indicated in the picture Microscope head Collector lens Eyepieces Trinocular tube Diopter adjustment Light intensity adjustment knob Nosepiece Coaxial coarse adjustment Objectives Slide protection handle Stage with X-Y mechanical stage Condenser height control X-Y stage controls Slide for polarization filter... -
Page 7: Preparing The Mt-420/Mt-430 For Use
PREPARING THE MT-420/MT-430 FOR USE Carefully remove the items from its packaging and place them on a flat, firm surface. Please do not expose the microscope to direct sun light, high temperatures, damp, dust or acute shake. Make sure the table or surface is flat and horizontal. When moving the microscope, use the left hand to hold the transport handle and with hold the base of the microscope with the right hand. -
Page 8: Assembling Steps
ASSEMBLING STEPS We always try to keep the number of assembly steps for their customers as low as possible but in some cases there are some steps to be taken. The steps mentioned below are often not necessary but described for your convenience nonetheless. Mounting the objectives 1. -
Page 9: Operation
OPERATION Setting up the illumination For optimal contrast and resolution one should follow the below procedure: • Place a specimen on the object stage and focus using the 4X objective with a fully opened iris diaphragm. • Turn light intensity to lowest position, then look through the eyepiece(s) and turn up to the comfortable light intensity level. -
Page 10: Focusing And Slide Protection
Focusing and slide protection Select the 4X objective and make sure that it is placed correctly in the optical path. Rotate the position screw to top, observe the right eyepiece with your right eye. Rotate the coarse focusing knob until the image appears. Rotate the fine focusing knob to sharpen the image. -
Page 11: The Interpupillary Distance
Eyepieces Using a binocular (or trinocular) tube is less tiring for the eyes than a monocular tube. In order to obtain a smooth “compound” image, we recommend you to go through the below steps. 1. The interpupillary distance The correct interpupillary distance is reached when one round image is seen in the field of view (see image below). -
Page 12: Adjusting The Diopter
3. Adjusting the diopter • Set diopter adjustment ring to zero. • Close the left eye and focus the right tube by adjusting the coarse and fine adjustment knobs. • Close the right eye and focus the left tube with the diopter adjustment ring. This procedure should be followed by each individual user. -
Page 13: Use Of The S100X Oil-Immersion Objective
Use of the S100x oil-immersion objective The MT - 420 and MT - 430 microscopes are equipped with an S100X N.A. 1.25 oil immersion objective. Please follow the below instructions on how to use this objective: Remove the dust protection cap from the revolving nosepiece to mount the S100X objective. Focus the image with the S40X objective. -
Page 14: Phase Contrast
PHASE CONTRAST (OPTIONAL) Use of phase contrast with the MT-420 and MT-430 microscope The phase contrast method was designed in 1934 by the Dutchman Frits Zernike to observe very thin or transparent objects. This technique uses the fact that light traveling through tissue undergoes a phase shift due to diffraction. -
Page 15: Aligning The Phase Rings
Aligning the phase rings To center: Rotate 10X infinity plan phase contrast objective into the field of view, then set the Zernike phase disc to position “10” to match the objective. Take the eyepiece out of the tube and insert centering telescope in its place. When looking through the centering telescope, the dark and bright ring images should coincide with each other as shown in the figures below. -
Page 16: Using The Phase Contrast Slider Condenser (Optional)
USING THE PHASE CONTRAST SLIDER CONDENSER (OPTIONAL) Keep the phase contrast slider face up (text up); insert it from left to right into the condenser slider socket as the direction of the arrow pointed. Each slider has 3 positions, 2 phase contrast positions and in the center of the slide the bright field position for normal use without phase contrast. -
Page 17: Maintenance And Cleaning
MAINTENANCE AND CLEANING Always place the dust cover over your MT-420/MT-430 microscope after use. Always keep the eyepiece and objectives mounted on the microscope to avoid dust entering the instrument. Cleaning the optics When the eyepiece lens or front lens of the 10X or S40X objective are dirty, they can be cleaned by wiping a piece of lens paper over the surface (circular movements). -
Page 18: Replacing The Fuse
Replacing the fuse To change the fuse, please follow these procedures: Remove the power cord from the back of the microscope. Locate the fuse compartment, which has a Fuse image. It is typically located beneath the power connector. Remove the fuse compartment. To do so, insert a flat head screw driver between the metal power tines and gently pry the fuse compartment loose with a slight down and out motion. -
Page 19: Using The Kensington Security Slot
Using the Kensington Security Slot At the back of the microscope a Kensington Security Slot is placed, which can be used to secure the instrument from theft using a Kensington lock (not supplied) -
Page 20: Digital Cameras
DIGITAL CAMERAS Digital cameras are designed to be used on the photo port of the microscope head. It is also possible to use the digital camera in combination with a binocular head. To use the camera on a binocular MT-420, you can simply remove the eyepiece[1] and then place the camera with mount- ed c-mount adapter into the eyepiece tube[2].
Need help?
Do you have a question about the MT-420 Series and is the answer not in the manual?
Questions and answers