Table of Contents
Advertisement
Advertisement
Table of Contents

Related Manuals for Kinesis KB133PC


Summary of Contents for Kinesis KB133PC
- Page 1 Kinesis Contoured PS/2 ® ™ Ergonomic Keyboard Family USER’S MANUAL...
- Page 3 Professional, KB134PC Professional QD, KB134PC/QD June 2005 Edition © 1996-2005 Kinesis Corporation, Bothell, Washington USA. All rights reserved. Printed in the U.S.A. on recycled paper. Please recycle! Kinesis is a registered trademark and Contoured, Essential, Advantage, MPC, QD and HumanKind are trademarks of Kinesis Corporation. Windows is a trademark of Microsoft Corporation.
- Page 4 FEDERAL COMMUNICATIONS COMMISSION RADIO FREQUENCY INTERFERENCE STATEMENT Note This equipment has been tested and found to comply with the limits for a Class B digital device, pursuant to Part 15 of the FCC Rules. These limits are designed to provide reasonable protection against harmful interference when the equipment is operated in a residential installation.
-
Page 5: Table Of Contents
TABLE OF CONTENTS Health and safety warning ............. 6 Read-me-first ................. 7 Chapter One: Quick tour ............9 Chapter Two: Installation ............. 17 Chapter Three: Adaptation guidelines ........19 Chapter Four: If you are injured ........... 21 Chapter Five: Customizing your keyboard ......23 Chapter Six: Technical support, repairs, accessories, and upgrades ................. -
Page 6: Health And Safety Warning
Kinesis Corporation bases its product designs on research, proven features and user evaluations. However, because of the complex set of factors believed to contribute to computer-related injuries, the company can make no warranty that its products will prevent or cure any physical ailment. -
Page 7: Read-Me-First
— and for those who do! Welcome to the HumanKind™ environment of the Kinesis® contoured ergonomic keyboard. Designed to fit the shape and movements of your body, the Kinesis contoured keyboard can significantly reduce the physical demands of keyboard use. And while this keyboard may look quite different from your traditional keyboard, you’ll find that... - Page 8 However, years of experience has shown us that most users find it easy and rapid – just try to schedule your first experience with the Kinesis keyboard during a period when you are not operating under a tight production deadline. The tension resulting from adjusting to new equipment when under pressure can lead to unnecessary frustration and even to physical discomfort.
-
Page 9: Chapter One: Quick Tour
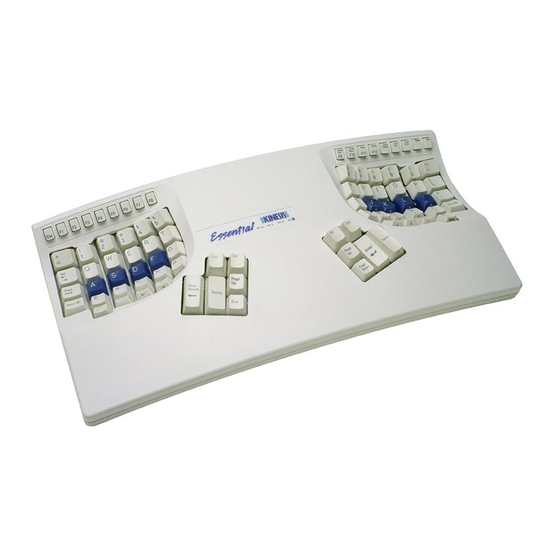
In a liberating departure from the constraints of a traditional, flat keyboard, the sculpted lines of the Kinesis Contoured keyboard fit the shape and movements of your body — reducing the physical demands of keyboarding. While it may look very different from the keyboard you have been using, you’ll find that making the transition... - Page 10 Familiar key layout (QWERTY standard, Dvorak available) Kinesis Contoured keyboards retain the familiar QWERTY key layout. Sevl changes in the location of non-letter keys reduce the work required of your overworked little fingers and increase the workload for your stronger thumbs. Optional foot switches can further reduce the work demanded of your hands and fingers.
- Page 11 Reference drawings of traditional keyboard Compare the Kinesis QWERTY layout with the alphanumeric and editing portions of traditional US and US International Windows keyboards (opposite). Traditional PC (Windows) keyboard International traditional keyboard (note new “International key” next to left Shift key)
- Page 12 Backspace are scattered around the edges of the alphanumeric keys. Reaching for these keys wastes time and can overwork your little fingers, as well as causing stressful wrist and hand motions. The Kinesis keyboard relocates these keys to two thumb-operated keypads.
- Page 13 Thumb keys (may also be activated with fingers) Important note: Move your hands and forearms, if necessary, to reach keys on the thumb keypads without stretching your thumbs or bending your wrists. If you prefer, you can activate thumb keys with your index fingers. If your thumbs are sensitive, see C for tips on reducing or HAPTER...
- Page 14 Keypad. The Keypad function key acts as a toggle key to activate the “embedded layer” of the keyboard, including the embedded numeric keypad. Except for the embedded numeric keypad and embedded right function keys, most embedded keys have the same actions as the top level keys, but can be reprogrammed to be different.
- Page 15 Keypad key or by an optional foot switch, and includes a numeric keypad (right) with the 10-key section on a traditional keyboard. The Kinesis keypad uses the “Space” key for “0" and includes an “=” key in the embedded numeric keypad on the right side.
- Page 16 There are four small, green, light emitting diode (LED) status indicators near the center of the Kinesis keyboard. The far left (“A”) is Caps Lock, with Num Lock (“1”) next. Num Lock is normally always on by default for most computers. Do not be concerned about this, as LEDs last a very long time and consume very little power.
-
Page 17: Chapter Two: Installation
HAPTER NSTALLATION Attach the Kinesis keyboard to a compatible computer in the same way you would attach a traditional PS/2 keyboard. No drivers are required other than what is provided by your operating system. Be sure to shut down your computer before connecting any PS/2 device to avoid the risk of damage. - Page 18 Starting to type To start typing, place your fingers on the Kinesis home row keys (the blue key caps). Relax your right thumb over the Space key and your left thumb over Backspace.
-
Page 19: Chapter Three: Adaptation Guidelines
Typical adaptation period You will need a little time to adjust to the new shape of the Kinesis keyboard, but not much. Laboratory studies and many years of experience show that most new users of Kinesis contoured keyboards are productive (approximately 80% of full speed) within the first few hours. - Page 20 Don’t overdo it at first Using typing exercises and other drills is physically taxing. Take frequent rest breaks. Limit your typing speed for the first few hours as you adapt to the Kinesis keyboard. Initial awkwardness, fatigue, discomfort At first, you probably will experience some awkwardness when using the Kinesis contoured keyboard.
-
Page 21: Chapter Four: If You Are Injured
HAPTER F YOU ARE INJURED The Kinesis keyboard is designed to reduce the physical stresses that all keyboard users experience — whether or not they are injured. Of course, ergonomic keyboards are not medical treatments, and no keyboard can guarantee to cure injuries or prevent injuries in the future. - Page 22 If you have not been using a keyboard regularly, build up slowly. Remember, even if you are symptom free after using the Kinesis keyboard for a period of time, you are still susceptible to injury. Do not dramatically increase your keyboarding time or stop treatments without consulting your health care professional.
-
Page 23: Chapter Five: Customizing Your Keyboard
The Essential model will revert to having tones active after a restart. Note: Most experienced Kinesis keyboard users find that leaving on the key click function makes it easier to use the function keys. You can also use the “click” to train yourself to type on the full travel keys with minimal force. - Page 24 down the Progrm key and tapping F9, the lights will begin flashing. Tap one of the function keys (F1 through F12, where F1 is the slowest and F12 is the fastest) to set the keyboard repeat rate. On an Essential keyboard, this process must be repeated each time the computer is re-booted.
- Page 25 Keyboard model 24 macro mode 36 macro mode 48 macro mode Classic Professional Performing the memory mode change Before performing this configuration change, review “Performance limitations at higher macro settings,” below. If you decide to proceed, press and hold the “Progrm”...
- Page 26 Activating on-board Dvorak layout (Progrm + Ctrl + F5) Activating on-board Dvorak is basically a “global remap” of the keyboard, so any other remapping that you may have done is erased. If you want to customize the keyboard and switch back and forth between QWERTY and Dvorak, use macros to make your special changes.
- Page 27 Customizing a foot switch action (up to three foot switches supported) If you have a single Kinesis foot switch, you can instantly use it to “shift” the embedded keypad to the active state. If you have two or three foot switch pedals along with a special “splitter”...
-
Page 28: Chapter Six: Technical Support, Repairs, Accessories
Two ways to achieve “sticky keys” Intentional “sticky keys” can be established two different ways: (1) using on-board programmability, or (2) using utilities available in most operating systems (use Accessibility Options in Windows control panel). Note: With the “on-board programmability” version of sticky keys, a sticky modifier will only act as a modifier for the first keystroke of the key being modified. -
Page 29: And Upgrades
When you contact Kinesis, please provide your name, address and the serial number of your keyboard. If you are shipping the keyboard to Kinesis, you will be provided with a Returned Merchandise Authorization (RMA) number and shipping instructions. - Page 30 Kinesis. Before returning any Kinesis product... Before returning any Kinesis product for repair, replacement, or refund, you must contact Kinesis to provide essential information and to receive a Returned Merchandise Authorization (RMA) number plus additional instructions. Be sure to write your RMA number on the outside of your package near the address label and purchase insurance from the carrier.
-
Page 31: Chapter Seven: Caring For Your Keyboard
Do not use the keyboard until it has dried completely. If you spill water on your Kinesis keyboard, tilt the keyboard so that the liquid can drain. Avoid getting the function keys wet in the process. Shake the keyboard vigorously to remove liquid trapped inside the switches. - Page 32 Product, contact Kinesis Technical Support. If you wish to return the Product to Kinesis for any reason, you must obtain from Kinesis an RMA number and instructions for returning the product. You are responsible for the cost of shipping the product to Kinesis.
-
Page 33: Ergonomic Guidelines For Computer Workstations
In fact, hand and arm injuries can result from elements of your workstation other than your keyboard. To enhance the comfort of your work environment, Kinesis has joined with Herman Miller, Inc. to provide guidance for creating an ergonomically appropriate workspace. - Page 34 ANSI-Recommended Seating 1. Seat height should range from 16” to 20.5”. This refers to how high the chair seat should be with a person’s weight pressing on the cushions. 2. Seat depth for chairs with rectangular cushions or chairs made of hard materials should range from 15” to 17”.
- Page 35 There should be at least 12.2” of front-to-back clearance at knee height, measured from underneath the front edge of the work surface back toward the wall supporting the work surface. Taller people will need more clearance. Now adjust your Kinesis keyboard and computer monitor. Adjusting your Keyboard Adjust the angle and height of your keyboard so that the front of the keyboard is approximately at the same height as your elbows.
-
Page 36: Appendix
PPENDIX B PC INTERNATIONAL KEY ACTIONS FOR WINDOWS OPERATING SYSTEMS The key to the left of Left arrow ( is the “International key,” which changes with the country established for your keyboard in the control panel. Alt Gr note: When a non-US keyboard driver is selected, the right Alt key on a traditional keyboard becomes a new kind of modifier, “Alt Gr.”... -
Page 37: Index
Index Accuracy, typing ............19 Adaptation period . - Page 38 Returning any Kinesis product........
Need help?
Do you have a question about the KB133PC and is the answer not in the manual?
Questions and answers