Chapters
Table of Contents

Related Manuals for Buffalo GK640-E


Summary of Contents for Buffalo GK640-E
- Page 1 GK640-E GK641-E Mikrowellengerät zur gewerblichen Nutzung Bedienungsanleitung Dieses Handbuch ist zu 100 % auf Recyclingpapier gedruckt. GK640-E_GK641-E_XEU_DE68-04279B-01_DE.indd 1 2014-06-27 6:48:59...
-
Page 2: Table Of Contents
Inhalt Sicherheitsinformationen Sicherheitsinformationen ................2 ZU DIESER BEDIENUNGSANLEITUNG Funktionen des Geräts ................11 Sie haben ein Mikrowellengerät von Buffalo erworben. Gerät ....................11 Die Bedienungsanleitung enthält nützliche Informationen zur Verwendung Bedienfeld ...................12 des Mikrowellengeräts: Display ....................12 • Sicherheitshinweise Verwenden des Geräts ................13 •... - Page 3 WICHTIGE SICHERHEITSHINWEISE WARNUNG: Dieses Gerät darf von Kindern ab LESEN SIE DIE FOLGENDEN HINWEISE 8 Jahren und Personen mit verminderten körperlichen, AUFMERKSAM DURCH, UND sensorischen oder geistigen Fähigkeiten oder einem BEWAHREN SIE SIE SO AUF, DASS SIE Mangel an Erfahrung und Wissen bedient werden, SIE SPÄTER SCHNELL WIEDERFINDEN.
- Page 4 WARNUNG: Beim Erhitzen von Getränken im Dieses Gerät ist nicht zum Gebrauch durch Personen Mikrowellengerät kann es zu verzögertem Sieden und (auch Kinder) mit verminderten körperlichen, damit verbundenem Spritzen kommen. Das Behältnis sensorischen oder geistigen Fähigkeiten oder einem muss deshalb vorsichtig herausgenommen werden. Mangel an Erfahrung und Wissen bestimmt.
- Page 5 Wenn das Gerät ungewöhnliche Geräusche, WARNUNG: Das Gerät und seine zugänglichen Teile Brandgeruch oder Rauch entwickelt, trennen Sie können während des Betriebs heiß werden. sofort die Stromversorgung und wenden Sie sich an Es ist Vorsicht geboten, damit Sie die Heizelemente Ihr nächstgelegenes Kundendienstzentrum.
- Page 6 AUFSTELLEN DES MIKROWELLENGERÄTS Benutzen Sie keine scharfen Scheuermittel oder Metallschaber, um den Glaseinsatz der Gerätetür zu Stellen Sie das Gerät auf einer ebenen und reinigen. Sie könnten die Oberfläche zerkratzen und waagerechten Fläche in einer Höhe von 85 cm damit das Glas zerbrechen lassen. auf.
- Page 7 Stecken Sie den Netzstecker zu Ihrer eigenen IMMER sauber sind und die Gerätetür Sicherheit nur in eine ordnungsgemäße und ordnungsgemäß schließt. geerdete Wechselstromsteckdose. Wenn das Gerät nicht sauber gehalten wird, kann Stellen Sie das Mikrowellengerät nicht in einer die Oberfläche beschädigt werden. Dies wirkt sich heißen oder feuchten Umgebung auf, z. B.
- Page 8 Aus Sicherheitsgründen darf die Glühlampe MIKROWELLENGERÄTS nicht selbst ausgetauscht werden. Wenden Sie Bei der Lagerung und Wartung Ihres sich an das nächstgelegene autorisierte Buffalo- Mikrowellengeräts sollten einige einfache Kundendienstzentrum, um die Glühlampe von Vorsichtsmaßnahmen beachtet werden. qualifiziertem Fachpersonal ersetzen zu lassen.
- Page 9 Stellen Sie dieses Gerät weder auf unebenem Untergrund noch Verwenden Sie niemals beschädigte Netzstecker und Netzkabel in der Nähe von Heizkörpern oder entflammbaren Materialien, an oder eine lose Steckdose. Wenn das Netzkabel bzw. der Stecker einem feuchten, öligen oder staubigen Ort oder an einem Platz auf, beschädigt sind, wenden Sie sich an Ihr nächstgelegenes der direktem Sonnenlicht oder Wassereinwirkungen ausgesetzt ist Kundendienstzentrum.
- Page 10 Verwenden Sie das Mikrowellengerät nicht zum Frittieren, da die Rühren Sie Flüssigkeiten nach der Hälfte oder nach Ablauf der Temperatur des heißen Öls nicht ausreichend kontrolliert werden Garzeit um, und lassen Sie sie mindestens 20 Sekunden lang kann. Dadurch kann es zu einem plötzlichen Überkochen von stehen, um ein Überkochen zu vermeiden.
-
Page 11: Funktionen Des Geräts
Buffalo erhebt Gebühren für den Austausch eines Zubehörteils oder das Beheben kosmetischer Fehler, Funktionen des Geräts wenn der Schaden am Gerät und/oder am Zubehörteil oder dessen Verlust auf ein Verschulden des Kunden zurückzuführen ist. Zu den von dieser Bestimmung betroffenen Teilen gehören: GERÄT... -
Page 12: Bedienfeld
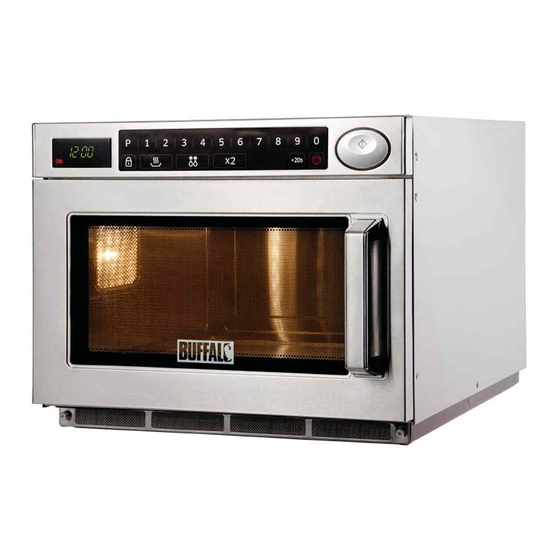
BEDIENFELD DISPLAY 1. DISPLAY 6. AUFTAUSTUFE 2. PROGRAMMAUSWAHLTASTE 7. DOPPELTE MENGE 3. ZIFFERNTASTEN 8. +20s-TASTE (Zeit, Programmspeicherung) (Garen mit einem Tastendruck) 4. TASTENSPERRE 9. ABBRECHEN 1. PROGRAMMANZEIGE (PROG) 5. LEISTUNGSSTUFE 10. START 2. ZEITANZEIGE 3. LUFTFILTERKONTROLLANZEIGE 4. PROGRAMMNUMMERNANZEIGE 5. NETZKONTROLLANZEIGE (Heizung außer Betrieb, wenn sie leuchtet) 6. -
Page 13: Verwenden Des Geräts
Zum Beispiel: Wenn auf der Verpackung angegeben ist, dass Sie bei einem Gerät der Kategorie D eine Garzeit von 3 Minuten bei Leistungsstufe „HOCH“ einstellen sollen, so müssen Sie bei den Modellen GK640-E (Kategorie E) bei Leistungsstufe „HOCH“ die 3. Drücken Sie die Taste START. - Page 14 Garen in mehreren Schritten Sobald die Zeit vollständig abgelaufen ist, ertönt viermal ein Signalton und der 1. Wählen Sie die gewünschte Betriebsart und Garvorgang wird beendet. Leistungsstufe aus, indem Sie entweder die Taste für die Die Gerätelampe erlischt. Eine Minute lang wird im Display die Meldung „0“ LEISTUNGSSTUFE oder die AUFTAUSTUFE drücken.
-
Page 15: Leistungsstufen Und Unterschiedliche Garzeiten
LEISTUNGSSTUFEN UND UNTERSCHIEDLICHE BEENDEN/UNTERBRECHEN DES GARVORGANGS GARZEITEN Sie können die Garvorgang jederzeit unterbrechen, um: • den Garzustand der Nahrungsmittel zu überprüfen, Mit Hilfe der Leistungsstufen können Sie die abgegebene Energiemenge einstellen, anhand derer die benötigten Gar- oder Aufwärmzeiten entsprechend der Art und Menge •... -
Page 16: Verwenden Der Taste +20Sek
VERWENDEN DER TASTE +20SEK. AUFTAUEN Diese Taste dient zum GAREN MIT EINEM TASTENDRUCK. Mit Hilfe der Auftaufunktion können Sie Fleisch, Geflügel und Fisch auftauen. Wenn Sie diese Taste einmal drücken, wird der Garvorgang unverzüglich gestartet. Verwenden Sie nur mikrowellengeeignetes Geschirr. Sie können die Garzeit während des Garvorgangs verlängern, indem Sie für jeweils Öffnen Sie die Gerätetür. -
Page 17: Programmspeicherung
PROGRAMMSPEICHERUNG Ein Schritt Stellen Sie durch ggf. mehrmaliges Drücken der Taste für LEISTUNGSSTUFE oder AUFTAUSTUFE die gewünschte Betriebsart und Leistungsstufe ein. 1. Drücken Sie bei gedrückter Taste für die TASTENSPERRE auf die PROGRAMMAUSWAHLTASTE. Halten Sie beide Tasten 2 Sekunden lang gedrückt. Ergebnis: Im Display leuchtet die Anzeige PROG Die maximalen Zeiten für die verschiedenen Leistungsstufen sind unter der Überschrift „Leistungsstufen und unterschiedliche Garzeiten“... - Page 18 Mehrere Schritte Achten Sie darauf, fest auf die Tasten zu drücken. 1. Drücken Sie bei gedrückter Taste für die TASTENSPERRE auf die PROGRAMMAUSWAHLTASTE. Halten Sie beide Stellen Sie durch ggf. mehrmaliges Drücken der Taste für LEISTUNGSSTUFE oder Tasten 2 Sekunden lang gedrückt. AUFTAUSTUFE die gewünschte Betriebsart und Leistungsstufe ein.
-
Page 19: Verwenden Der Gespeicherten Programme
VERWENDEN DER GESPEICHERTEN PROGRAMME PROGRAMMIEREN DER TASTE FÜR DIE DOPPELTE MENGE Nachdem Sie die Programmspeicherung abgeschlossen haben, müssen Sie lediglich durch Drücken der ZIFFERNTASTEN die Nummer des gewünschten Programms eingeben. Das Gerät startet automatisch den Betrieb entsprechend der eingestellten Zeit 1. -
Page 20: Einstellen Des Signaltons
Bearbeiten des Mengenfaktors durch Drücken der Tasten in der folgenden Reihenfolge: Snd 0 (Ton 0) Snd 1 (Ton 1) Snd 2 (Ton 2) Snd 3 (Ton 3) Snd 0 (Kein Ton) Funktion Tasteneingabe Display Hinweis Als Standardwert ist „Snd 2 (Ton 2)“ eingestellt. Drücken Sie bei gedrückter Taste für Halten Sie beide Tasten 2 Sekunden... -
Page 21: Verborgene Tastenfunktionen
VERBORGENE TASTENFUNKTIONEN PFLEGE DES MIKROWELLENGERÄTS Hinweis: Drücken Sie bei gedrückter Taste 1 die zweite Taste. Halten Sie beide Reinigen des Mikrowellengeräts Tasten 2 Sekunden lang gedrückt. 1. Ziehen Sie den Netzstecker aus der Steckdose, ehe Sie das Gerät reinigen. Tasteneingabe 2. -
Page 22: Reinigen Der Deckenverkleidung
REINIGEN DER DECKENVERKLEIDUNG INSTALLATIONSHINWEISE BEI STAPELUNG Wichtig 1. Fassen Sie die Deckenverkleidung an den beiden seitlichen Haltern, und ziehen Sie sie zur Garraummitte und gleichzeitig nach unten. 1. Ziehen Sie den Netzstecker aus der Steckdose, ehe Sie mit der Installation Nehmen Sie die Deckenverkleidung dann aus dem Garraum. -
Page 23: Ersetzen Der Glühlampe
ERSETZEN DER GLÜHLAMPE Informationen zum Geschirr Wichtig Für die Zubereitung von Nahrungsmitteln in einem Mikrowellengerät müssen die Mikrowellen die Nahrungsmittel durchdringen können, ohne dabei vom verwendeten 1. Entfernen Sie die Befestigungsschraube an der Lampenabdeckung. Geschirr reflektiert oder absorbiert zu werden. Deshalb muss das Geschirr sorgfältig ausgewählt werden. -
Page 24: Zubereitungshinweise
Zubereitungshinweise Mikrowellen- T: Tiefgefroren K: Gekühlt Geschirr Kommentare geeignet Leistungs- Zeit Gericht Vorgehensweise Ruhezeit Metall stufe 1850 W 1500 W 1300 W ✗ • Geschirr Kann zu Funkenbildung oder Feuer führen. BROT UND KUCHEN ✗ • Verschlussdrähte für Auftauen Wiener Brot 9" (T) AUFTAUEN 45 Sek. - Page 25 T: Tiefgefroren K: Gekühlt Leistungs- Zeit Leistungs- Zeit Gericht Vorgehensweise Ruhezeit Gericht Vorgehensweise Ruhezeit 1850 W 1500 W 1300 W 1850 W 1500 W 1300 W stufe stufe SNACKS & VORSPEISEN Backbohnen 250 g Abdecken und HOCH 1 Min. 1 Min. 1 Min.
- Page 26 T: Tiefgefroren K: Gekühlt Leistungs- Zeit Leistungs- Zeit Gericht Vorgehensweise Ruhezeit Gericht Vorgehensweise Ruhezeit 1850 W 1500 W 1300 W stufe 1850 W 1500 W 1300 W stufe Brokkoli, Röschen 60 ml bzw. 4 EL HOCH 3 Min. 3 Min. 3 Min.
-
Page 27: Fehlerbehebung Und Fehlercodes
3 Min. 3 Min. 4 Min. nach der Hälfte der HOCH 2 Min. Wenden Sie sich an das nächstgelegene autorisierte Buffalo-Kundendienstzentrum, 00 Sek. 30 Sek. 00 Sek. Zeit umrühren. um die Glühlampe von qualifiziertem Fachpersonal ersetzen zu lassen. Reis, 500 g Das Gerät verursacht Störungen bei Radio- oder Fernsehgeräten. -
Page 28: Fehlercodes
Kundendienst. Abluft zu heiß 2 Sekunden langer Der Garraum wird zu heiß, weil das Gerät zu Setzen Sie sich bei Fragen oder Hinweisen zu Produkten von Buffalo mit dem durchgehender lange ohne oder mit nur geringer Heizlast Buffalo-Kundendienstzentrum in Verbindung. -
Page 29: Technische Daten
Technische Daten Buffalo ist ständig darum bemüht, seine Produkte zu verbessern. Aus diesem Grunde Fehler Code Signalton Ursache behält sich Buffalo Änderungen am Design und an Bedienungsanleitungen vor. HVT-I-Leistung 2 Sekunden langer Die Schaltungen im Geräteinneren Gemäß der allgemeinen Regelung 2/1984 (III.10) BKM-IpM bestätigen wir als Händler durchgehender funktionieren nicht korrekt. - Page 30 NOTIZEN NOTIZEN GK640-E_GK641-E_XEU_DE68-04279B-01_DE.indd 30 2014-06-27 6:49:11...
- Page 31 NOTIZEN NOTIZEN GK640-E_GK641-E_XEU_DE68-04279B-01_DE.indd 31 2014-06-27 6:49:11...
- Page 32 Setzen Sie sich bei Problemen mit dem Gerät mit dem Buffalo- Kundendienstzentrum in Verbindung. FRAGEN ODER HINWEISE LAND RUFEN SIE UNS AN ADRESSE Buffalo. Fourth Way, Avonmouth, Bristol, The United Kingdom 0845 146 2887 BS11 8TB, The United Kingdom. Nederland...
- Page 33 GK640-E GK641-E Horno microondas comercial Manual de instrucciones Este manual está impreso en papel 100 % reciclado. GK640-E_GK641-E_XEU_DE68-04279B-01_ES.indd 1 2014-06-27 6:49:49...
-
Page 34: Información De Seguridad
Información de seguridad................2 USO DE ESTE MANUAL DE INSTRUCCIONES Funciones del horno ..................11 Acaba de adquirir un horno microondas Buffalo. El manual de instrucciones Horno ....................11 contiene importante información sobre la cocción con el horno microondas: Panel de control ...................12 •... - Page 35 INSTRUCCIONES IMPORTANTES DE SEGURIDAD ADVERTENCIA: Este aparato lo pueden LÉALAS ATENTAMENTE Y GUÁRDELAS utilizar niños mayores de 8 años y personas PARA FUTURAS CONSULTAS. con las capacidades físicas, sensoriales o Asegúrese de que estas precauciones de mentales reducidas, o faltas de experiencia y seguridad se tengan siempre en cuenta.
- Page 36 ADVERTENCIA: El calentamiento de Este electrodoméstico no está pensado bebidas con el microondas puede provocar para que lo usen personas (incluidos ebulliciones eruptivas con retraso. Por lo los niños) con las capacidades físicas, tanto, tenga cuidado al manejar el recipiente. sensoriales o mentales reducidas, o faltas de experiencia y conocimientos, a menos ADVERTENCIA: El contenido de los...
- Page 37 Antes de utilizar el horno por primera vez, ADVERTENCIA: Las partes accesibles debe hacerlo funcionar con agua durante pueden calentarse durante el uso. 10 minutos. No deje que los niños se acerquen. Si el horno genera ruidos extraños, No utilice un limpiador con vaporizador. olor a quemado o humo, desconéctelo ADVERTENCIA: Cuando vaya a reemplazar inmediatamente y llame al centro de servicio...
- Page 38 establecimientos excepto los domésticos y los Este aparato lo pueden utilizar niños mayores que están conectados directamente a una red de 8 años y personas con las capacidades de suministro de energía de bajo voltaje que la físicas, sensoriales o mentales reducidas, o suministra a edificios para uso doméstico.
- Page 39 Compruebe que el plato giratorio gire sin • Superficies internas y externas problemas. • Puerta y cierres de la puerta (Solo modelo con plato giratorio) • Plato giratorio y aros giratorios (Solo modelo con plato giratorio) 4. Este horno microondas debe colocarse de modo que el enchufe sea accesible.
- Page 40 Por razones de seguridad no reemplace la que baje el termostato a 45 º. bombilla usted mismo. Póngase en contacto (Solo modelo con calentador giratorio) con el Centro de atención al cliente de Buffalo CONSERVACIÓN Y MANTENIMIENTO para solicitar un técnico cualificado que DEL HORNO MICROONDAS cambie la bombilla.
- Page 41 No instale este aparato cerca de un calentador ni de No cuelgue el cable de alimentación de un objeto metálico, materiales inflamables; en un lugar con humedad, aceite o ni lo introduzca entre objetos ni detrás del horno. polvo, que esté expuesto a la luz directa del sol o al agua, No utilice un enchufe o un cable de alimentación dañados o donde pueda haber fugas de gas;...
- Page 42 No utilice el horno microondas para freír con mucho aceite Al abrir la puerta, manténgase a una distancia de medio ya que la temperatura del aceite no se puede controlar. metro del aparato para evitar quemarse si sale aire caliente Podría provocar un hervor súbito del líquido caliente.
-
Page 43: Funciones Del Horno
Buffalo le cobrará una tarifa de reparación por la sustitución de un accesorio o por la funciones del horno reparación de un desperfecto superficial si el daño a la unidad o el daño o la pérdida del accesorio ha sido provocado por el usuario. Elementos que cubre esta estipulación: HORNO (a) Puerta, tirador, panel exterior o panel de control abollados, rayados o rotos. -
Page 44: Panel De Control
PANEL DE CONTROL PANTALLA 1. PANTALLA 6. BOTÓN SELECTOR DESCONGELACIÓN 2. BOTÓN PROGRAMA 7. BOTÓN DOBLE CANTIDAD 3. BOTONES NUMÉRICOS S (hora, programación de la memoria) 8. BOTÓN +20s (botón cocción de un toque) 4. BOTÓN BLOQUEO DE PROGRAMAS 1. INDICADOR DEL PROGRAMA 9. -
Page 45: Uso Del Horno
D, deberá establecer el temporizador en menos de 3 minutos a nivel ALTO para el GK640-E (categoría E). Tenga en cuenta siempre que las instrucciones de cocción solo son indicativas. 3. Pulse el botón INICIO. - Page 46 Cocción en varias etapas Una vez transcurrido el tiempo, suena 4 veces el pitido de final de ciclo y se detiene 1. Seleccione el nivel de potencia deseado pulsando el la función. botón SELECTOR NIVEL DE POTENCIA o SELECTOR La lámpara del horno se apaga. Durante 1 minuto la pantalla muestra “0” y el DESCONGELACIÓN.
-
Page 47: Niveles De Potencia Y Variaciones De Tiempo
NIVELES DE POTENCIA Y VARIACIONES DE TIEMPO CÓMO DETENER LA COCCIÓN La función de nivel de potencia permite adaptar la cantidad de energía disipada y, de Puede detener la cocción en cualquier momento para: esta forma, el tiempo necesario para cocinar o recalentar la comida, según el tipo y la •... -
Page 48: Uso Del Botón +20S
USO DEL BOTÓN +20S USO DE LAS FUNCIONES DE DESCONGELACIÓN Es un botón de COCCIÓN DE UN TOQUE. Las funciones de descongelación permiten descongelar carne, aves o pescado. Si se pulsa una vez, el horno empieza a funcionar inmediatamente. Utilice solo recipientes que sean aptos para microondas. Se puede aumentar el tiempo de cocción pulsando el botón +20s durante el ciclo de Abra la puerta. -
Page 49: Programación Del Botón De La Memoria
PROGRAMACIÓN DEL BOTÓN DE LA MEMORIA Una etapa Debe pulsar los botones con firmeza. 1. Mantenga pulsado el botón BLOQUEO DE PROGRAMAS Pulse el botón SELECTOR DEL NIVEL DE POTENCIA o SELECTOR y, a continuación, pulse el botón PROGRAMA b. DESCONGELACIÓN una o más veces hasta obtener el nivel de potencia que Mantenga pulsados ambos durante 2 segundos desee. - Page 50 Varias etapas Debe pulsar los botones con firmeza. 1. Mantenga pulsado BLOQUEO DE PROGRAMAS y pulse el botón PROGRAMA. Mantenga pulsados ambos durante Pulse el botón SELECTOR DEL NIVEL DE POTENCIA o SELECTOR 2 segundos. DESCONGELACIÓN una o más veces hasta obtener el nivel de potencia que Resultado: El indicador PROG se muestra en la pantalla desee.
-
Page 51: Funcionamiento De La Cocción Programada
FUNCIONAMIENTO DE LA COCCIÓN PROGRAMADA PROGRAMACIÓN DEL BOTÓN DE DOBLE CANTIDAD Una vez realizada la programación de memoria, basta con pulsar los botones 1. Mantenga pulsado el botón CANCELAR y después pulse NUMÉRICOS del número de memoria que se desee seleccionar. El horno iniciará el botón DOBLE CANTIDAD. -
Page 52: Control Del Tono De La Alarma
Edición del factor de doble cantidad PROGRAMACIÓN DEL TIEMPO DE LIMPIEZA DEL FILTRO DEL AIRE Función Botón Pantalla Observación Cuando el indicador de comprobación del filtro del aire (FILTER (FILTRO)) aparece en Mantenga pulsado el la pantalla después de cierto tiempo de utilización del horno, se debe limpiar el filtro botón CANCELAR y Mantenga pulsado 2 segundos. -
Page 53: Teclas Ocultas
TECLAS OCULTAS CUIDADOS DEL HORNO MICROONDAS Nota: Pulse la tecla 1 y a continuación la siguiente. Mantenga la pulsación Limpieza del horno microondas durante 2 segundos 1. Desenchufe el horno de la toma de corriente antes de la limpieza. Botón 2. -
Page 54: Limpieza De La Cubierta Del Techo
LIMPIEZA DE LA CUBIERTA DEL TECHO INSTRUCCIONES PARA LA INSTALACIÓN EN COLUMNA Importante 1. Con las dos manos, empuje los topes de la cubierta del techo hacia adentro y luego hacia abajo. A continuación extraiga la cubierta de la cavidad del horno. 1. -
Page 55: Sustitución De La Lámpara
SUSTITUCIÓN DE LA LÁMPARA guía de utensilios de cocina Importante Para cocinar alimentos en el horno microondas, las microondas deben poder penetrar en la comida, sin que sean absorbidas por el plato utilizado. 1. Quite el tornillo de la cubierta de la lámpara. Por lo tanto, debe tener cuidado al elegir los utensilios de cocina. -
Page 56: Guía De Cocción
guía de cocción Utensilios de Seguro para C: Congelado R: Refrigerado Comentarios cocina microondas Tiempo Tiempo Receta Método Nivel de Potencia Metal reposo 1850 W 1500 W 1300 W ✗ • Platos Pueden producir arcos eléctricos o un incendio. PAN Y PASTAS ✗... - Page 57 C: Congelado R: Refrigerado Tiempo Tiempo Tiempo Tiempo Receta Método Nivel de Potencia Receta Método Nivel de Potencia reposo reposo 1850 W 1500 W 1300 W 1850 W 1500 W 1300 W APERITIVOS Y ENTRANTES POSTRES Para cocinar Para calentar Bacon, loncha R Poner en parrilla ALTO...
- Page 58 C: Congelado R: Refrigerado Tiempo Tiempo Tiempo Tiempo Receta Método Nivel de Potencia Receta Método Nivel de Potencia reposo reposo 1850 W 1500 W 1300 W 1850 W 1500 W 1300 W VERDURA FRESCA Lasaña 192 g Poner en plato MEDIO 4’00”...
-
Page 59: Solución De Problemas Y Códigos De Error
2 min • Por razones de seguridad no reemplace la bombilla usted mismo. Póngase en la mitad contacto con el Centro de atención al cliente de Buffalo más cercano para solicitar un ARROZ, 500 g técnico cualificado que cambie la bombilla. -
Page 60: Códigos De Error
Si tiene cualquier comentario o pregunta referentes a los productos Buffalo, durante 2 demasiado debido al funcionamiento temperatura de póngase en contacto con el Centro de atención al cliente de Buffalo. segundos. excesivo sin carga o con poca carga, o aire de salida Buffalo. -
Page 61: Especificaciones Técnicas
Para obtener más información sobre estos códigos de error o si la solución sugerida no resuelve el problema, llame al centro de atención al cliente local de Buffalo. Español - 29 GK640-E_GK641-E_XEU_DE68-04279B-01_ES.indd 29... - Page 62 NOTAS NOTAS GK640-E_GK641-E_XEU_DE68-04279B-01_ES.indd 30 2014-06-27 6:50:11...
- Page 63 NOTAS NOTAS GK640-E_GK641-E_XEU_DE68-04279B-01_ES.indd 31 2014-06-27 6:50:11...
- Page 64 Si tiene problemas con la máquina, póngase en contacto con el centro de asistencia técnica de Buffalo PREGUNTAS O COMENTARIOS PAÍS LLAME DIRECCIÓN Buffalo. Fourth Way, Avonmouth, Bristol, The United Kingdom 0845 146 2887 BS11 8TB, The United Kingdom. Nederland...
- Page 65 GK640-E GK641-E Four à micro-ondes commercial Manuel d’utilisation Ce manuel est en papier recyclé à 100 %. GK640-E_GK641-E_XEU_DE68-04279B-01_FR.indd 1 2014-06-27 6:50:06...
- Page 66 Consignes de sécurité ................2 UTILISATION DU MANUEL D'UTILISATION Fonctions du four ..................11 Vous venez d'acquérir un four micro-ondes Buffalo. Ce manuel contient de Four .....................11 nombreux conseils et instructions sur l’utilisation de votre micro-ondes : Tableau de commande ................12 •...
-
Page 67: Consignes De Sécurité
CONSIGNES DE SÉCURITÉ IMPORTANTES AVERTISSEMENT : cet appareil peut être utilisé LISEZ ATTENTIVEMENT CE MANUEL ET par des enfants à partir de 8 ans et des personnes CONSERVEZ-LE PRÉCIEUSEMENT EN ayant des capacités physiques, sensorielles ou VUE D'UNE CONSULTATION ULTÉRIEURE. mentales réduites ou un manque d'expérience et Assurez-vous que ces consignes de sécurité... - Page 68 AVERTISSEMENT : si vous faites réchauffer Cet appareil n'est pas conçu pour être utilisé des liquides au four micro-ondes, l'ébullition peut par des personnes (y compris les enfants) survenir à retardement ; soyez donc vigilant lorsque inexpérimentées ou dont les capacités physiques, vous sortez le récipient du four.
- Page 69 Si l'appareil génère un bruit anormal, une odeur de AVERTISSEMENT : afin d'éviter tout risque brûlé ou de la fumée, débranchez immédiatement d'électrocution, veillez à ce que l'appareil soit hors la prise et contactez le service de dépannage le tension avant de procéder au remplacement de plus proche.
- Page 70 de classe A sont des équipements adaptés à cet appareil peut être utilisé par des enfants à partir l'usage dans tous les établissements autres que de 8 ans et des personnes ayant des capacités domestiques et ceux directement reliés à un réseau physiques, sensorielles ou mentales réduites ou d'alimentation électrique basse tension qui alimente un manque d'expérience et de connaissance...
- Page 71 (Modèle à plateau tournant uniquement) (Modèle à plateau tournant uniquement) 4. Installez le four à micro-ondes de telle façon que la Veillez TOUJOURS à ce que les joints de la prise reste facilement accessible. porte soient propres et à ce que celle-ci se ferme correctement.
- Page 72 (Modèle à élément chauffant oscillant uniquement) l'ampoule pour des raisons de sécurité. Veuillez contacter le service d'assistance RANGEMENT ET ENTRETIEN DU FOUR Buffalo le plus proche afin qu'un ingénieur MICRO-ONDES qualifié remplace l'ampoule. Pour le rangement ou la réparation de votre four...
- Page 73 Cet appareil doit être correctement relié à la terre en N'utilisez jamais une fiche ou un cordon d'alimentation conformité aux normes locales et nationales. endommagé(e) ou une prise murale mal fixée. Si la prise ou le cordon d'alimentation est endommagé(e), contactez le centre Retirez régulièrement toute substance étrangère (poussière de dépannage le plus proche.
- Page 74 N'utilisez pas le four à micro-ondes pour une cuisson à Remuez les liquides à la moitié du temps de chauffe et laissez bain d'huile car la température de l'huile ne peut pas être reposer au moins 20 secondes une fois le temps écoulé pour contrôlée.
-
Page 75: Fonctions Du Four
Buffalo facturera les travaux de réparation lorsqu'un accessoire doit être réparé ou un défaut fonctions du four esthétique corrigé, si l'endommagement de l'appareil et/ou l'endommagement ou la perte de l'accessoire a été occasionné(e) par le client. Les éléments concernés par cette stipulation sont : FOUR (a) une porte, une poignée, un panneau extérieur ou le tableau de commandes bosselé(e),... -
Page 76: Tableau De Commande
TABLEAU DE COMMANDE ÉCRAN 1. ÉCRAN 6. BOUTON SÉLECTION DE LA PUISSANCE DE DÉCONGÉLATION 2. BOUTON PROGRAMME 7. BOUTON DOUBLE QUANTITÉ 3. BOUTONS NUMÉROTÉS (programmation de la mémoire et du 8. BOUTON +20s temps) (bouton de cuisson immédiate) 1. INDICATEUR DE PROGRAMME 4. -
Page 77: Utilisation Du Four
3 minutes sur ÉLEVÉ pour les modèles GK640-E (catégorie E). Gardez en tête que les consignes concernant la cuisson ne sont fournies qu'en tant 3. Appuyez sur le bouton DÉPART. - Page 78 Cuisson en plusieurs étapes Une fois la durée sélectionnée écoulée, un signal sonore retentit 4 fois et le cycle 1. Sélectionnez le niveau de puissance souhaité en appuyant sur de chauffe s'arrête. La lampe s'éteint. L'écran affiche « 0 » pendant une minute et les boutons SÉLECTION DU NIVEAU DE PUISSANCE ou le ventilateur continue de fonctionner jusqu'au refroidissement correct de tous les SÉLECTION DE LA PUISSANCE DE DÉCONGÉLATION.
-
Page 79: Niveaux De Puissance Et Variations De Temps
NIVEAUX DE PUISSANCE ET VARIATIONS DE TEMPS ARRÊT DE LA CUISSON La fonction du niveau de puissance vous permet d'adapter la quantité d'énergie Vous pouvez arrêter la cuisson à tout moment pour : dispersée et, par conséquent, le temps nécessaire à la cuisson ou au réchauffage des •... -
Page 80: Utilisation Du Bouton +20S
UTILISATION DU BOUTON +20S UTILISATION DES FONCTIONS DE DÉCONGÉLATION Il s'agit d'un bouton de CUISSON IMMEDIATE. Le mode Décongélation permet de faire décongeler de la viande, de la volaille ou du Lorsque celui-ci est actionné, le cycle de chauffe démarre instantanément. poisson. -
Page 81: Programmation Du Bouton De La Mémoire
PROGRAMMATION DU BOUTON DE LA MÉMOIRE Une étape Assurez-vous d'appuyer fermement sur les boutons. 1. Maintenez VERROUILLAGE DU PROGRAMME appuyé, Appuyez sur le bouton SÉLECTION DU NIVEAU DE PUISSANCE ou sur le puis appuyez sur le bouton PROG. Maintenez appuyés les bouton SÉLECTION DE LA PUISSANCE DE DÉCONGÉLATION une ou plusieurs deux boutons pendant 2 s. - Page 82 Plusieurs étapes Assurez-vous d'appuyer fermement sur les boutons. 1. Maintenez appuyé le bouton VERROUILLAGE DU PROGRAMME, puis appuyez sur le bouton PROG. Appuyez sur le bouton SÉLECTION DU NIVEAU DE PUISSANCE ou sur le Maintenez appuyés les deux boutons pendant 2 s. bouton SÉLECTION DE LA PUISSANCE DE DÉCONGÉLATION une ou plusieurs Résultat : l'indicateur PROG apparaît dans la zone fois jusqu'à...
-
Page 83: Utilisation De La Cuisson Mémorisée
UTILISATION DE LA CUISSON MÉMORISÉE PROGRAMMATION DU BOUTON DE DOUBLE QUANTITÉ Une fois la programmation mémorisée terminée, appuyez sur les boutons NUMÉROTÉS correspondant au numéro mémorisé que vous souhaitez sélectionner. Le four commence à chauffer conformément au temps et au niveau de puissance de cuisson pré- 1. -
Page 84: Réglage De La Tonalité Du Signal Sonore
Modification du facteur de double quantité PROGRAMMATION DU TEMPS DE NETTOYAGE DU FILTRE À AIR Fonction Entrée de touche Affichage Remarque Lorsque l'indicateur de vérification du filtre à air (FILTER (FILTRE)) s'affiche après un Maintenez le bouton certain temps d'utilisation du filtre, il est nécessaire de le nettoyer conformément aux ANNULER appuyé, puis Maintenez appuyé... -
Page 85: Touches Cachées
TOUCHES CACHÉES ENTRETIEN DE VOTRE FOUR MICRO-ONDES Remarque : appuyez sur la Touche 1, puis sur la touche Suivante. Nettoyage du four à micro-ondes Maintenez enfoncées les deux touches pendant 2 s. 1. Avant toute opération de nettoyage, débranchez l'appareil de la prise murale. Entrée de touche Fonction Affichage... -
Page 86: Nettoyage Du Cache De La Paroi Supérieure Interne
NETTOYAGE DU CACHE DE LA PAROI SUPÉRIEURE INTERNE CONSIGNES D'INSTALLATION EN VUE D'UNE SUPERPOSITION 1. Saisissez les tampons du cache avec les deux mains et tirez-les vers le bas. Important Retirez ensuite du four le cache de la paroi supérieure interne. 1. -
Page 87: Remplacement De La Lampe
REMPLACEMENT DE LA LAMPE guide des récipients Important Pour faire cuire des aliments dans le four micro-ondes, il est nécessaire que les micro- ondes pénètrent dans les aliments sans être réfléchies ou absorbées par le plat utilisé. 1. Retirez la vis immobilisant le cache de la lampe. Le choix du type de récipient est donc essentiel. -
Page 88: Guide De Cuisson
guide de cuisson Adapté à la S : Surgelé R : Réfrigéré Récipient cuisson aux Remarques Temps Niveau de Temps micro-ondes Recette Instructions puissance de repos 1850 W 1500 W 1300 W ✓ • Pots en verre Retirez-en le couvercle. Pour faire réchauffer PAIN ET PATISSERIES uniquement. - Page 89 S : Surgelé R : Réfrigéré Niveau de Temps Temps Niveau de Temps Temps Recette Instructions Recette Instructions puissance 1850 W 1500 W 1300 W de repos puissance 1850 W 1500 W 1300 W de repos EN-CAS ET ENTRÉES DESSERTS Cuisson Réchauffage Bacon en Placez-le sur la grille ÉLEVÉ...
- Page 90 S : Surgelé R : Réfrigéré Temps Niveau de Temps Temps Niveau de Temps Recette Instructions Recette Instructions puissance de repos puissance 1850 W 1500 W 1300 W de repos 1850 W 1500 W 1300 W LÉGUMES FRAIS 192 g de lasagnes Placez-le dans un plat MOYEN 4’00”...
-
Page 91: Dépannage Et Code D'erreur
• Vous ne devez pas remplacer vous-même l'ampoule pour des raisons de sécurité. 500 g de ÉLEVÉ 3’30” 4’00” 4’30” 2 min Veuillez contacter le service d'assistance Buffalo le plus proche afin qu'un ingénieur ratatouille qualifié remplace l'ampoule. Bruxelles Couvrez et remuez à ÉLEVÉ 3’00”... -
Page 92: Codes D'erreur
Erreur relative à le Un long signal L'intérieur du four devient trop chaud en raison Pour toute question ou tout commentaire concernant les produits Buffalo, veuillez contacter le service d’assistance clientèle Buffalo. sonore de 2 s. d'une utilisation excessive du four à vide ou température trop... -
Page 93: Caractéristiques Techniques
Buffalo s'efforce sans cesse d'améliorer ses produits. Les caractéristiques et le mode Erreur Code Signal d'erreur Cause d'emploi de ce produit peuvent être modifiés sans préavis. Erreur Un long signal Le circuit interne du four ne fonctionne pas En vertu de la réglementation 2/1984 (III.10) BKM-IpM, nous, revendeurs, certifions... - Page 94 MÉMO MÉMO GK640-E_GK641-E_XEU_DE68-04279B-01_FR.indd 30 2014-06-27 6:50:32...
- Page 95 MÉMO MÉMO GK640-E_GK641-E_XEU_DE68-04279B-01_FR.indd 31 2014-06-27 6:50:32...
- Page 96 Si vous rencontrez des problèmes lors de l’utilisation de votre machine, veuillez contacter le centre d’assistance clientèle Buffalo. DES QUESTIONS OU DES COMMENTAIRES PAYS APPELEZ LE ADRESSE Buffalo. Fourth Way, Avonmouth, Bristol, The United Kingdom 0845 146 2887 BS11 8TB, The United Kingdom.
- Page 97 GK640-E GK641-E Forno a microonde per uso commerciale Manuale di istruzioni Questo manuale è realizzato interamente con carta riciclata. GK640-E_GK641-E_XEU_DE68-04279B-01_IT.indd 1 2014-06-27 6:50:20...
- Page 98 Informazioni di sicurezza ................2 USO DEL MANUALE DI ISTRUZIONI Caratteristiche del forno ................11 Grazie per avere acquistato un forno a microonde Buffalo. Il Manuale Forno ....................11 dell’utente contiene informazioni utili sulla cottura degli alimenti nel forno a Pannello di controllo ................12 microonde: Display ....................12...
- Page 99 ISTRUZIONI DI SICUREZZA IMPORTANTI AVVERTENZA: Questo apparecchio può essere LEGGERE ATTENTAMENTE QUESTA utilizzato da bambini di età superiore agli 8 anni e SEZIONE E CONSERVARLA COME da persone che abbiano ridotte capacità fisiche, RIFERIMENTO FUTURO. sensoriali o mentali o siano prive di esperienza o Rispettare sempre queste precauzioni di conoscenza, sotto la supervisione di una persona sicurezza.
- Page 100 In caso di fumo, spegnere o scollegare Questo apparecchio non è inteso per l’uso da l’apparecchiatura dalla rete elettrica e tenere chiuso parte di persone (bambini inclusi) che abbiano lo sportello del forno per evitare di far propagare ridotte capacità fisiche, sensoriali o mentali, o siano eventuali fiamme.
- Page 101 Se l'apparecchio emette un rumore anomalo, AVVERTENZA: Assicurarsi che l'apparecchio sia odore di bruciato o fumo, scollegare spento prima di sostituire la lampadina in modo da immediatamente la spina di alimentazione e evitare possibili scariche elettriche. rivolgersi al più vicino centro assistenza. AVVERTENZA: L'apparecchio e le sue parti Il forno a microonde deve essere posizionato in accessibili si surriscaldano durante l'uso.
- Page 102 Classe A sono idonei all'uso in tutti gli edifici tranne Questo apparecchio può essere utilizzato da quelli residenziali e quelli direttamente collegati a una bambini di età superiore agli 8 anni e da persone rete elettrica a basso voltaggio che alimenta edifici che abbiano ridotte capacità...
- Page 103 Se il cavo di alimentazione è danneggiato, deve Assicurarsi SEMPRE che le guarnizioni dello essere sostituito dal costruttore, dal centro sportello siano pulite e che lo sportello si chiuda assistenza o da un tecnico qualificato per evitare correttamente. di incorrere in eventuali pericoli. Se il forno non viene mantenuto in condizioni di Per motivi di sicurezza, collegare la spina del cavo pulizia ottimali, le superfici potrebbero deteriorarsi...
- Page 104 CONSERVAZIONE E RIPARAZIONE DEL Per la sostituzione della lampadina, rivolgersi al FORNO A MICROONDE centro assistenza clienti Buffalo per richiedere l'uscita Per la conservazione e la riparazione del forno a di un tecnico specializzato. microonde, è necessario adottare alcune semplici precauzioni.
- Page 105 La messa a terra di questo apparecchio deve essere Non utilizzare spine, prese di corrente o cavi di conforme a quanto previsto dalle normative locali e alimentazione danneggiati. Se la spina o il cavo di nazionali. alimentazione sono danneggiati, rivolgersi al più vicino centro di assistenza.
- Page 106 Mescolare i liquidi durante o al termine del riscaldamento, quindi lasciare riposare per almeno 20 secondi per evitare Buffalo applicherà una tariffa per la sostituzione di un accessorio o la riparazione di un difetto fuoriuscite causate dalla bollitura. estetico se il danno all'unità e/o il danno o la perdita dell'accessorio è stato causato dal cliente.
-
Page 107: Caratteristiche Del Forno
(a) Ammaccatura, graffiatura o rottura dello sportello, della maniglia, di un pannello caratteristiche del forno esterno o del pannello di controllo. (b) Rottura o mancanza del vassoio, dell'anello girevole, dell'accoppiatore o della griglia. FORNO • Utilizzare l'apparecchio solo per lo scopo per il quale è stato prodotto, come descritto in questo manuale. -
Page 108: Pannello Di Controllo
PANNELLO DI CONTROLLO DISPLAY 1. DISPLAY 6. TASTO DI SELEZIONE SCONGELAMENTO 2. TASTO PROGRAMMA 7. TASTO QUANTITA' DOPPIA 3. TASTI NUMERICI (Tempi di riscaldamento, 8. TASTO +20s Programmazione memoria) (Cottura con un singolo tocco) 1. INDICATORE PROGRAMMA 4. TASTO BLOCCO PROGRAMMA 9. -
Page 109: Uso Del Forno
Esempio: Se per un forno di categoria D le istruzioni per il riscaldamento del cibo display. indicano di impostare 3 minuti su ALTO, utilizzando un forno GK640-E (di categoria E) sarà necessario impostare un tempo inferiore a 3 minuti su ALTO. - Page 110 Cottura multifase Al termine del tempo impostato, vengono emessi 4 segnali acustici di fine ciclo e il 1. Selezionare il livello di potenza desiderato premendo i tasti di riscaldamento si arresta. selezione LIVELLO DI POTENZA o SCONGELAMENTO. La lampada del forno si spegne. Per 1 minuto, sul display appare ‘0’ e la ventola di Risultato: Il livello di potenza selezionato verrà...
-
Page 111: Livelli Di Potenza E Modifiche Dei Tempi
LIVELLI DI POTENZA E MODIFICHE DEI TEMPI INTERRUZIONE DELLA COTTURA I livelli di potenza consentono di modificare la quantità di energia generata e quindi il E’ possibile interrompere la cottura in qualsiasi momento per: tempo necessario per il riscaldamento o la cottura, a seconda del tipo di alimento. •... -
Page 112: Uso Del Tasto +20S
USO DEL TASTO +20S USO DELLE FUNZIONI DI SCONGELAMENTO Questo tasto consente la COTTURA CON UN SINGOLO TOCCO. La funzione Scongelamento consente di scongelare carni, pollame e pesce. Premendo una volta questo tasto, il riscaldamento si avvia all’istante. Utilizzare solo recipienti idonei al forno a microonde. E' possibile aumentare il tempo di cottura premendo il tasto +20s durante il Aprire lo sportello. -
Page 113: Programmazione Tasto Memoria
PROGRAMMAZIONE TASTO MEMORIA A fase singola Premere i tasti di selezione LIVELLO DI POTENZA o SCONGELAMENTO una o più volte fino a impostare il livello di potenza desiderato. 1. Tenere premuto il tasto BLOCCO PROGRAMMA quindi premere PROGRAMMA. Tenere premuti entrambi i tasti contemporaneamente per 2 secondi. - Page 114 Multifase Premere i tasti di selezione LIVELLO DI POTENZA o SCONGELAMENTO una o 1. Tenere premuto il tasto BLOCCO PROGRAMMA quindi più volte fino a impostare il livello di potenza desiderato. premere PROGRAMMA. Tenere premuti entrambi i tasti contemporaneamente per 2 secondi. Risultato: L'indicatore PROG appare sul display.
-
Page 115: Cucinare Con I Programmi Memorizzati
CUCINARE CON I PROGRAMMI MEMORIZZATI PROGRAMMAZIONE DEL TASTO QUANTITÀ DOPPIA Al termine della procedura di memorizzazione, premere il tasto NUMERICO associato al 1. Tenere premuto il tasto ANNULLA quindi premere il tasto programma che si desidera selezionare. Il forno si avvia automaticamente in base al livello QUANTITA' DOPPIA. -
Page 116: Controllo Tono Segnale Acustico
Modifica del fattore Quantità doppia PROGRAMMAZIONE DELLA PULIZIA DEL FILTRO DELL'ARIA Funzione Tasto di immissione Display Nota Tenere premuto il Quando l'indicatore di controllo del filtro dell'aria (FILTER [FILTRO]) appare sul display, tasto ANNULLA Tenere premuti entrambi i tasti pulire il filtro seguendo le istruzioni riportate nel capitolo “Pulizia del filtro dell'aria” a quindi premere il tasto contemporaneamente per 2 secondi. -
Page 117: Tasti Nascosti
TASTI NASCOSTI MANUTENZIONE DEL FORNO A MICROONDE Nota: Premere il Tasto 1 quindi quello successivo. Tenerli premuti per 2 secondi. Pulizia del forno a microonde Tasto di immissione 1. Prima della pulizia, scollegare il forno dalla presa elettrica. Funzione Display Nota Tasto 1 Successivo... -
Page 118: Pulizia Del Cielo Del Forno
PULIZIA DEL CIELO DEL FORNO ISTRUZIONI PER L'INSTALLAZIONE A COLONNA Importante 1. Tenere i fermi laterali con entrambe le mani e tirare il cielo verso di se e in basso. Estrarre quindi il cielo dal forno. 1. Scollegare la spina di alimentazione dalla presa a parete prima di eseguire l'installazione. -
Page 119: Sostituzione Della Lampada
SOSTITUZIONE DELLA LAMPADA guida ai materiali per la cottura Importante Durante la cottura, le microonde devono essere in grado di penetrare negli alimenti, senza essere riflesse o assorbite dal piatto. Per questo, è necessario prestare molta attenzione nella 1. Rimuovere la vite che trattiene il coprilampada. scelta dei materiali per la cottura. -
Page 120: Guida Alla Cottura
guida alla cottura S: surgelato C: congelato Materiali per la Adatti per Commenti cottura microonde Tempi Tempo ✓ • Materiali in vetro fine Possono essere utilizzati per riscaldare Ricetta Metodo Livello di potenza 1850 W 1500 W 1300 W alimenti o liquidi. Il vetro fragile può rompersi riposo o creparsi se riscaldato improvvisamente. - Page 121 S: surgelato C: congelato Tempi Tempo Tempi Tempo Ricetta Metodo Livello di potenza Ricetta Metodo Livello di potenza 1850 W 1500 W 1300 W 1850 W 1500 W 1300 W riposo riposo Fagioli cotti Coprire e ALTO 2’00” 2’10” 2’20” 2 min SNACK E ANTIPASTI 500 g...
- Page 122 S: surgelato C: congelato Tempi Tempo Tempi Tempo Ricetta Metodo Livello di potenza Ricetta Metodo Livello di potenza 1850 W 1500 W 1300 W 1850 W 1500 W 1300 W riposo riposo Piatti Coperto ALTO 2’00” 2’15” 2’30” 1 min Pollo al curry Forare la pellicola ALTO...
-
Page 123: Risoluzione Dei Problemi E Codici Di Errore
• Per motivi di sicurezza, si raccomanda di non sostituire autonomamente la lampadina interna. Per la sostituzione della lampadina, rivolgersi al centro assistenza clienti di Ratatouille 500 g ALTO 3’30” 4’00” 4’30” 2 min Buffalo per richiedere l'uscita di un tecnico specializzato. Cavolini di Coprire, mescolare ALTO 3’00” 3’30” 4’00” 2 min Il forno causa interferenze alla ricezione radiotelevisiva. -
Page 124: Codici Di Errore
Collegare nuovamente la spina di alimentazione. Quindi contattare il rivenditore di zona o l'assistenza postvendita Buffalo. Se il sintomo persiste, rivolgersi al più vicino centro di assistenza. In caso di domande o commenti sui prodotti Buffalo, contattare il centro assistenza Errore Un segnale acustico La cavità... -
Page 125: Specifiche Tecniche
Per altri codici non riportati in questa sezione, oppure se la soluzione suggerita non dovesse risolvere il problema, rivolgersi al Centro di assistenza clienti Buffalo di zona. Italiano - 29 GK640-E_GK641-E_XEU_DE68-04279B-01_IT.indd 29... - Page 126 MEMO MEMO GK640-E_GK641-E_XEU_DE68-04279B-01_IT.indd 30 2014-06-27 6:50:46...
- Page 127 MEMO MEMO GK640-E_GK641-E_XEU_DE68-04279B-01_IT.indd 31 2014-06-27 6:50:46...
- Page 128 In caso di problemi con il prodotto, rivolgersi al centro assistenza Buffalo DOMANDE O COMMENTI NAZIONE CHIAMARE IL NUMERO INDIRIZZO Buffalo. Fourth Way, Avonmouth, Bristol, The United Kingdom 0845 146 2887 BS11 8TB, The United Kingdom. Nederland 040 262 8080...
- Page 129 GK640-E GK641-E Magnetronoven voor commercieel gebruik Gebruiksaanwijzing Deze handleiding is gemaakt van 100 % gerecycled papier. GK640-E_GK641-E_XEU_DE68-04279B-01_NL.indd 1 2014-06-27 6:50:34...
- Page 130 Veiligheidsinformatie ................... 2 OVER DEZE GEBRUIKSAANWIJZING Eigenschappen van de oven............... 11 U hebt zojuist een nieuwe Buffalo-magnetronoven aangeschaft. Oven ....................11 Deze gebruiksaanwijzing bevat veel waardevolle informatie over het gebruik Bedieningspaneel ................12 van deze magnetronoven: Display ....................12 • Veiligheidsmaatregelen Gebruik van de oven ..................
- Page 131 BELANGRIJKE VEILIGHEIDSAANWIJZINGEN WAARSCHUWING: dit apparaat kan door LEES DE AANWIJZINGEN ZORGVULDIG kinderen vanaf acht jaar en door personen met een DOOR EN BEWAAR DEZE VOOR verminderd fysiek, zintuiglijk of mentaal vermogen, RAADPLEGING IN DE TOEKOMST. of gebrek aan ervaring en kennis, worden gebruikt Zorg ervoor dat deze veiligheidsvoorschriften als ze onder toezicht staan of instructies hebben altijd worden opgevolgd.
- Page 132 WAARSCHUWING: omdat gerechten en Dit apparaat is niet bedoeld voor gebruik door vloeistoffen die u met de magnetron hebt personen (inclusief kinderen) met een verminderd verwarmd buiten de magnetron alsnog plotseling fysiek, zintuiglijk of mentaal vermogen, of met aan de kook kunnen raken en naar buiten spatten, onvoldoende ervaring en kennis, tenzij deze moet u voorzichtig zijn wanneer u ze uit de toestemming of instructies met betrekking tot...
- Page 133 Voordat u de oven voor het eerst gebruikt, laat u Gebruik geen stoomreiniger. deze gedurende 10 minuten werken met water. WAARSCHUWING: controleer of het apparaat Als de oven vreemde geluiden maakt of als er een is uitgeschakeld voordat u de lamp vervangt, om brandlucht of rook uit komt, moet u onmiddellijk de elektrische schokken te vermijden.
- Page 134 omgevingen die rechtstreeks zijn aangesloten op dit apparaat kan door kinderen vanaf acht jaar een stroomnet met laag voltage dat is bestemd en door personen met een verminderd fysiek, voor stroomvoorziening aan gebouwen die zintuiglijk of mentaal vermogen, of gebrek aan worden gebruikt voor woondoeleinden.
- Page 135 4. De oven moet zodanig worden geplaatst dat u (alleen type model met draaiplateau) de stekker kunt bereiken. Controleer ALTIJD of de afsluitstrippen schoon Als het netsnoer is beschadigd, moet u het zijn en de deur goed sluit. laten vervangen door de fabrikant of de Als de oven niet schoon gehouden wordt, kan onderhoudsdienst van de leverancier, of door het oppervlak beschadigd raken.
- Page 136 DE MAGNETRONOVEN OPBERGEN OF Neem contact op met het dichtstbijzijnde LATEN REPAREREN klantenservicecentrum van Buffalo om een Bij het uitvoeren van onderhoud aan of het bevoegde technicus te regelen die de lamp opbergen van de magnetronoven moet u enkele kan vervangen.
- Page 137 Het apparaat moet goed worden geaard in overeenstemming Giet geen water op de oven en spuit geen water rechtstreeks met plaatselijke en landelijke voorschriften. op de oven. Gebruik een droge doek om regelmatig alle vreemde Plaats geen objecten op de oven, in de oven of op de deur stoffen, zoals stof en water, van de voedingsterminals en van de oven.
- Page 138 Ga tijdens het openen van de ovendeur op armlengte afstand LET OP van de oven staan zodat u zich niet kunt branden aan ontsnappende hete lucht of stoom. Gebruik alleen kookmaterialen die geschikt zijn voor gebruik in magnetronovens. Gebruik GEEN metalen verpakkingen, Start de magnetronoven niet wanneer deze leeg is.
-
Page 139: Eigenschappen Van De Oven
Buffalo brengt reparatiekosten in rekening voor het vervangen van een onderdeel of het repareren eigenschappen van de oven van een cosmetisch defect als de beschadiging van het apparaat en/of beschadiging of verlies van het onderdeel is veroorzaakt door de klant. Onderdelen die hieronder vallen zijn onder andere: OVEN (a) Een gedeukte bekraste of defecte deur, handgreep, buitenpaneel of bedieningspaneel. -
Page 140: Bedieningspaneel
BEDIENINGSPANEEL DISPLAY 1. DISPLAY 6. ONTDOOIEN SELECTEREN 2. PROGRAMMA 7. DUBBELE HOEVEELHEID 3. CIJFERTOETSS 8. +20s (Tijd, Geheugen programmeren) (Eéndruksbereiding) 4. PROGRAMMA VERGRENDELEN 9. ANNULEREN 1. PROGRAMMA-INDICATIE 5. VERMOGEN SELECTEREN 10. START 2. TIJDSAANDUIDING 3. TIJDINDICATOR CONTROLE LUCHTFILTER 4. GEHEUGENTOETS NUMMERINDICATIE 5. -
Page 141: Gebruik Van De Oven
CIJFER-toetsen. Bijvoorbeeld: Als de opwarminstructies 3 minuten aangeven op hoog vermogen voor Resultaat: De geselecteerde tijd wordt weergegeven in het een oven categorie D, stelt u uw timer voor de GK640-E (categorie E) in op minder dan display. 3 minuten. - Page 142 Bereiding in meerdere fasen Wanneer de tijd is verstreken, klinkt er 4 keer een geluidssignaal om aan te geven 1. Selecteer het gewenste vermogensniveau door op de dat de tijd is verstreken en stopt de oven met verwarmen. toets VERMOGEN SELECTEREN of ONTDOOIEN De ovenlamp gaat uit.
-
Page 143: Vermogensniveaus En Bereidingstijden
VERMOGENSNIVEAUS EN BEREIDINGSTIJDEN DE BEREIDING BEËINDIGEN Met de vermogensinstelling kunt u de hoeveelheid energie die wordt afgegeven, en U kunt de bereiding elk gewenst moment onderbreken om: daarmee de tijd die benodigd is voor het verwarmen van het gerecht, afstemmen •... -
Page 144: De Toets +20S Gebruiken
DE TOETS +20S GEBRUIKEN DE ONTDOOIFUNCTIE GEBRUIKEN Dit is een toets voor ÉÉNKNOPSBEREIDING. Met de ontdooifunctie kunt u vlees, vis en gevogelte ontdooien. Door één keer op deze toets te drukken, kunt u meteen verwarmen. Gebruik alleen magnetronbestendige schalen. U kunt de bereidingstijd tussentijds verlengen door op de toets +20s te drukken in een Open de deur. -
Page 145: Geheugentoetsen Programmeren
GEHEUGENTOETSEN PROGRAMMEREN Eén fase Druk een of meerdere keren op de toets VERMOGEN SELECTEREN of ONTDOOIEN SELECTEREN totdat u het gewenste vermogen bereikt. 1. Houd PROGRAMMA VERGRENDELEN ingedrukt en druk op de PROGRAMMA-toets. Houd ze samen 2 seconden ingedrukt. Resultaat: De PROG-indicator wordt weergegeven op de De maximale tijd volgens ieder kookvermogensniveau is terug te vinden in “Vermogensniveaus en bereidingstijden”... - Page 146 Meerdere fasen Druk een of meerdere keren op de toets VERMOGEN SELECTEREN of 1. Houd PROGRAMMA VERGRENDELEN ingedrukt en druk ONTDOOIEN SELECTEREN totdat u het gewenste vermogen bereikt. op de PROGRAMMA-toets. Houd ze samen 2 seconden ingedrukt. Resultaat: De PROG-indicator wordt weergegeven op de display.
-
Page 147: Werken Met Geheugen-Koken
WERKEN MET GEHEUGEN-KOKEN PROGRAMMEREN TOETS DUBBELE HOEVEELHEID Nadat u klaar bent met het programmeren van het geheugen, drukt u gewoon op 1. Houd de toets ANNULEREN ingedrukt en druk vervolgens de CIJFER-toetsen van het geheugennummer dat u wilt selecteren. De oven begint op de toets DUBBELE HOEVEELHEID. -
Page 148: Controlerende Pieptoon
Bewerken factor dubbele hoeveelheid PROGRAMMEREN TIJD VOOR REINIGEN VAN DE LUCHTFILTER Functie Toetsinvoer Display Opmerking Wanneer de controle-indicatie voor de luchtfilter (FILTER) in de display wordt Houd de toets weergegeven na een bepaalde gebruiksperiode, moet u de luchtfilter reinigen volgens ANNULEREN ingedrukt Houd ze samen 2 seconden de instructies “Luchtfilter schoonmaken”... -
Page 149: Verborgen Toetsen
VERBORGEN TOETSEN ONDERHOUD VAN UW MAGNETRONOVEN Opmerking: Druk op toets 1 en daarna op de volgende. Houd ze samen De magnetronoven reinigen 2 seconden ingedrukt. 1. Haal de stekker uit het stopcontact voordat u de oven reinigt. Toetsinvoer Functie Display Opmerking 2. -
Page 150: De Bovenplaat Reinigen
DE BOVENPLAAT REINIGEN INSTALLATIE-INSTRUCTIES VOOR STAPELEN Belangrijk 1. Duw de borgringen van de bovenplaat met twee handen naar binnen en trek ze naar beneden. Neem de bovenplaat uit de oven. 1. Haal de stekker uit het stopcontact alvorens de installatie te beginnen. 2. -
Page 151: De Lamp Vervangen
DE LAMP VERVANGEN richtlijnen voor kookmaterialen Belangrijk Om voedsel in een magnetronoven te kunnen bereiden moeten de microgolven in staat zijn het voedsel te bereiken zonder te worden weerkaatst of geabsorbeerd door de 1. Verwijder de schroef van het afdekplaatje van de lamp. gebruikte schaal. -
Page 152: Kooktips
kooktips Magnetron- D: Diepvries G: Gekoeld Kookmateriaal Opmerkingen bestendig Timer Vermogens- Nagaar- Metaal Recept Methode niveau tijd 1850 W 1500 W 1300 W ✗ • Schalen Kunnen vonken en brand veroorzaken. BROOD & GEBAK ✗ • Binddraadjes voor Ontdooien plastic zakken Weense staaf 9”... - Page 153 D: Diepvries G: Gekoeld Timer Timer Vermogens- Nagaar- Vermogens- Nagaar- Recept Methode Recept Methode niveau tijd niveau tijd 1850 W 1500 W 1300 W 1850 W 1500 W 1300 W SNACK & VOORGERECHTEN DESSERTS Koken Opwarmen Bacon, plakje (G) Zet op rek HOOG 1’30”...
- Page 154 D: Diepvries G: Gekoeld Timer Timer Vermogens- Nagaar- Vermogens- Nagaar- Recept Methode Recept Methode niveau tijd niveau tijd 1850 W 1500 W 1300 W 1850 W 1500 W 1300 W Lasagne 192 g Plaats in MIDDEL 4’00” 4’15” 4’30” 2 min VERSE GROENTEN magnetron- 500 g koken...
-
Page 155: Problemen Oplossen En Foutcodes
10’00” 11’15” 12’30” 2 min gestampt, 4 st. • Vervang de lamp in de oven om veiligheidsredenen niet zelf. Neem contact op met het dichtstbijzijnde klantenservicecentrum van Buffalo om een bevoegde technicus te Ratatouille 500 g HOOG 3’30” 4’00” 4’30”... -
Page 156: Foutcodes
2 seconden overmatige werking zonder lading of een uitlaatlucht te hoog Als u vragen of opmerkingen hebt met betrekking tot de Buffalo-producten, dient u kleine lading of door verstoppend materiaal contact op te nemen met klantenservice van Buffalo. rond het luchtfilter of de luchtuitlaat achter Buffalo. -
Page 157: Technische Specificaties
Het circuit in de oven werkt niet goed. gewijzigd. van 2 seconden Volgens de algemene regulering 2/1984 (III.10) BKM-IpM. verklaren wij als distributeurs dat de ovens GK640, GK641 van Buffalo voldoen aan de genoemde technologische Oplossing parameters. Haal de stekker uit het stopcontact en wacht 10 seconden. - Page 158 MEMO MEMO GK640-E_GK641-E_XEU_DE68-04279B-01_NL.indd 30 2014-06-27 6:50:54...
- Page 159 MEMO MEMO GK640-E_GK641-E_XEU_DE68-04279B-01_NL.indd 31 2014-06-27 6:50:54...
- Page 160 Als u problemen ondervindt met dit apparaat, neem dan contact op met het Buffalo Support Center VRAGEN OF OPMERKINGEN LAND ADRES Buffalo. Fourth Way, Avonmouth, Bristol, The United Kingdom 0845 146 2887 BS11 8TB, The United Kingdom. Nederland 040 262 8080...
- Page 161 GK640-E GK641-E Forno microondas comercial Manual de instruções O papel utilizado na execução deste manual é 100 % reciclado. GK640-E_GK641-E_XEU_DE68-04279B-01_PT.indd 1 2014-06-27 6:50:46...
- Page 162 Informações de segurança ................. 2 UTILIZAR ESTE FOLHETO DE INSTRUÇÕES Funções do forno..................11 Acabou de adquirir um forno microondas Buffalo. Forno ....................11 O Manual de instruções contém informações importantes sobre a Painel de controlo ................12 confecção de alimentos com este forno microondas: Visor ....................12...
- Page 163 INSTRUÇÕES DE SEGURANÇA AVISO: este aparelho pode ser utilizado por IMPORTANTES crianças a partir dos 8 anos e por pessoas com capacidades físicas, sensoriais ou LEIA ATENTAMENTE E GUARDE PARA mentais reduzidas, ou falta de experiência CONSULTAS FUTURAS. e conhecimento, se tiverem supervisão ou Certifique-se de que estas precauções de instruções relativas à...
- Page 164 Se detectar algum fumo, desligue o aparelho Este aparelho não é indicado para ser ou retire o cabo de alimentação da tomada utilizado por pessoas (incluindo crianças) e mantenha a porta fechada para abafar as com capacidades físicas, sensoriais ou chamas.
- Page 165 Caso o forno gere um ruído estranho, um AVISO: para evitar o risco de choque eléctrico, cheiro a queimado ou fumo, desligue a ficha de certifique-se de que o aparelho está desligado alimentação imediatamente e contacte o centro antes de substituir a lâmpada. de assistência mais próximo.
- Page 166 INSTALAR O FORNO MICROONDAS Não utilize produtos de limpeza abrasivos ou raspadores de metal afiados para limpar a porta Coloque o forno numa superfície nivelada e de vidro do forno pois pode riscar a superfície, o plana a 85 cm acima do chão. A superfície que pode resultar no quebrar do vidro.
- Page 167 Não instale o forno microondas num Se não mantiver o forno limpo, a local quente ou húmido, como na superfície pode deteriorar-se e afectar proximidade de um forno tradicional ou o aparelho, resultando em possíveis radiador. As especificações relativas à situações de perigo.
- Page 168 Contacte o centro autorizado de apoio ao forno microondas. cliente da Buffalo mais próximo para que Não deve utilizar o forno se a porta ou os a substituição da lâmpada seja efectuada vedantes da porta estiverem danificados: por um técnico qualificado.
- Page 169 Para sua segurança, não utilize produtos de limpeza com água a Ligue a ficha de alimentação à tomada com firmeza. Não alta pressão nem jactos de vapor. utilize um bloco de tomadas, um cabo de extensão ou um transformador eléctrico. Não instale este aparelho próximo de um aquecedor, de materiais inflamáveis;...
- Page 170 Não coloque o tabuleiro ou a grelha dentro de água pouco depois Mexa os líquidos durante ou após o aquecimento, e deixe que da confecção, pois pode quebrar ou danificar o tabuleiro ou a o líquido repouse, no mínimo, durante 20 segundos após o grelha.
-
Page 171: Funções Do Forno
A Buffalo cobrará uma taxa de reparação pela substituição de um acessório ou pela reparação de um funções do forno defeito estético se o dano no aparelho e/ou dano ou perda do acessório tiver sido causado pelo cliente. Esta cláusula abrange os seguintes itens: FORNO (a) Painel de controlo, porta, pega ou painel exterior riscado, amolgado ou partido. -
Page 172: Painel De Controlo
PAINEL DE CONTROLO VISOR 1. VISOR 6. BOTÃO SELECTOR DE DESCONGELAÇÃO 2. BOTÃO DE PROGRAMAÇÃO 7. BOTÃO DOBRO DA QUANTIDADE 3. BOTÕES NUMÉRICOS (Programação da memória, tempo) 8. BOTÃO +20s (Botão de cozedura de um toque) 4. BOTÃO DE BLOQUEIO DE 1. -
Page 173: Utilização Do Forno
D, então necessitará de programar o seu temporizador para Resultado: acende-se a lâmpada do forno e a ventoinha menos de 3 minutos na potência ALTA para o GK640-E (categoria E). de arrefecimento começa a funcionar. Lembre-se sempre que as instruções de confecção são apenas uma orientação. - Page 174 Cozedura em várias fases Depois de decorrido o tempo programado, o sinal sonoro de fim de ciclo ouve-se 1. Seleccione o nível de potência pretendido carregando no 4 vezes e o aquecimento pára. botão SELECTOR do NÍVEL DE POTÊNCIA ou no botão A luz do forno apaga-se.
-
Page 175: Níveis De Potência E Variações De Tempo
NÍVEIS DE POTÊNCIA E VARIAÇÕES DE TEMPO INTERROMPER A COZEDURA A função de nível de potência permite-lhe adaptar a quantidade de energia dissipada e, Pode interromper a cozedura em qualquer momento, para poder: consequentemente, o tempo necessário para cozinhar ou reaquecer os alimentos, de •... -
Page 176: Utilizar O Botão +20S
UTILIZAR O BOTÃO +20S UTILIZAR AS FUNÇÕES DE DESCONGELAÇÃO Este é um botão de COZEDURA DE UM TOQUE. As funções de descongelação permitem descongelar carne, aves ou peixe. Tocando no botão uma vez, pode começar o aquecimento instantaneamente. Utilize apenas recipientes próprios para microondas. Pode aumentar o tempo de cozedura carregando no botão +20s durante um ciclo de Abra a porta. -
Page 177: Programação Do Botão Da Memória
PROGRAMAÇÃO DO BOTÃO DA MEMÓRIA Uma fase Carregue no botão SELECTOR DO NÍVEL DE POTÊNCIA ou no botão SELECTOR DE DESCONGELAÇÃO uma ou mais vezes até obter o nível de 1. Carregue sem soltar o botão BLOQUEIO DE potência pretendido. PROGRAMAÇÃO e depois carregue no botão PROGRAMAÇÃO. - Page 178 Várias fases Carregue no botão SELECTOR DO NÍVEL DE POTÊNCIA ou no botão 1. Carregue sem soltar o botão BLOQUEIO DE SELECTOR DE DESCONGELAÇÃO uma ou mais vezes até obter o nível de PROGRAMAÇÃO e depois carregue no botão potência pretendido. PROGRAMAÇÃO.
-
Page 179: Como Utilizar A Cozedura Com Um Programa De Memória
COMO UTILIZAR A COZEDURA COM UM PROGRAMA PROGRAMAÇÃO DO BOTÃO DE DOBRO DA DE MEMÓRIA QUANTIDADE Depois de acabada a programação da memória, carregue apenas nos botões 1. Carregue sem soltar o botão CANCELAR e depois NUMÉRICOS do número de memória que quer seleccionar. O forno começa a carregue no botão DOBRO DA QUANTIDADE. -
Page 180: Controlar O Sinal Sonoro
Editar factor de quantidade dupla PROGRAMAR O INTERVALO DE LIMPEZA DO FILTRO DE AR Função Combinação de teclas Visor Observação Quando o indicador de verificação do filtro de ar [FILTER (FILTRO)] aparecer no visor após um determinado tempo de utilização, deverá limpar o filtro de ar de acordo com as Carregue sem soltar o instruções da secção "Limpar o filtro de ar"... -
Page 181: Teclas Ocultas
TECLAS OCULTAS CUIDADOS A TER COM O FORNO MICROONDAS Nota: carregue na tecla 1 e depois na seguinte. Carregue durante 2 segundos. Limpar o forno microondas Combinação de teclas 1. Desligue o forno da tomada antes de o limpar. Função Visor Observação Tecla 1... -
Page 182: Limpar A Cobertura Do Tecto
LIMPAR A COBERTURA DO TECTO INSTRUÇÕES PARA INSTALAÇÃO EM PILHA Importante 1. Agarre os bloqueadores laterais da cobertura do tecto com ambas as mãos e puxe-os para dentro e para baixo. Em seguida, retire a cobertura do tecto para 1. Desligue o cabo de alimentação da tomada antes de proceder à instalação. fora da cavidade do forno. -
Page 183: Substituição Da Lâmpada
SUBSTITUIÇÃO DA LÂMPADA guia de utensílios de cozinha Importante Para cozinhar alimentos no forno microondas, as microondas têm de penetrar nos alimentos, sem serem reflectidas ou absorvidas pelo recipiente utilizado. Por isso, tem de ter cuidado 1. Retire o parafuso que segura a tampa da lâmpada. quando escolhe os utensílios. -
Page 184: Guia De Confecção De Alimentos
guia de confecção de alimentos C: congelado F: frio Próprios para Utensílios de cozinha Comentários microondas Tempo Tempo de Receita Método Nível de potência ✓ • Utensílios de vidro Podem ser utilizados para aquecer alimentos ou 1850 W 1500 W 1300 W espera frágeis líquidos. - Page 185 C: congelado F: frio Tempo Tempo de Tempo Tempo de Receita Método Nível de potência Receita Método Nível de potência 1850 W 1500 W 1300 W espera 1850 W 1500 W 1300 W espera REFEIÇÕES LIGEIRAS E ENTRADAS Feijão cozido Tape e mexa a ALTA 2’00”...
- Page 186 C: congelado F: frio Tempo Tempo de Tempo Tempo de Receita Método Nível de potência Receita Método Nível de potência 1850 W 1500 W 1300 W espera 1850 W 1500 W 1300 W espera Refeição Tapada ALTA 3’00” 3’15” 3’30” 1 min Frango Coloque no...
-
Page 187: Resolução De Problemas E Código De Erro
• Por motivos de segurança, a lâmpada não deve ser substituída pelo utilizador. puré X 4 Contacte o serviço autorizado de apoio ao cliente da Buffalo mais próximo para que Ratatouille a substituição da lâmpada seja efectuada por um técnico qualificado. -
Page 188: Códigos De Erro
• Uma descrição clara do problema durante 2 seg. funcionar correctamente. termístor Em seguida, contacte o revendedor local do serviço pós-venda da Buffalo. (Sensor do termístor em curto-circuito) Se tiver dúvidas ou comentários relativamente aos produtos Buffalo, contacte o Solução centro de assistência ao cliente da Buffalo. -
Page 189: Características Técnicas
Caso apareçam códigos que não estejam na lista acima ou se a solução sugerida não resolver o problema, contacte o serviço local de apoio ao cliente da Buffalo. Português - 29 GK640-E_GK641-E_XEU_DE68-04279B-01_PT.indd 29... - Page 190 NOTAS NOTAS GK640-E_GK641-E_XEU_DE68-04279B-01_PT.indd 30 2014-06-27 6:51:01...
- Page 191 NOTAS NOTAS GK640-E_GK641-E_XEU_DE68-04279B-01_PT.indd 31 2014-06-27 6:51:01...
- Page 192 Se tiver algum problema com a sua máquina, contacte o centro de assistência da Buffalo. PERGUNTAS OU COMENTÁRIOS PAÍS TELEFONE ENDEREÇO Buffalo. Fourth Way, Avonmouth, Bristol, The United Kingdom 0845 146 2887 BS11 8TB, The United Kingdom. Nederland 040 262 8080...
- Page 193 GK640-E GK641-E Commercial Microwave Oven Instruction Manual This manual is made with 100 % recycled paper. GK640-E_GK641-E_XEU_DE68-04279B-01_EN.indd 1 2014-06-27 6:49:36...
- Page 194 Safety information ..................2 USING THIS INSTRUCTION BOOKLET Oven features ....................11 You have just purchased a Buffalo microwave oven. Your Owner’s Oven ....................11 Instructions contains valuable information on cooking with your microwave Control panel ..................12 oven: Display ....................12...
- Page 195 IMPORTANT SAFETY INSTRUCTIONS WARNING: This appliance can be READ CAREFULLY AND KEEP FOR used by children aged from 8 years FUTURE REFERENCE. and above and persons with reduced Make sure that these safety precautions are physical, sensory or mental capabilities obeyed at all times.
- Page 196 If smoke is emitted, switch off or unplug This appliance is not intended for use by the appliance and keep the door closed persons (including children) with reduced in order to stifle any flames. physical, sensory or mental capabilities, or lack of experience and knowledge, WARNING: Microwave heating of unless they have been given supervision beverages can result in delayed eruptive...
- Page 197 If the oven generates a strange noise, WARNING: Ensure that the appliance is a burning smell, or smoke is emitted, switched off before replacing the lamp to unplug the power plug immediately and avoid the possibility of electric shock. contact your nearest service center. WARNING: The appliance and its The microwave oven has to be accessible parts become hot during use.
- Page 198 A equipment is equipment suitable for use in This appliance can be used by children all establishments other than domestic and aged from 8 years and above and those directly connected to a low voltage persons with reduced physical, sensory or power supply network which supplies mental capabilities or lack of experience and knowledge if they have been given...
- Page 199 4. This microwave oven has to be positioned ALWAYS ensure that the door seals are so that plug is accessible. clean and the door closes properly. If the supply cord is damaged, it must be Failure to maintain the oven in a clean replaced by the manufacturer, its service condition could lead to deterioration of the agent or similarly qualified persons in...
- Page 200 (Swing heater model only) The Light bulb should not be replaced in person for safety reasons. STORING AND REPAIRING YOUR Please contact nearest authorised Buffalo MICROWAVE OVEN customer Care centre to arrange for a A few simple precautions should be taken qualified engineer to replace the bulb.
- Page 201 This appliance must be properly grounded in Do not use a damaged power plug, damaged power accordance with local and national codes. cord or loose wall socket. When the power plug or power cord is damaged, contact your nearest Remove all foreign substances such as dust or service centre.
- Page 202 Do not operate the microwave oven for deep Stand at arms length from the oven when opening fat frying because the oil temperature cannot be the door to avoid getting scalded by escaping hot air controlled. This could result in a sudden boil over of or steam.
-
Page 203: Oven Features
Buffalo will charge a repair fee for replacing an accessory or repairing a cosmetic oven features defect if the damage to the unit and/or damage to or loss of the accessory was caused by the customer. Items this stipulation covers include: OVEN (a) A Dented, Scratched, or Broken Door, Handle, Out-Panel, or Control Panel. -
Page 204: Control Panel
CONTROL PANEL DISPLAY 1. DISPLAY 6. DEFROST SELECTOR BUTTON 2. PROGRAM BUTTON 7. DOUBLE QUANTITY BUTTON 3. NUMBER BUTTONS 8. +20s BUTTON (Time, Memory Programming) (One Touch Cook Button) 4. PROGRAM LOCK BUTTON 9. CANCEL BUTTON 1. PROGRAM INDICATOR 5. POWER LEVEL SELECTOR BUTTON 10. -
Page 205: Oven Use
For example : If the heating instructions are 3 minutes on HIGH for a D category oven, buttons. then you will need to set your timer for less than 3 minutes on HIGH for the GK640-E Result : The selected time is displayed in the display (E category). - Page 206 Multi-stage cooking When all time is elapsed, the end of cycle Beep Tone will sound 4 times and all 1. Select the desired power level by pressing the POWER heating will stop. LEVEL SELECTOR button or DEFROST SELECTOR The oven lamp will go off. For 1 min, the display shows ‘0‘ and the cooling fan button.
-
Page 207: Power Levels And Time Variations
POWER LEVELS AND TIME VARIATIONS STOPPING THE COOKING The power level function enables you to adapt the amount of energy dissipated and thus You can stop cooking at any time so that you can: the time required to cook or reheat your food, according to its type and quantity. You can •... -
Page 208: Using +20S Button
USING +20S BUTTON USING THE DEFROST FEATURES This is a ONE TOUCH COOK button. The Defrost features enables you to defrost meat, poultry or fish. By touching the button once, you can start heating instantly. Only use containers that are microwave-safe. You can increase the cooking time by pressing the +20s button while heating is being Open the door. -
Page 209: Memory Button Programming
MEMORY BUTTON PROGRAMMING One-stage The maximum time according to each cooking power level can be referred to in the title “Power Levels and Time Variations” on page 15. The NUMBER buttons will not 1. Hold down PROGRAM LOCK and then press PROGRAM operate or respond when you press a cooking time exceeding the maximum value. - Page 210 Multi-stage The maximum time according to each cooking power level can be referred to in the 1. Hold down PROGRAM LOCK and then press PROGRAM title “Power Levels and Time Variations” on page 15. The NUMBER buttons will not button. Hold together for 2 sec. operate or respond when you press a cooking time exceeding the maximum value.
-
Page 211: How To Operate Memory Cooking
HOW TO OPERATE MEMORY COOKING DOUBLE QUANTITY BUTTON PROGRAMMING After having finished memory programming, just press the NUMBER buttons of the 1. Hold down CANCEL button and then press the DOUBLE memory number you want to select. The oven will automatically start heating according QUANTITY button. -
Page 212: Controlling Beep Tone
Double Quantity Factor Editing PROGRAMMING AIR FILTER CLEAN TIME When the air filter check indicator (FILTER) appears in the display window after a certain Feature Key Entry Display Remark time of use, you should clean the air filter according to the instructions “Cleaning the Hold down Air Filter”... -
Page 213: Hidden Keys
HIDDEN KEYS CARE OF YOUR MICROWAVE OVEN Note: Press Key 1 and then the next one. Hold for 2 secs. Cleaning the Microwave Oven 1. Unplug the oven from the electrical socket before cleaning. Key Entry Feature Display Remark Key 1 Next 2. -
Page 214: Cleaning The Ceiling Cover
CLEANING THE CEILING COVER INSTALLATION INSTRUCTIONS FOR STACKING Important 1. Hold side stoppers of ceiling cover with both hands and pull them in and down. Then take the ceiling cover out of the oven cavity. 1. Disconnect the power cord from the wall socket before attempting installation. 2. -
Page 215: Replacement Of Lamp
REPLACEMENT OF LAMP cookware guide Important To cook food in the microwave oven, the microwaves must be able to penetrate the food, without being reflected or absorbed by the dish used. 1. Remove a screw securing the lamp cover. Care must therefore be taken when choosing the cookware. If the cookware is marked 2. -
Page 216: Cooking Guide
cooking guide Microwave- F : Frozen C : Chilled Cookware Comments safe Timing Power Stand Metal Recipe Method Level Time 1850 W 1500 W 1300 W ✗ • Dishes May cause arcing or fire. BREAD & PASTRIES ✗ • Freezer bag twist To Defrost ties Vienna Baton... - Page 217 F : Frozen C : Chilled Timing Timing Power Stand Power Stand Recipe Method Recipe Method Level Time Level Time 1850 W 1500 W 1300 W 1850 W 1500 W 1300 W SNACK & STARTERS DESSERTS To cook To warm Bacon, rasher Place on rack HIGH...
- Page 218 F : Frozen C : Chilled Timing Timing Power Stand Power Stand Recipe Method Recipe Method Level Time Level Time 1850 W 1500 W 1300 W 1850 W 1500 W 1300 W Lasagne 192 g Place in 4’00” 4’15” 4’30” 2 mins FRESH VEGETABLES microwave...
-
Page 219: Troubleshooting And Error Code
2 mins 500 g • The Light bulb should not be replaced in person for safety reasons. Please contact Sprouts Cover, stir nearest authorised Buffalo customer care, to arrange for a qualified engineer to HIGH 3’00” 3’30” 4’00” 2 mins half way replace the bulb. -
Page 220: Error Codes
Then contact your local dealer or Buffalo aftersales service. Plug the power cord again. If the symptom persists, contact the nearest service centre. If you have any questions or comments relating to Buffalo products, please contact the Buffalo customer care centre. Temperature of... -
Page 221: Technical Specifications
Buffalo strives to improve its products at all times. Both the design specifications and Error Items Code Error Beep Cause these user instructions are thus subject to change without notice. HVT-I Power One long beep The circuitry inside the oven is not By right of the common regulation 2/1984 (III.10) BKM-IpM. - Page 222 MEMO MEMO GK640-E_GK641-E_XEU_DE68-04279B-01_EN.indd 30 2014-06-27 6:49:56...
- Page 223 MEMO MEMO GK640-E_GK641-E_XEU_DE68-04279B-01_EN.indd 31 2014-06-27 6:49:56...
- Page 224 If you have any problems with your machine please contact Buffalo Support Center QUESTIONS OR COMMENTS COUNTRY CALL ADDRESS Buffalo. Fourth Way, Avonmouth, Bristol, The United Kingdom 0845 146 2887 BS11 8TB, The United Kingdom. Nederland 040 262 8080 Germany...
Need help?
Do you have a question about the GK640-E and is the answer not in the manual?
Questions and answers
How to solve thus problem?