Advertisement
Quick Links
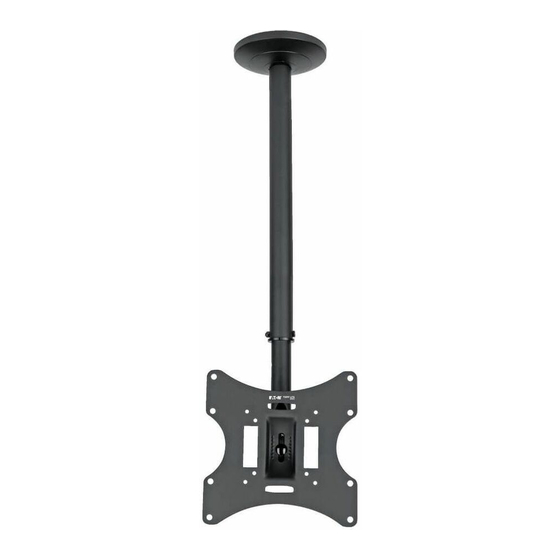
Full-Motion
Ceiling Mount
75x75
100x100
200x100
200x200
Este manual esta disponible en español en la página de Tripp Lite: www.tripplite.com
Ce manuel est disponible en français sur le site Web de Tripp Lite : www.tripplite.com
Русскоязычная версия настоящего руководства представлена на веб-сайте компании
Dieses Handbuch ist in deutscher Sprache auf der Tripp Lite-Website verfügbar: www.tripplite.com
PROTECT YOUR INVESTMENT!
Register your product for quicker service
and ultimate peace of mind.
You could also win an
ISOBAR6ULTRA surge protector—
a $100 value!
www.tripplite.com/warranty
1111 W. 35th Street, Chicago, IL 60609 USA • www.tripplite.com/support
18-02-428 93-37FF-EN.indd 1
Owner's Manual
MODEL: DCTM
CAUTION: DO NOT EXCEED
MAXIMUM LISTED WEIGHT
CAPACITY. SERIOUS INJURY
OR PROPERTY DAMAGE
MAY OCCUR!
Tripp Lite по адресу: www.tripplite.com
Copyright © 2018 Tripp Lite. All rights reserved.
42"
MAX
1
66 lb.
(30 kg)
MAX
3/14/2018 10:45:58 AM
Advertisement

Related Manuals for Tripp Lite DCTM


Summary of Contents for Tripp Lite DCTM
- Page 1 Owner’s Manual Full-Motion Ceiling Mount MODEL: DCTM CAUTION: DO NOT EXCEED MAXIMUM LISTED WEIGHT CAPACITY. SERIOUS INJURY OR PROPERTY DAMAGE MAY OCCUR! 75x75 42” 100x100 66 lb. 200x100 (30 kg) 200x200 Este manual esta disponible en español en la página de Tripp Lite: www.tripplite.com Ce manuel est disponible en français sur le site Web de Tripp Lite : www.tripplite.com...
-
Page 2: Warranty And Product Registration
Warranty and Product Registration 5-Year Limited Warranty Seller warrants this product, if used in accordance with all applicable instructions, to be free from original defects in material and workmanship for a period of 5 years from the date of initial purchase. If the product should prove defective in material or workmanship within that period, Seller will repair or replace the product, in its sole discretion. -
Page 3: Parts List
Parts List Knob Coupling Joint Hardware Cover Ceiling Plate Flat Washer Lock Washer Straight Pole Telescoping Pole M6 Nut VESA Plate Bracket Square Neck Washer M6 x 45 Bolt VESA Plate Cover Square Neck M8 x 20 Screw M8 Nut Square Neck M8 x 45 Bolt M4 x 14 Screw M5 x 14 Screw... - Page 4 Assembly Attach Ceiling Plate to Ceiling Wood Joist Ceiling Mounting Ceiling Plate Anchor Bolt Anchor Bolt 18-02-428 93-37FF-EN.indd 4 3/14/2018 10:46:00 AM...
- Page 5 Assembly Concrete Ceiling Mounting Concrete Ceiling Plate Anchor Anchor Bolt Anchor Bolt 18-02-428 93-37FF-EN.indd 5 3/14/2018 10:46:01 AM...
- Page 6 Assembly Attach Straight Pole to Ceiling Plate M6 x 45 Bolt Coupling Joint M6 Nut Straight Pole Hardware Cover Run Power Cord Through Components, Then Attach Telescoping Tube to Desired Length M6 Nut M6 x 45 Bolt M6 Nut Coupling Joint Telescoping Pole 18-02-428 93-37FF-EN.indd 6...
- Page 7 Assembly Assemble VESA Plate and Bracket VESA Plate VESA Plate Knob Lock Washer Cover Square Neck M8 x 20 Screw Flat Washer VESA Plate Bracket Attach VESA Assembly to Telecoping Pole Arm Square Neck M8 x 45 Bolt Square Neck Washer Square Neck Washer Flat Washer M8 Nut...
- Page 8 Assembly Attach Display To VESA Plate WARNING: Always use an assistant or mechanical lifting equipment to safely lift and position equipment. M4 x 14 M6 x 14 M5 x 14 M8 x 20 M8 x 20 Spacer M8 x 20 Spacer Note: Choose appropriate screws, washers and spacers (if necessary) according to the type of screen.
- Page 9 Assembly Adjustment Turn Knob Counterclockwise to Adjust Display to Turn Knob Clockwise to Loosen Display Bracket Desired Angle Tighten Display Position 18-02-428 93-37FF-EN.indd 9 3/14/2018 10:46:05 AM...
-
Page 10: Maintenance
Maintenance • Check that the mount is secure and safe to use at regular intervals (at least every three months). • Please visit www.tripplite.com/support if you have any questions. 18-02-428 93-37FF-EN.indd 10 3/14/2018 10:46:05 AM... - Page 11 18-02-428 93-37FF-EN.indd 11 3/14/2018 10:46:05 AM...
- Page 12 1111 W. 35th Street, Chicago, IL 60609 USA • www.tripplite.com/support 18-02-428 93-37FF_RevA 18-02-428 93-37FF-EN.indd 12 3/14/2018 10:46:06 AM...
Need help?
Do you have a question about the DCTM and is the answer not in the manual?
Questions and answers