Table of Contents
Advertisement
Advertisement
Table of Contents

Subscribe to Our Youtube Channel
Related Manuals for Fortress Technologies S6 Titan


Summary of Contents for Fortress Technologies S6 Titan
- Page 1 S6 Titan Security System Wi-Fi and 3G GSM Version 1 - Apr 2018...
-
Page 3: Table Of Contents
Table of Contents Introduction Self Monitoring GSM SIM Card and Land Line Free Mobile App (iPhone / Android) Pre-Programmed Accessories Connections for Existing Sensors Support Resources The Main Panel Main Panel Keypad Navigating the Menus First-Time Setup Take Notes Test the Accessories Install the Equipment Program Phone Number(s) Download the Mobile App... - Page 4 Table of Contents (continued) Phone Controls (continued) Placing an Outbound Call From the System Only Contacts Can Call / Text the Main Panel Recording Your Custom Message Date & Time / Scheduling / Auto Arm, Auto Disarm Delays - Entry & Exit Delay Panel Settings Arm / Disarm SMS Power / Battery Notices...
-
Page 6: Introduction
GSM SIM Card and Land Line You can connect your S6 Titan main panel to a land line if you have one available. You can also use a GSM SIM card so the system can place calls over a cellular tower, with no land line required. -
Page 7: Pre-Programmed Accessories
Connections For Existing Sensors If you have some existing third-party wired sensors, you can also connect those to the S6 Titan main panel, and use them with your new system, too. No programming is needed for wired sensors. Simply connect them and start... -
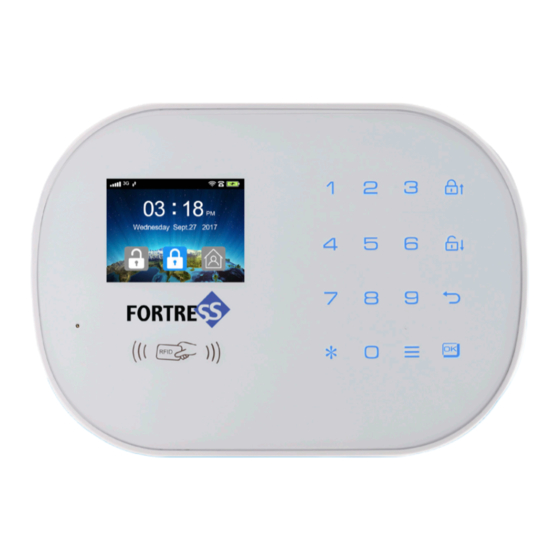
Page 8: The Main Panel
The Main Panel In this section we’ll introduce you to the S6 Titan main panel. This main panel is a hub for your accessories. The alarm is armed or disarmed through this main panel, and you can also change settings for your system in the main panel’s menus. - Page 9 Main Panel (back) Tamper Switch Power Switch Ports (see below)
-
Page 10: Navigating The Menus
Navigating the Menus Waking the screen By default, the screen will time out after a certain amount of inactivity. When that happens, your panel would still be powered on and working, but the screen would be dark. To wake the screen and access the system, press any key on the keypad. - Page 11 Scrolling, Selecting, Deleting, etc. The Main Menu, pictured below, contains several other menus within it. In general, the currently selected item in the menu will be outlined, or highlighted, in orange. The Main Menu You can scroll through the menu options using the Scroll Up and Scroll Down Buttons, and select an option with the OK Button.
- Page 12 The Status Bar The Status Bar on the top of the screen features several icons. Here’s a breakdown of what they each mean. GSM Signal Level (Talk / Text) (or “No SIM” or “Searching...”) Internet Connection Detected (via either WiFi or Mobile Data) WiFi Connected (red X = not connected) New Event(s) in Alarm Log / History...
-
Page 13: First-Time Setup
(If you add more accessories at a later time, programming them is quick and easy.) Here are a few quick steps you can take to set up your new S6 Titan Security System: • Take Notes - Zone Numbers • Test the Accessories •... -
Page 14: Test The Accessories
Test the Accessories Before installing or mounting the accessories, it’s a good idea to test each one to make sure they’re all working. You can arm the system, trigger an accessory, and confirm that the alarm triggers and reports the Zone number to you. There are more details about how to trigger the accessories in the Accessories section of this user manual. -
Page 15: Program Phone Number(S)
Program Phone Number(s) Note: If you plan to use this system as a local alarm without a phone connection, you can skip this step. You can specify up to 6 different phone numbers for the system to call if the alarm is triggered. The Contacts menu is the first option in the Main Menu. -
Page 16: Download The Mobile App
Download the Mobile App Download the app You can download the free mobile app for iOS or Android by opening the App Store and searching for “My Fortress. ” You can also scan this QR code: http://app.fortresssecuritystore.com Connect your panel to the app Then, you can follow the instructions in the mobile app to connect your seurity system to the app. -
Page 17: Change Your Password
Change Your Password Your S6 Titan system uses two passwords: the 4-digit User Password is used to disarm your system, and the 6-digit Administrator Password is used to access your menus and adjust settings in the panel. Default User Password (disarm):... -
Page 18: Remote Control Features
Remote Notifications Phone Call Text Message (SMS) Push Notification Email Notification The S6 Titan main panel can use multiple methoeds to contact you. -
Page 19: Remote Control Options
Remote Control Options When the S6 Titan main panel is connected using one or more methods for remote control, then you can send com- mands to the system and check the status of the system remotely. Below is a description of the things you can do... -
Page 20: Connecting A Landline
Connecting a Landline You can connect the S6 Titan main panel to a landline phone line using the RJ-11 phone cable that’s provided in the box. Plug the phone cable into your existing landline jack (usu- ally in the wall outlet or in your modem). In other words, plug the cable into wherever you receive dial tone from your phone company. -
Page 21: Connecting / Activating A Sim Card
Connecting / Activating a SIM Card When you have a SIM card installed and activated in the S6 Titan main panel, then it’s able send and receive calls and texts, just as if it were a cellular phone. In that way, it’s able to notify you even without a landline or WiFi connection. -
Page 22: Connecting To Wifi - Mobile App
Connecting to WiFi When the main panel is connected to a WiFi signal, then the WiFi icon on the top of the screen will show one or more bars of signal strength. If the main panel is not con- nected to WiFi, then you will see a red X in front of the WiFi symbol. -
Page 23: Connecting To Wifi - Wifi Scan Mode
Using WiFi Scan Using the WiFi Scan option, the panel will search for any nearby signals, and will allow you to select one to connect to. You will then be prompted to enter in the password for that WiFi network (if any), and then the panel will attempt to connect. -
Page 24: Discconecting From Wifi
WiFi Central Monitoring (Contact ID) (Landline or SIM card required) The S6 Titan main panel can be configured to work with a central monitoring company, using a SIM card or landline connection. The technology that is used is called “Contact ID”... - Page 25 Central Monitoring (continued) Here are the steps to configure your panel to contact the monitoring company: 1. Add the phone number for the monitoring company as the first number in the panel’s Contact List 2. Select the option for “CID”. 3.
-
Page 26: Using The System
Using the System If you’re setting up your S6 Titan Security System for the first time, we recommend browsing through the previous sections of this user manual, The Main Panel and First- Time Setup. In this section, we’ll talk about the features and settings... -
Page 27: Arming And Disarming
Arming and Disarming You can arm and disarm the system using a few differ- ent methods. Also, there are two different arming modes that your system can be armed in, called Away Armed and Home Armed. By default, here is how the system will be- have in these different modes: •... - Page 28 • Arm in Away Mode: Press the Arm Button (locked padlock). If the Keypad Lock is enabled, you will need to enter your 4-digit User Password. If the Exit Delay is enabled, then the system will be armed when the Exit Delay is finished. You can skip the Exit Delay by pressing the Arm But- ton again.
-
Page 29: Phone Controls
Phone Controls Adding/Removing Contact Phone Numbers You can specify up to 6 different phone numbers for the system to call if the alarm is triggered. The system will call each number in order, one at a time. If no one answers, the system will call the whole list a total of 3 times. - Page 30 Adding/Removing Contact Phone Numbers (cont.) Note: When programming your phone number(s) into the system, we recommend including the country code and the area code. The country code for the US is ‘1. ’ You can also select a Type setting for your contact phone number, as described below.
-
Page 31: Controlling The System Over The Phone
Only SMS The system will send an SMS / text message to this number. (Active SIM card required.) This setting is used if you are connecting your system with a third-party monitoring company that uses CID tech- nology. The monitoring company will provide you with a CID phone number, which you can add here, and set the Type to “CID”. -
Page 32: Placing An Outbound Call From The System
Controlling the System Over the Phone (cont.) Here’s a full list of the commands available for controlling the system over the phone. When you place a call to the system: Enter your password when prompted, then... Press 0 - Play back the recorded message Press 1 - Enable 1-way Intercom / Listen In (SIM card required) Press 2 - Turn sirens on Press 3 - Turn sirens off... -
Page 33: Only Contacts Can Call / Text The Main Panel
Only Contacts Can Call or Text the Main Panel Only people whose phone numbers have been added to the Contact List in the main panel ahead of time will be able to call or text inbound to the main panel. It will ignore calls and texts from all other numbers. -
Page 34: Date & Time / Scheduling / Auto Arm, Auto Disarm
Date & Time / Scheduling / Auto Arm This system allows you to set the date and time in your local time zone, and then you can schedule certain events to happen automatically at certain times of day, on certain days of the week. - Page 35 The Auto Arm Menu Creating a scheduled event in No scheduled events exist yet the Auto Arm Menu. At this scheduled day / time, The Auto Arm Menu the system can arm in either mode, with a schedule created. or disarm itself. Smart Outlet Timers If you have one or more Smart Outlet accessories, you can also program the Smart Outlet(s) to turn on or off auto-...
-
Page 36: Delays - Entry & Exit Delay
Delays - Entry & Exit Delay In the Delay Menu, you can specify a system-wide Entry Delay, and a system-wide Exit Delay. These apply to all of the accessories in your system, in all Zones. An Entry Delay will begin counting down if a sensor is trig- gered. -
Page 37: Panel Settings
Main Menu -> Sensors -> Sensors -> Zone -> Sensors -> Edit Editing a sensor’s settings The delay setting is on A 15-second delay has the second page been set for this sensor. Panel Settings There are a variety of options that are referred to as Panel Settings, because these settings control how your panel will behave in certain situations. -
Page 38: Power / Battery Notices
Main Menu -> System -> Arm / Disarm SMS By default, these options are disabled. Press OK to enable one or more options. Power / Battery Notices The panel can optionally alert you when batteries are get- ting low, or when power is lost or restored on the main panel. -
Page 39: Volume Settings
GSM Ring determines how many rings the panel will wait for before picking up an inbound call that’s coming in over the SIM card. (Active SIM card required.) PSTN Ring determines how many rings the panel will wait for before picking up an inbound call that’s coming in over the land line. -
Page 40: Key Tone
Main Menu -> System -> Volume The Volume Menu Key Tone By default, when pressing buttons on the main panel, the panel will respond with a short beep, or tone. This Key Tone option can be toggled on or off in this menu. Main Menu ->... -
Page 41: Brightness
Brightness The Brightness Menu allows you to adjust the screen’s brightness. There are 5 brightness levels. Main Menu -> System -> Brightness Selecting a brightness level... -
Page 42: Working With Accessories
Working With Accessories The S6 Titan main panel can be programmed with up to 100 accessories (150-foot range). It also has support for connecting up to 2 zones of third-party wired sensors. More than one wired sensor can be on the same zone. -
Page 43: Remote Key Fobs
Remote Key Fobs The Remote Key Fobs can be used to control the system from up to 150 feet away from the main panel. You can arm the system from outside the house as you leave in the morning, and disarm the system before open- ing the door when you come home. -
Page 44: Wireless Sensors / Detectors
Grouping Accessories in Zones Fortress Security Store offers a variety of different wireless sensors and detectors that can be used with your S6 Titan Security System. When adding an accessory to the system, it will be added into a numbered Zone. - Page 45 Adding a Sensor to a Zone Choose a Zone and press OK. While ‘Sensors’ is selected, press OK again. A newly created Zone will be empty until accessories are added to it. Press OK. The panel is now in listening mode. Trigger the accessory to add it to this Zone.
- Page 46 Settings for Sensors Each sensor will have its own settings that can be adjusted individually. • Name Assign a custom name for the sensor • Type This Type label tells a 3rd-party monitoring company how to respond to the alarm •...
- Page 47 Sensor Modes There are four Modes which you can choose from for how sensors will behave. • Normal In this mode, if the alarm is Away Armed or Home Armed, then the sensor will trigger the alarm. (Entry Delay still applies.) If the system is Disarmed, then the sensor will do nothing.
- Page 48 Triggering Accessories Part of the programming process involves triggering the sensor to send a signal to the main panel. Different sensors can be triggered in different ways. • Door Sensor Begin with the magnet and sensor next to each other, then separate the magnet from the sensor.
-
Page 49: Rfid Key Tags
RFID Key Tags RFID Key Tags are ideal for sharing with house guests, cleaning staff, security personnel, or anyone who needs temporary access to your system. If someone has an RFID Key Tag, they don’t need to know your password in order to disarm the system. If an RFID Key Tag is lost or stolen, you can easily de-program that Key Tag so that it won’t work with your system anymore. -
Page 50: Secondary Rfid Keypad
Secondary RFID Keypad If you have an RFID Keypad with your system, you can use that to arm and disarm the system as well. Additionally, you can swipe the RFID Key Tags in front of the Keypad to disarm the system. The Secondary RFID Keypad also comes with 2 additional Key Tags. - Page 51 Programming the Keypad to the Main Panel The main panel considers the RFID Keypad to be the same as a Remote Key Fob, so when programming the Keypad to the Main Panel, it will be added under the Remotes menu. Main Menu ->...
-
Page 52: Wireless Sirens
Wireless Sirens The S6 Titan system works with one or more wireless si- rens that can be placed anywhere within range of the panel (150 feet). Like the other accessories, sirens that come with your new system are pre-programmed by our technicians so they should be working right out of the box. - Page 53 Setting Wireless Sirens into Programming Mode Each of the wireless sirens compatible with the S6 Titan system can be set into “programming mode” as part of the process to add it to your system. Here are the details for each type of wireless siren that we offer now.
- Page 54 Round Plug-In Strobe Siren Small Indoor Plug-In Siren Press and hold the white programming button on the back (not pictured) Press the black programming button on the side. Indoor / Outdoor Strobe Siren Press and hold the black pro- graming button on the back, just below the power switch.
- Page 55 Black Outdoor Siren Disconnect and reconnect the pow- er 3 times in a row, quickly. On the third time, leave it plugged in. Note: For the Black Outdoor Siren, if you wait too long in between plugging it in and unplugging it during this process, the siren will time out.
-
Page 56: Smart Outlets
Smart Outlets If you have one or more Smart Outlets with your system, these can be plugged into a regular outlet in the wall, and controlled remotely. That way, you can turn appliances on or off from anywhere. You can also define a weekly sched- ule for a Smart Outlet to turn on or off automatically. - Page 57 Next, we’ll create an Outlet in the system’s menu, and then sync the panel with the Smart Outlet. Main Menu -> Sensors -> Wireless Outlet No outlets have been added yet. An outlet has now been created. Press OK to add an outlet. Press Back once.
- Page 58 After the signal is sent, the Pressing Back takes us back screen will now show to the outlet list. “Turn On”. Now, press the white button on the Smart Outlet. The light on the Smart Outlet will turn red. Your Smart Outlet is now programmed. You can test it by turning it on and off from the panel, as shown.
- Page 59 Creating a Schedule for a Smart Outlet The Smart Outlet can be programmed with a weekly sched- ule to turn on and off automatically at different times. Set one or more Timers to create the schedule, as shown. No timers have been created The Timer setup screen.
-
Page 60: Wired Accessories
Wired Accessories The S6 Titan main panel has a connector port for a wired siren, and also some connections for any third-party wired sensors that you may have. Wired Siren Wired Sensors A close-up of the back of the main panel. - Page 61 Wired Sensors Settings If you have any wired sensors connected, no programming is required to make them work. You can change the settings for your wired sensors in the Sensors Menu, as shown. Main Menu -> Sensors -> Wired Sensors Two wired zones Z1 and Z2 The Wired Sensor Menu Changing settings for a wired zone...
-
Page 62: Technical Specifications
Technical Specifications This section contains technical specifications for the S6 Titan main panel. For technical information regarding the accessories, you can refer to the documentation for that accessory. We also have details available on our web site. https://www.fortresssecuritystore.com/ Power Input: DC 5V Standby Current: <25mA Alarm Current: <500mA RF Frequency: 433MHz... -
Page 63: Troubleshooting
Troubleshooting If you experience any difficulties with the system, you can contact Fortress Customer Support for assistance. • https://www.fortresssecuritystore.com/faq • https://www.fortresssecuritystore.com/contacts • support@fortresssecuritystore.com • +1 (206) 981-5371 We also have some general troubleshooting tips you can try if your system is experiencing any problems. Power Cycling the Main Panel If the system begins behaving unexpectedly, or stops work- ing as usual, one possible solution is to power cycle the... -
Page 64: Checking Placement Of Sensors
Checking Placement of Sensors If one or more sensors is not working consistently or cor- rectly, or if you are receiving frequent false alarms, you may need to check the placement of the sensors to make sure they are oriented correctly for best performance. •... -
Page 65: Space For Notes
Space For Notes This space intentionally left blank. - Page 66 This space intentionally left blank.
- Page 67 This space intentionally left blank.
- Page 68 www.FortressSecurityStore.com Contact Us!
Need help?
Do you have a question about the S6 Titan and is the answer not in the manual?
Questions and answers