Table of Contents
Advertisement
Advertisement
Table of Contents

Related Manuals for Fortress Technologies S03


Summary of Contents for Fortress Technologies S03
- Page 1 Security System Version 3 - Mar 2018...
-
Page 3: Table Of Contents
Table of Contents Introduction The Main Panel Main Panel Front Main Panel Back Main Panel Ports First-Time Setup Take Notes Test the Accessories Install the Equipment Add / Remove Phone Number(s) Change Your Password Change Optional Settings Using the System Arming and Disarming Ready to Arm Feature Phone Controls... - Page 4 Table of Contents (continued) Working With Accessories Remote Key Fobs Wireless Sensors / Detectors RFID Key Tags Secondary RFID Keypad Wireless Sirens Wired Accessories Smart Outlets Removing All Accessories Technical Specifications Troubleshooting Contacting Customer Support Power Cycling the Main Panel Changing Accessory Batteries Checking Placement of Sensors Performing a Factory Reset...
-
Page 6: Introduction
Introduction Thank you for purchasing the S03 Security System from Fortress Security Store! We’ll highlight some of the fea- tures of your new system here. You can browse through the Table of Contents at the beginning of this user manual to quickly find answers to any questions you may have about your system. -
Page 7: The Main Panel
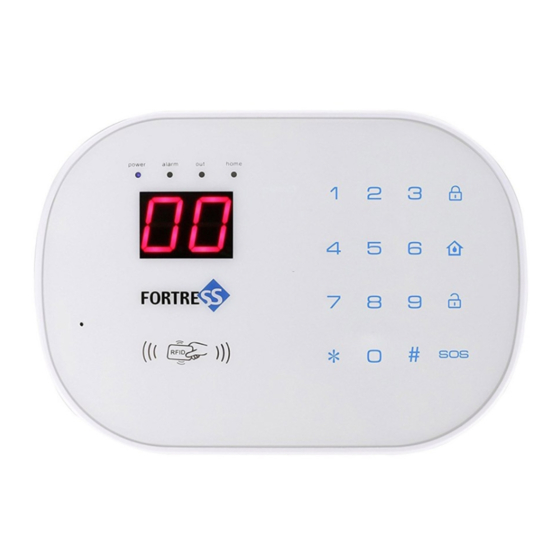
The Main Panel The S03 main panel is the hub where you can arm and dis- arm your system, and make changes to settings. Let’s take a look at the details of the main panel. Main Panel Front Status Lights... - Page 8 The alarm has been triggered The system is in Programming Mode The system is armed in Home Mode The system is armed in Out / Away Mode Note: If the Out light is blinking, that indicates that the sys- tem is counting down for its Exit Delay to give you time to leave before the system arms.
- Page 9 Keypad Buttons Numeric Keys Arm in Out / Away Mode Arm in Home Mode Disarm SOS / Panic Button (press and hold) Star Key Pound Key Note: Wake up the keypad to begin entering commands. To wake up the keypad, press any key. The keys will light up with a blue backlight, as shown below.
-
Page 10: Main Panel Back
RFID Keyless Entry The main panel has RFID technology built in. You can swipe your RFID Key Tag over this logo on the front of the main panel to disarm the system. Main Panel Back Power Switch Tamper Switch (inside) Ports (see next page) -
Page 11: Main Panel Ports
Main Panel Ports A close-up of the ports on the back of the main panel Main Panel Power Once set up, the main panel’s power switch should be turned ON, and the power cable should also be plugged in. This will ensure that the internal backup battery will be charging whenever the main panel is receiving power. -
Page 12: Entering Commands
Entering Commands Arming the System To arm the system in Out Mode, wake the keypad and then press the Arm Button (Lock icon). To arm the system in Home Mode, wake the key- pad and then press the Home Arm Button (House icon). - Page 13 Responses from the Main Panel When pressing buttons on the Main Panel keypad, you’ll hear one beep for every button you press. If you don’t hear a beep, then the panel did not recognize the button press. (It does not beep when you wake up the keypad.) When you’ve finished entering a command, you’ll hear two beeps from the panel to let you know that the command was recognized successfully.
-
Page 14: First-Time Setup
(If you add more accessories at a later time, programming them is quick and easy.) Here are a few quick steps you can take to set up your new S03 Security System: • Take Notes - Zone Numbers • Test the Accessories •... -
Page 15: Test The Accessories
Test the Accessories Before installing or mounting the accessories, it’s a good idea to test each one to make sure they’re all working. You can arm the system, trigger an accessory, and confirm that the alarm triggers and reports the Zone number to you. There are more details about how to trigger the accessories in the Accessories section of this user manual. -
Page 16: Add / Remove Phone Number(S)
Program Phone Number(s) The S03 Security System can dial up to 6 different phone numbers that you specify, and play a brief, custom message that you record ahead of time. The system will call each number one at a time, in order. You can enter phone num- bers up to 14 digits long. -
Page 17: Change Your Password
Change Your Password The default password for the S03 Security System is 1234. To set a new password, enter Programming Mode (page 7), then... 1 0 * [New 4-digit password] # Then you can press # again to exit Programming Mode. -
Page 18: Using The System
Using the System If you’re setting up your S03 Security System for the first time, we recommend browsing through the previous sec- tions of this user manual, The Main Panel and First-Time Setup. In this section, we’ll talk about the features and settings... -
Page 19: Arming And Disarming
Arming and Disarming Using the Main Panel Arming the System To arm the system in Out Mode, wake the keypad and then press the Arm Button (Lock icon). To arm the system in Home Mode, wake the key- pad and then press the Home Arm Button (House icon). -
Page 20: Ready To Arm Feature
Using a Secondary RFID Keypad • Disarm: Swipe an RFID Key Tag, or enter the Keypad’s pass- word and then press the Keypad’s Disarm Button. • Arm: Enter the Keypad’s password, then press Arm Button. For more information about the Seconrdary RFID Keypad, see the Working With Accessories section. -
Page 21: Phone Controls
Phone Controls If you have a land line phone connection, you can connect your S03 Security System by plugging in the phone cable from the wall to the LINE port on the back of the Main Panel (page 6). If you also want to connect a phone to the same line, then the phone can be plugged into the panel using the EXT port. -
Page 22: Answering Calls From The System
Answering Calls from the System When the system calls out and the call is answered, the person who answered will hear the custom message that’s been recorded into the system ahead of time. While this recorded message is playing, pressing # will prevent the sys- tem from calling any other numbers in the list. -
Page 23: Ring Count
3 times every 30 seconds to notify you. Without dial tone, the phone control features of the S03 Security System will not work correctly. -
Page 24: Entry Delay
Exit Delay By default, when you arm the system in Out Mode, the Main Panel will count down with an Exit Delay in order to give you time to leave before the system is armed. The Out light will be flashing while the Exit Delay is counting down. The default Exit Delay is 30 seconds, and it can be adjusted from 0 to 90 seconds. -
Page 25: Siren Time / Silent Alarm
Siren Time / Silent Alarm You can adjust how long the Internal Wired Siren will sound for when the alarm is triggered, from 0 to 30 min- utes (default 1 minute). If this is set to 0, all sirens will be off and the alarm will be silent. -
Page 26: Zone Settings
To toggle the Door Chime feature for a certain Zone, enter Programming Mode (page 7), then... Enable: * [2-digit Zone number] 7 1 # Disable: * [2-digit Zone number] 7 0 # The Door Chime feature is ideal for anyone using the sys- tem in a small business location, where you may want to know when customers walk in your front door, or etc. - Page 27 3 - Emergency Any accessories in a Zone with this setting will trigger the alarm immediately, even if the system is disarmed. This is ideal for certain types of accessories, such as smoke alarms, panic buttons, etc. 4 - Disabled Any accessories in a Zone with this setting will not trigger the alarm, even if the system is armed.
-
Page 28: Working With Accessories
Working With Accessories The S03 main panel can be programmed with up to 100 accessories (150-foot range). The system has 32 numbered Zones for wireless accessories, which can hold up to 10 ac- cessories each. It also has support for connecting up to 2 zones of third-party wired sensors. -
Page 29: Remote Key Fobs
Remote Key Fobs The Remote Key Fobs can be used to control the system from up to 150 feet away from the main panel. You can arm the system from outside the house as you leave in the morning, and disarm the system before open- ing the door when you come home. -
Page 30: Rfid Key Tags
Also, make sure that the Zone Settings for the Zone that you’ve chosen are correct so that the accessory you’re add- ing will behave as expected. You can see more information in the previous section, entitled Zone Settings. RFID Key Tags RFID Key Tags are ideal for sharing with house guests, cleaning staff, security personnel, or anyone who needs temporary access to your system. -
Page 31: Secondary Rfid Keypad
Secondary RFID Keypad If you have an RFID Keypad with your system, you can use that to arm and disarm the system as well. Additionally, you can swipe the RFID Key Tags in front of the Keypad to disarm the system. The Secondary RFID Keypad also comes with 2 additional Key Tags. -
Page 32: Wireless Sirens
(or swipe an RFID Key Tag in front of the Keypad.) Wireless Sirens The S03 Security System works with one or more wireless si- rens that can be placed anywhere within range of the panel (150 feet). Like the other accessories, sirens that come with your new system are pre-programmed by our technicians so they should be working right out of the box. - Page 33 Triggering Wireless Sirens Each of the wireless sirens compatible with the S03 system can be triggered as part of the process to add it to your system. Here are the details for each type of wireless siren...
- Page 34 Round Plug-In Strobe Siren Small Indoor Plug-In Siren Press and hold the white programming button on the back (not pictured) Press the black programming button on the side. Indoor / Outdoor Strobe Siren Press the black programing button on the back, just below the power switch.
- Page 35 Solar Siren Press and hold the volume button. There are 2 indentations in the white plastic on the back for a finger / thumb. The Volume Button is the upper one of these spots. Black Outdoor Siren Disconnect and reconnect the power 3 times in a row, quickly.
-
Page 36: Wired Accessories
Wired Accessories The S03 main panel has a connector port for a wired siren, and also some connections for any third-party wired sen- sors that you may have. Wired Siren Wired Sensors A close-up of the back of the main panel. -
Page 37: Smart Outlets
Smart Outlets The Smart Outlets are an optional accessory that provide you with some home automation controls. You can turn the Smart Outlets on and off remotely, either by entering commands on the Main Panel, or by calling the system and entering commands over the phone. - Page 38 Controlling over the phone After calling the system and entering your password, you can turn a Smart Outlet on or off with these commands: • Turn On: [2-digit outlet number] 1 • Turn Off: [2-digit outlet number] 0 Programming a Smart Outlet Like other accessories, any Smart Outlets you have pur- chased with a new system will be pre-programmed to the panel.
-
Page 39: Removing All Accessories
Other settings in the panel (such as your password, de- lay settings, chime settings, and etc.) will not be forgotten when you remove all accessories. To remove all accessories from your S03 main panel, enter Programming Mode (page 7), then... 0 7 # [your 4-digit password] # Unlike other commands in the S03 system, you’ll notice... -
Page 40: Technical Specifications
Technical Specifications This section contains technical specifications for the S03 main panel. For technical information regarding the acces- sories, you can refer to the documentation for that acces- sory. We also have details available on our web site. https://www.fortresssecuritystore.com/ Power Input: DC 5V Standby Current: <25mA... -
Page 41: Troubleshooting
Troubleshooting If you experience any difficulties with the system, you can contact Fortress Customer Support for assistance. https://www.fortresssecuritystore.com/faq https://www.fortresssecuritystore.com/contacts Email: support@fortresssecuritystore.com Phone: 1 (206) 981-5371 We also have some general troubleshooting tips you can try if your system is experiencing any problems. Power Cycling the Main Panel If the system begins behaving unexpectedly, or stops work- ing as usual, once possible solution is to power cycle the... -
Page 42: Checking Placement Of Sensors
Checking Placement of Sensors If one or more sensors is not working consistently or cor- rectly, or if you are receiving frequent false alarms, you may need to check the placement of the sensors to make sure they are oriented correctly for best performance. •... -
Page 43: Space For Notes
Space for Notes This space intentionally left blank. - Page 44 This space intentionally left blank.
- Page 45 This space intentionally left blank.
Need help?
Do you have a question about the S03 and is the answer not in the manual?
Questions and answers
SO3 Box tells me low battery even after I changed it in door sensor.
The low battery warning may appear after changing the battery in the door sensor if the system has not yet recognized the new battery. Possible reasons include improper battery installation, a low-quality or partially drained battery, or a delay in the system updating the battery status. To resolve this, ensure the battery is correctly installed, use a fresh battery, and allow some time for the system to update. If the issue persists, refer to the troubleshooting section or contact Fortress Customer Support.
This answer is automatically generated