
Related Manuals for Aeware in.k400


Summary of Contents for Aeware in.k400
- Page 1 TechBook Giving full control to wet fingers!
-
Page 2: Table Of Contents
- drilling template .............. 5 - with adhesive ..............6 - with brackets ..............6 connections - connecting in.k400 keypad to in.xm ......7 functions - on/off key .................8 - pumps 1 & 2 keys .............8 - pump 3 & blower key .............9 - light key ................9... - Page 3 in.k400...
-
Page 4: Overview
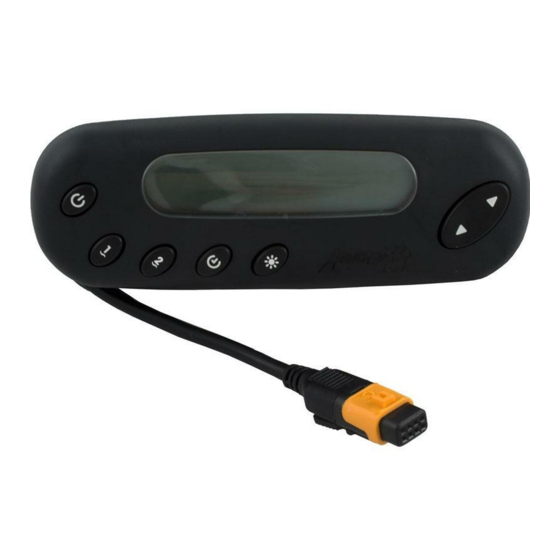
Aeware’s new series of keypads features a large LCD display and raised keys that let users control all in.xm functions and programming directly from spa side. In.k400 comes in an easy to install waterproof plastic enclosure and is designed to maximize user experience. - Page 5 Pumps icon Time, temperature The "Pump" indicator & message digits AM/PM (˚F/ ˚C) Filter Cycle icon numbers light up and their icons become fast animated The "Filter Cycle" icon lights when pump or blower are in up when fi lter cycle is on.
-
Page 6: Drilling Template
Drilling template 1,60" 1,50" 40,6 mm 38,1 mm 1/4" 7/8" 1/4" 6,4 mm 22,2 mm 6,4 mm... -
Page 7: With Adhesive
7/8" 7/8" 2 x 1/4" To install the in.k400, the user must cut out one 7/8" diameter hole To install the in.k400, the user must cut out two 1/4" diameter for the cable (see illustration). holes for the fixation studs and one 7/8" diameter hole for the cable (see illustration). -
Page 8: Connecting In.k400 Keypad To In.xm
Connecting in.k400 keypad to in.xm... -
Page 9: On/Off Key
On/Off key Pump 1 key Pump 2 key Depending on the spa manufac- Standby mode and restart the Press Pump 1 key to turn Press Pump 2 key to turn turer, this key may have differ- pumps. The "Stby" message is Pump 1 on at low speed. -
Page 10: Pump 3 & Blower Key
Pump 3/Blower key Light key Up/Down keys Program key Press Pump 3/Blower key to Press Light key to turn light on Use Up or Down key to set Use Program key to display turn Pump 3/Blower on. at high intensity. -
Page 11: Setting Time
Setting the time Setting fi lter cycle start time Setting fi lter cycle duration Filter cycle frequency Enter Programming mode by To program the fi lter cycle, you Press Prog. key a fourth time. Press Prog. key a fi fth time. -
Page 12: Setting Temperature Unit
Water temperature Cooldown Setting temperature unit Smart Winter Mode regulation After heating the spa water to Water temperature can be Our Smart Winter Mode In a regulation cycle, the system the desired Set Point, the heater displayed in either Fahrenheit protects your system from fi... -
Page 13: Specifi Cations
Dimensions: General specifi cations: Environmentals: Storage temperature: 70˚C (158˚F) to –30˚C (-22˚F) Operating temperature: 60˚C (140˚F) to –20˚C (-4˚F) Humidity: up to 95% condensing " 7/32 (56 mm) Mechanical Specs: Weight: 0.27 kg (0.6 lbs) Dimensions (W x H x D): Front Panel: "... - Page 14 Advanced electronics! Water resistance! Gecko Alliance 450 des Canetons, Quebec City (QC) G2E 5W6 Canada, 1.800.78.GECKO 9225 Stellar Court, Corona, CA 92883 USA , 1.866.639.7274 9919-100604 www.geckoalliance.com Rev. 08/08...
Need help?
Do you have a question about the in.k400 and is the answer not in the manual?
Questions and answers