
Related Manuals for Despatch LBB 1-23


Summary of Contents for Despatch LBB 1-23
- Page 1 LBB Series Oven Owner’s Manual REFACE Version 20 LBB SERIES OVEN C-188 PN 336979 OWNER’S MANUAL VERSION 20 4/2018...
- Page 2 APPENDIX Change Product Warranty page Update drawings and High Limit information Parts lists corrections in DRAWING AND SPARE PARTS LISTS section. Corrected Despatch address. Parts lists corrections in DRAWING AND SPARE PARTS LISTS section Updated warranty...
- Page 3 LBB Series Oven Owner’s Manual REFACE Version 20...
- Page 4 LBB Series Oven Owner’s Manual REFACE Version 20...
-
Page 5: Table Of Contents
LBB Series Oven Owner’s Manual REFACE Version 20 Table of Contents About This Manual ......................8 1.1. Important User Information ..................8 1.2. Manufacturer & Service ..................9 1.3. Organization of this Manual ..................9 1.4. Conventions ......................10 1.5. Specifications ...................... - Page 6 LBB Series Oven Owner’s Manual REFACE Version 20 5.4.2. Control Instrument Parameter Programming Mode .......... 33 5.4.2.1. Entering Control Instrument Set-up and Configuration Mode ...... 33 5.4.2.2. Control Instrument Operating Mode Notes ........... 34 5.4.3. Change Control Instrument Display from Centigrade to Fahrenheit ....35 5.4.4.
- Page 7 LBB Series Oven Owner’s Manual REFACE Version 20 Figures Figure 1. Disconnect Switch......................19 Figure 2. LBB Forced Convection Benchtop Oven..............20 Figure 3. Uniflow Airflow through the LBB Oven............... 20 Figure 4. LBB Series Oven Primary Control Instrument .............. 21 Figure 5.
-
Page 8: About This Manual
Despatch Industries. Despatch Industries does not assume any responsibility for any errors that may appear in this manual. In no event will Despatch Industries be liable for technical or editorial omissions made herein, nor for direct, indirect, special, incidental, or consequential damages resulting from the use or defect of this manual. -
Page 9: Manufacturer & Service
Lakeville, MN 55044 Fax: 1-952-469-4513 Service @despatch.com info@despatch.com www.despatch.com 1.3. Organization of this Manual This owner’s manual contains the most comprehensive set of information for the Despatch LBB Series ovens, including installation instructions, theory of operation, and operating instructions, among other things. -
Page 10: Conventions
LBB Series Oven Owner’s Manual BOUT ANUAL Version 20 Danger! Failure to heed warnings in this instruction manual and on the oven could result in personal injury, property damage or death. 1.4. Conventions This icon signifies information that describes an unsafe condition that may result in death, serious injury, or damage to the equipment. -
Page 11: Specifications
Do not use liquids in the oven. Do not set product or liquids on top of the oven. Liquids that may spill on the oven floor or top of oven may cause considerable damage to the oven. Contact Despatch for options available to help prevent such failures. -
Page 12: Capacities
LBB Series Oven Owner’s Manual BOUT ANUAL Version 20 1.5.2. Capacities LBB Model Number Capacity 1-23 1-69 2-12 2-18 2-27 Maximum Load Lbs (Kg) (91) (181) (272) (272) (272) Maximum Shelf Load 200* 200* 200* 200* Lbs (Kgs) (23) (91) (91) (91) (91) -
Page 13: Power
75 °C (167 °F). Ovens designed for 240 volts (check your oven nameplate for power requirement) will operate satisfactorily on a minimum of 208 volts, but with a 25% reduction in heater power. If your power characteristics are lower, contact Despatch industries. -
Page 14: Temperature
LBB Series Oven Owner’s Manual BOUT ANUAL Version 20 1.5.4. Temperature LBB Model Number Temperature and Parameters 1-23 1-69 2-12 2-18 2-27 Time to 40°C- temperature 150°C (approximate 40°C- minutes with no 204°C load) Recovery time with 150°C door open 1 minute (approximate 204°C minutes with no... -
Page 15: Safety
LBB Series Oven Owner’s Manual AFETY Version 20 Safety 2.1. Safety Information Do not work on the LBB Series oven without reading and understanding this section, which contains important information and warnings. Ignoring these warnings can result in death, serious injury or damage to the machine and product. -
Page 16: Provisions For Lifting And Carrying
LBB Series Oven Owner’s Manual AFETY Version 20 2.2. Provisions for Lifting and Carrying Caution! Do not tilt oven while lifting. Do not lift oven using the door handle to prevent damage to the oven and/or personnel involved. Caution! Do not risk injury when lifting equipment. Take proper precautions when lifting, carrying or otherwise maintaining heavy items. -
Page 17: Fire
Do not set product or liquids on top of the oven. Liquids that may spill on the oven floor or top of oven may cause considerable damage to the oven. Contact Despatch for options available to help prevent such failures. 2.5. Fire Keep the LBB Series oven clean and free of scrap materials, oil or solvents to prevent the possibility of fire. -
Page 18: Emergency Stop
This shuts off all electrical power to the oven. 2.7. Disconnecting Devices 2.7.1. Power Requirements Despatch recommends the LBB Series Ovens have unobstructed access to a dedicated power source. Use a power stabilizer if voltage fluctuation is greater than ±10% nominal voltage fluctuation. -
Page 19: Disconnecting Corded Units
LBB Series Oven Owner’s Manual AFETY Version 20 Danger! Keep switch or circuit-breaker in building installation close to the equipment, within easy reach of the operator and clearly marked. 2.7.3. Disconnecting Corded Units LBB cord-connected ovens includes model LBB1-23. To disconnect a corded unit, unplug the cord from the power source. -
Page 20: Theory Of Operation
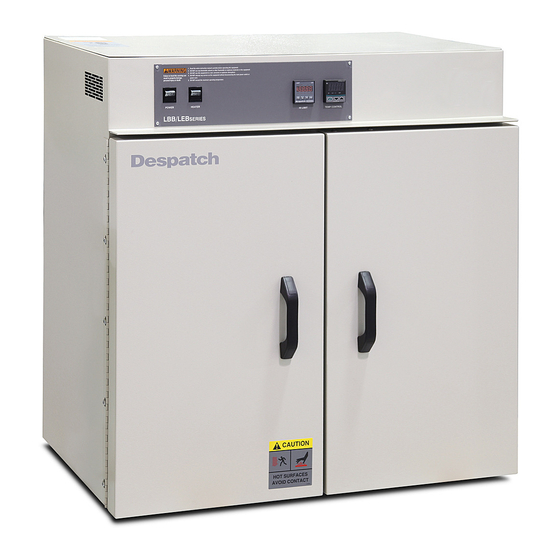
Theory of Operation 3.1. The LBB Series Oven The Despatch LBB Series ovens (Figure 2) effectively distribute heat with a processing time among the fastest of any lab oven in its class. LBB Series ovens are effectively used in testing, preheating, sterilizing, drying, aging and curing as well as other production applications. -
Page 21: Oven Theory
LBB Series Oven Owner’s Manual HEORY OF PERATION Version 20 Warning! Do not remove the hat bracket as it distributes exhaust air and protects the exhaust opening from being completely covered. 3.1.1. Oven Theory The LBB Series forced circulating oven uses fans to circulate air through the chamber. A circulating oven is a much more efficient and uniform oven than a gravity-convection oven due to the constant air movement. -
Page 22: High Limit Instrument
LBB Series Oven Owner’s Manual HEORY OF PERATION Version 20 Table 2. Control Instrument Explanations. Display Description Main (PV) Display Typically displays actual oven temperature. Press SET/ENT to display setpoint. Displays parameter code and value. Press to switch between PV and SP displays. Enter data using . -
Page 23: Product High Limit Instrument
LBB Series Oven Owner’s Manual HEORY OF PERATION Version 20 Features Description Increases a setpoint or mode parameter Decreases a setpoint or mode parameter Reset the High Limit, return to normal display 3.2.2.1. Product High Limit Instrument If the product being processed has a critical high temperature limit, use the High Limit instrument as a product High Limit instrument. -
Page 24: Assembly & Setup
4. Where excessive particulate matter is present, such as on a construction site or coal processing, Despatch recommends periodic (usually monthly) cleaning of all electrical compartments. 5. Ensure the power supply meets Despatch specifications. If the facility power supply is not stable, Despatch recommends a line conditioner. -
Page 25: Set-Up Procedure
LBB Series Oven Owner’s Manual & S SSEMBLY ETUP Version 20 4.2.2. Set-up Procedure Warning! All grounding and safety equipment must be in compliance with applicable codes, ordinances and accepted safe practices. Warning! Do not use the oven in wet, corrosive or explosive atmospheres unless this oven is specifically designed for a special atmosphere. -
Page 26: Figure 7. Lbb Series Oven Name Plate Example
LBB Series Oven Owner’s Manual & S SSEMBLY ETUP Version 20 Model LBB1-23 come equipped with an appropriate plug and cord. Models LBB1-69 and LBB2- 12, -18, -27 must be hardwired to the electric supply using 10 AWG or larger wires suitable for at least 75 °C (167 °F). -
Page 27: Figure 9. Wiring Access Through Rear Of Oven
LBB Series Oven Owner’s Manual & S SSEMBLY ETUP Version 20 2. Run the wire through the rear access hole (Figure 9) and connect the appropriate wires at the connector block (Figure 10). Figure 9. Wiring Access through Rear of Oven. Figure 10. -
Page 28: Operation
5.1. Load Oven Despatch Industries cannot be responsible for either the process or process temperature used, or for the quality of the product being processed. The purchaser and operator are ... -
Page 29: Pre-Startup Checklist
LBB Series Oven Owner’s Manual PERATION Version 20 The two shelves are designed to be pulled out about halfway without tipping. Do not overload the shelves (Refer to Support Capacity listed in Section 1.5.3). Distribute the workload evenly so airflow is not restricted. Do not overfill your oven. The workload should not take up more than two-thirds of any dimension of the inside cavity. -
Page 30: Operating Procedure-Standard Control Instrument
LBB Series Oven Owner’s Manual PERATION Version 20 • For sample heating, close vent when no ventilation is required 5.3. Operating Procedure—Standard Control Instrument See Protocol 3 Controller Owner's Manual for operating procedures for optional Protocol 3 control instrument. Warning! Do not use flammable solvent or other flammable material in this oven. -
Page 31: Figure 11. Lbb Series Oven Control Panel
LBB Series Oven Owner’s Manual PERATION Version 20 c. Press to enter the setpoint. d. Press again to display the process temperature. 5. Turn HEATER a. When the process value on the Control instrument reaches setpoint, cycles ON and OFF to maintain the temperature setpoint. lights when the control calls for heat. -
Page 32: Working With The Control Instrument
LBB Series Oven Owner’s Manual PERATION Version 20 5.4. Working with the Control Instrument Danger! Failure to heed warnings in this instruction manual and on the oven could result in personal injury, property damage or death. The LBB Series oven is factory tested and the controls have been factory-set for normal operating conditions. -
Page 33: Control Instrument Parameter Programming Mode
LBB Series Oven Owner’s Manual PERATION Version 20 5.4.2. Control Instrument Parameter Programming Mode Warning! Changing program parameters alters the function of the Control. Proceed carefully and fully understand each parameter before changing that parameter. Control instrument parameters are set through the Operating and Set-up modes. In most applications, it is not necessary to alter the oven settings. -
Page 34: Control Instrument Operating Mode Notes
0 (32 if F) The minimum setpoint limit of oven. The user cannot Setpoint Low change the setpoint below this lower setpoint limit. Despatch recommends leaving the SC feature OFF Super Function Direct/Reverse action. This value is set for 0 (reverse Direct/Reverse action). -
Page 35: Change Control Instrument Display From Centigrade To Fahrenheit
LBB Series Oven Owner’s Manual PERATION Version 20 5.4.3. Change Control Instrument Display from Centigrade to Fahrenheit Warning! Program parameter changes will alter the function of the Control instrument. Proceed carefully and fully understand each parameter before changing that parameter. Configure the Control instrument for either °C or °F. -
Page 36: Oven Zone Calibration
LBB Series Oven Owner’s Manual PERATION Version 20 To change from Fahrenheit to Centigrade, repeat the steps in Section 5.4.3 using = 5, = 204, 5.4.4. Oven Zone Calibration The Control instrument has been factory-tested and calibrated. Under normal operating conditions, recalibration should not be necessary. -
Page 37: Set The High Limit
LBB Series Oven Owner’s Manual PERATION Version 20 5.4.5. Set the High Limit Danger! Failure to heed warnings in this instruction manual and on the oven could result in personal injury, property damage or death. The oven has been factory-tested with the High Limit instrument factory-preset for normal operating conditions. -
Page 38: High Limit Instrument Setup Parameters
LBB Series Oven Owner’s Manual PERATION Version 20 Set High Limit instrument parameters using the Operating and Set-up modes (Section 5.4.2.1). See section 5.4.4. to calibrate High Limit, only use SHif parameter. In most applications, it is not necessary to alter the oven settings. The following instructions describe how to access, view and, if desired, change the parameters. -
Page 39: Change High Limit Instrument Display From Centigrade To Fahrenheit
Maximum temperature setting for the High Limit 204 (400 if HSP.H F) HSP1. out2 Second output None Despatch does not use this function Used to select the display in normal condition: Normal display • PV = Process Value diSP format. •... -
Page 40: Maintenance
Do not use liquids in the oven. Do not set product or liquids on top of the oven. Liquids that may spill on the oven floor or top of oven may cause considerable damage to the oven. Contact Despatch for options available to help prevent such failures. 6.1. Checklist •... -
Page 41: Lubrication
LBB Series Oven Owner’s Manual AINTENANCE Version 20 faithfully. Careful operation and maintenance will be more than paid for in continuous, safe and economical operation. • Maintain equipment in good repair. Make repairs immediately. Delays may be costly in added expense for labor and materials and in prolonged shut down. •... -
Page 42: Decontaminating The Lbb Series Oven
LBB Series Oven Owner’s Manual AINTENANCE Version 20 6.3.2. Decontaminating the LBB Series Oven Warning! Do not decontaminate oven without first disconnecting power. Ensure adequate personal safety while decontaminating oven. Before using any cleaning or decontamination method except those recommended by the manufacturer, users should check Notice with the manufacturer that the proposed method will not damage the equipment. -
Page 43: Test Control Instrument
LBB Series Oven Owner’s Manual AINTENANCE Version 20 6.4.1. Test Control Instrument Test the Control instrument every 40 hours: • Check that the Control instrument LED is cycling ON and OFF • Verify that the heater works 6.4.2. Test High Limit Instrument Test the High Limit instrument every 40 hours. -
Page 44: Replacement Parts
To order or return parts, contact Despatch Service and Technical Support. When returning parts, a Despatch representative will provide an MRA (Material Return Authorization) number. Attach the MRA number to the returned part for identification. When ordering parts, expedite the process by having the model number, serial number and part number on hand. -
Page 45: Replace The Control Instrument
LBB Series Oven Owner’s Manual AINTENANCE Version 20 6.5.1. Replace the Control Instrument Danger! Do not attempt any service on this oven before opening the main power disconnect switch or removing all power from the oven. Tools needed: • One-quarter (1/4) inch socket set •... -
Page 46: Figure 14. Providing Easy Access To The Control Instrument
LBB Series Oven Owner’s Manual AINTENANCE Version 20 3. Slide the panel forward (Figure 14). Support the panel while working by wedging a flat surface between the oven door and oven ceiling. Figure 14. Providing easy access to the Control instrument. 4. -
Page 47: Figure 16. Prepare To Remove Control Instrument By Removing The Mounting Bracket
LBB Series Oven Owner’s Manual AINTENANCE Version 20 5. Move the Control instrument mounting bracket back and off (Figure 16). Control Instrument Mounting Bracket Figure 16. Prepare to remove control instrument by removing the mounting bracket. 6. Remove old Control instrument from the panel. 7. -
Page 48: Replace High Limit Instrument
LBB Series Oven Owner’s Manual AINTENANCE Version 20 6.5.2. Replace High Limit Instrument Danger! Do not attempt any service on this oven before opening the main power disconnect switch or removing all power from the oven. Tools needed: • One-quarter (1/4) inch socket set •... -
Page 49: Figure 19. Press And Hold Tabs To Remove High Limit Instrument
LBB Series Oven Owner’s Manual AINTENANCE Version 20 Figure 19. Press and Hold Tabs to Remove High Limit Instrument. Install new High Limit instrument into the control panel. Replace mounting bracket. Connect High Limit instrument connector plug to the circuit board (Figure 18). Reattach thermocouple wires. -
Page 50: Replace (Optional) Protocol 3 Controller
LBB Series Oven Owner’s Manual AINTENANCE Version 20 6.5.3. Replace (Optional) Protocol 3 Controller Refer to the Protocol 3 Owner’s Manual for instructions on replacing the Protocol 3 Controller. 6.5.4. Replace Heater Unit Danger! Do not attempt any service on this oven before opening the main power disconnect switch or removing all power from the oven. -
Page 51: Figure 22. Heater Element Connections
LBB Series Oven Owner’s Manual AINTENANCE Version 20 72” wire Terminal Ring Flat washer Flat washer Insulator Lock washer Hex nut 18” wire Side View Front View Install terminals as shown to prevent possible electrical shorts and/or stress on terminals. Angle tolerance: +/- 15°. Figure 22. -
Page 52: Replace Fan Motor
LBB Series Oven Owner’s Manual AINTENANCE Version 20 Figure 23. Typical Heating Element (Inset connections see Figure 22) . 6.5.5. Replace Fan Motor Danger! Do not attempt any service on this oven before opening the main power disconnect switch or removing all power from the oven. -
Page 53: Figure 24. Fan Motor Location
LBB Series Oven Owner’s Manual AINTENANCE Version 20 7. Remove fan motor. a. Disconnect motor leads from circuit board. b. Unscrew screws (4) holding motor mounts to body (T30 Torx bit driver). c. Lift fan motor from oven body. 8. After running at temperature, the fan wheel may stick to the shaft. Separating the fan wheel from the fan motor shaft may require force. -
Page 54: Figure 25. Separate Fan Wheel From Fan Motor Shaft
LBB Series Oven Owner’s Manual AINTENANCE Version 20 Motor Torx screw Motor mount Tinnerman Torx clip screw Motor shaft sleeve Fan wheel (spaced 0.25 from inside top) Figure 25. Separate fan wheel from fan motor shaft. -
Page 55: Troubleshooting
LBB Series Oven Owner’s Manual AINTENANCE Version 20 Troubleshooting Table 7. Common Technical Issues and Remedies. Technical Issue Probably Cause Suggested Remedy/Next Step No power Check power source and/or oven and wall fuses. Burned out heater(s) Replace element (see Warranty statement, Section 8). -
Page 56: Des2000 Control Parameters Check
LBB Series Oven Owner’s Manual ROUBLESHOOTING Version 20 Technical Issue Probably Cause Suggested Remedy/Next Step Debris has fallen into Inspect the wheel for damage. Remove debris. fan through shaft collar. High Limit instrument Set the High Limit higher. set too low Oven will not Control instrument Check control parameters before replacing... - Page 57 LBB Series Oven Owner’s Manual ROUBLESHOOTING Version 20 c. The CtL parameter should be displayed. Press one of the arrow keys once and PID should be displayed, if it reads anything else, then it needs to be changed to PID. d.
-
Page 58: Hi Limit L91 Hi-Limit Reset
LBB Series Oven Owner’s Manual ROUBLESHOOTING Version 20 Operating Parameter Outline Code Name Settings Control Mode Auto-tuning Proportional Band 5 ** Integral Time Derivative Time Cycle Time Input Filter PV Bias (Offset) Key Lock * If P is not displayed the CtL must be first set to PID. ** For F change to value 13. -
Page 59: Appendices
LAC/LFC Series Oven Owner’s Manual PPENDICES Version 20 Appendices 8.1. Standard Products Warranty http://www.despatch.com/pdfs/standard_warranty.pdf. 8.2. -
Page 60: Optional Equipment
LAC/LFC Series Oven Owner’s Manual PPENDICES Version 20 8.3. Optional Equipment 8.3.1. Assemble Oven Stand 1. Install four rubber grommets into holes in the stand (Figure 26). a. For LBB1-69 stands, the rear grommets mount into the forward set of rear holes. b. -
Page 61: End Of Cycle (Eoc) Timer Option
LAC/LFC Series Oven Owner’s Manual PPENDICES Version 20 8.3.2. End of Cycle (EOC) Timer Option Use the timer option to count down in hours toward powering the heater OFF (Figure 27). Figure 27. Timer Option Displays and Switches. Actual timer may vary from the model pictured (Figure 27). -
Page 62: Operating The Timer
LAC/LFC Series Oven Owner’s Manual PPENDICES Version 20 Operating the Timer 8.3.3. - Page 63 LAC/LFC Series Oven Owner’s Manual PPENDICES Version 20...
-
Page 64: Parameter Default Settings
LAC/LFC Series Oven Owner’s Manual PPENDICES Version 20 Parameter Default Settings 8.3.4. 8.3.5. Timer Option with Audible and Visual Alarm The Timer option sounds an alarm and turns on a light when the timer times out. • Clear the alarm condition by turning the heater switch OFF. •... -
Page 65: Part Lists
All rights reserved. No part of the contents of this manual may be reproduced, copied or transmitted in any form or by any means including graphic, electronic, or mechanical methods or photocopying, recording, or information storage and retrieval systems without the written permission of Despatch Industries, unless for purchaser's personal use.
Need help?
Do you have a question about the LBB 1-23 and is the answer not in the manual?
Questions and answers