Table of Contents
Advertisement
WARNING
Improper installation, adjustment, alteration, service
or maintenance can result in death, injury or
property damage. Read the Installation, Operation
and Service Manual thoroughly before installing or
servicing this equipment.
Installation must be done by a contractor qualified
in the installation and service of gas-fired heating
equipment or your gas supplier.
© 2018 Roberts-Gordon LLC
EP-300 Series
Please take the time to read and understand
these instructions prior to any installation.
Installer must give a copy of this manual to the owner.
Keep this manual in a safe place in order to provide
your service technician with necessary information.
Roberts-Gordon LLC
1250 William Street
P.O. Box 44
Buffalo, New York 14240-0044
Telephone: +1.716.852.4400
Fax: +1.716.852.0854
Toll Free: 800.828.7450
www.robertsgordon.com
Installation,
Operation &
Service Manual
Installer
Owner
P/N 127202NA Rev. N 3/18
Advertisement
Table of Contents

Related Manuals for Roberts Gorden EP-301


Summary of Contents for Roberts Gorden EP-301
- Page 1 EP-300 Series Installation, Operation & Service Manual Installer WARNING Please take the time to read and understand Improper installation, adjustment, alteration, service these instructions prior to any installation. or maintenance can result in death, injury or Installer must give a copy of this manual to the owner. property damage.
-
Page 3: Table Of Contents
11.1 Replacement Parts ..........28 11.2 Accessories .............29 SECTION 12: Specifications........30 12.1 Material Specifications ........30 12.2 EP-301 Controls Specifications .......30 © 2018 Roberts-Gordon LLC All rights reserved. No part of this work covered by the copyrights herein may be reproduced or copied in any form or by any means - graphic, electronic, or mechanical, including photocopying, recording, taping or information storage and retrieval systems - without the written permission of Roberts-Gordon LLC. - Page 5 Figure 22: Condensate Tee - Discharge Side ....23 Figure 23: Condensate Neutralization Tube ....24 LIST OF TABLES Table 1: EP-301 Pump Package 4" (P/N 02723014) ..6 Table 2: EP-301 Pump Package 6" (P/N 02723016) ..7 Table 3: EP-303 Pump Package 4" (P/N 02723034) ..8...
-
Page 7: Section 1: Heating System Safety
SECTION 1: H EATING YSTEM AFETY SECTION 1: HEATING SYSTEM SAFETY 1.1 Manpower Requirements Your Safety is Important to Us! To prevent personal injury and damage to the pump, This symbol is used throughout two persons will be required for installation. the manual to notify you of possible fire, electrical or burn 1.2 Safety Labels and Their Placement... -
Page 8: Figure 1: Label Placement
EP-300 S ERIES NSTALLATION PERATION AND ERVICE ANUAL FIGURE 1: Label Placement Description Part Number Severe Injury Label 91012100 Rating Plate Label 91010401 Logo Label 91017200 2 of 31... -
Page 9: Section 2: Installer Responsibility
SECTION 2: I NSTALLER ESPONSIBILITY SECTION 2: INSTALLER RESPONSIBILITY 2.1 Corrosive Chemicals The installer is responsible for the following: CAUTION • To install the pump and electrical supplies, in accordance with applicable specifications and codes. Roberts-Gordon LLC recommends the installer contact a local building inspector or fire marshal for guidance. -
Page 10: Section 3: Unpacking The Pump
EP-300 S ERIES NSTALLATION PERATION AND ERVICE ANUAL SECTION 3: UNPACKING THE PUMP 3.1 Open Shipping Cartons WARNING Cut/Pinch Hazard Wear protective gear during installation, operation and service. Edges are sharp. Failure to follow these instructions can result in injury. Open cartons and remove packing inserts. -
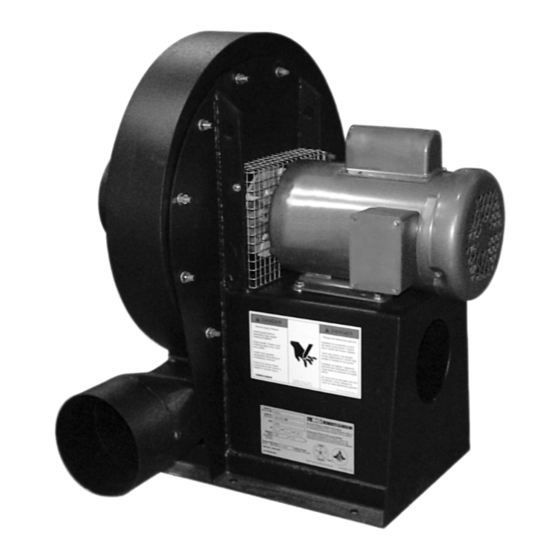
Page 11: Section 4: Major Components
OMPONENTS SECTION 4: MAJOR COMPONENTS FIGURE 2: Major Component Descriptions Pump Scroll Assembly - 90713451 EP-301 Pump Assembly - 02730101 EP-303 Pump Assembly - 02730103 Flexible Boot 4.5" (11 cm) - 91412801 Flexible Boot 6" (15 cm) - 91412802 Pump Inlet Assembly - 90713454 Silicone Rubber Ring - 91906900 Adapter 4"... -
Page 12: Standard Parts List
EP-300 S ERIES NSTALLATION PERATION AND ERVICE ANUAL 4.1 Standard Parts List Table 1: EP-301 Pump Package 4" (P/N 02723014) Part No. Description Quantity Box 1 of 2 02730101 EP-301 Pump Assembly Includes: 90713454 Pump Inlet Assembly, 455 mm dia... -
Page 13: Table 2: Ep-301 Pump Package 6" (P/N 02723016)
SECTION 4: M AJOR OMPONENTS Table 2: EP-301 Pump Package 6" (P/N 02723016) Part No. Description Quantity Box 1 of 2 02730101 EP-301 Pump Assembly Includes: 90713454 Pump Inlet Assembly, 455 mm dia 90713451 Pump Scroll Assembly, 529 mm dia... -
Page 14: Table 3: Ep-303 Pump Package 4" (P/N 02723034)
EP-300 S ERIES NSTALLATION PERATION AND ERVICE ANUAL Table 3: EP-303 Pump Package 4" (P/N 02723034) Part No. Description Quantity Box 1 of 2 02730103 EP-303 Pump Assembly Includes: 90713454 Pump Inlet Assembly, 455 mm dia 90713451 Pump Scroll Assembly, 529 mm dia 01312105 EP-300 Scroll/Inlet Fastener Package 127202NA... -
Page 15: Table 4: Ep-303 Pump Package 6" (P/N 02723036)
SECTION 4: M AJOR OMPONENTS Table 4: EP-303 Pump Package 6" (P/N 02723036) Part No. Description Quantity Box 1 of 2 02730103 EP-303 Pump Assembly Includes: 90713454 Pump Inlet Assembly, 455 mm dia 90713451 Pump Scroll Assembly, 529 mm dia 01312105 EP-300 Scroll/Inlet Fastener Package 127202NA... -
Page 16: Section 5: Pump Installation
EP-300 S ERIES NSTALLATION PERATION AND ERVICE ANUAL SECTION 5: PUMP INSTALLATION WARNING Cut/Pinch Hazard Wear protective gear during installation, operation and service. Edges are sharp. Failure to follow these instructions can result in injury. NOTE: Installers may also visit Roberts-Gordon YouTube page to view pump assembly video at https://www.youtube.com/watch?v=F-u8xtvaAZ8 or scan the QR code below:... -
Page 17: Figure 3: Pump Discharge Orientation
SECTION 5: P NSTALLATION at the bottom horizontal position. the impeller blades and the body of the pump scroll. FIGURE 3: Pump Discharge Orientation Bottom Right Horizontal Discharge 5.1.3 Attaching Pump Inlet Assembly From scroll assembly side of pump, orient inlet assembly so threaded pipe coupling is on top. -
Page 18: Pump Impeller Rotation
EP-300 S ERIES NSTALLATION PERATION AND ERVICE ANUAL FIGURE 4: Pump Assembly End View Side View Inlet Assembly Vertical Scroll Assembly Mounting M8 Screw Plate Stud M8 Hexnut and Washer Impeller M8 Hexnut and Washer Description Part Number Pump Scroll 90713451 Hex Nut, M8 (24) 92204502... -
Page 19: Figure 6: Pump Inlet Side 4
SECTION 5: P NSTALLATION 5.2.1 Pump Inlet Adapter for 4" (10 cm) Tubing FIGURE 7: Pump Inlet Side 6" and Schedule 40 Pipe Band Clamp 6" (15 cm) Apply a bead of silicone sealant (600 °F) to the 6" (15 cm) inside of the adapter (6"... -
Page 20: Section 6: Pressure Switch Mounting And Wiring
EP-300 S ERIES NSTALLATION PERATION AND ERVICE ANUAL SECTION 6: PRESSURE SWITCH MOUNTING AND WIRING 6.1 Pressure Switch Installation 6.1.1 Attaching Pressure Switch to Pump Inlet For connection to a pump, locate the two pressure Apply silicone sealant (600 °F) to the threads of the switch mounting holes on the pump frame. -
Page 21: Section 7: Pump Mounting Instructions
SECTION 7: P OUNTING NSTRUCTIONS SECTION 7: PUMP MOUNTING INSTRUCTIONS 7.1 Mounting Platform The standard method of mounting the pump is on an outside wall and venting directly through the wall. The pump may be mounted by using mounting angles as shown in Figure 12 and Figure 13. The two mounting angles form a mounting platform to which the pump will be attached. -
Page 22: Section 8: Motor Wiring
208 V - 230 V/460 V, 60 Hz operation. For proper 8.2 EP-301 Wiring motor wiring, follow manufacturer's wiring diagram The EP-301 motor is wired for 1 Ø, 230 V, 60 Hz located on motor. operation. For proper motor wiring, follow manufac- Do not directly connect the controller relay terminals to turer's wiring diagram located on motor. -
Page 23: Figure 15: Motor Wiring For Ep-301 Pump (Clockwise Impeller Rotation)
SECTION 8: M OTOR IRING ® ® ® ® If using ROBERTS GORDON CORAYVAC Modulat- the ROBERTS GORDON CORAYVAC Modulating ing Heating Control, the power to the EP-303 pump is Heating Control Installation Manual (P/N 1006101NA) not supplied by the controller. Power is supplied by a for wiring details. -
Page 24: Section 9: Venting
EP-300 S ERIES NSTALLATION PERATION AND ERVICE ANUAL SECTION 9: VENTING 9.2 Venting the Pump • The exhaust connection from the pump is 6" (15 WARNING cm) diameter. • Connect the 6" (15 cm) pump boot (provided) to the 6" (15 cm) flue pipe, using the 6" (15 cm) band clamp provided. -
Page 25: Vertical Venting
9.6 Venting Accessories 9.5 Vertical Venting NOTE: 4" (10 cm) accessories may only be used on the inlet side of the EP-301 pump. If using vent lengths greater than 20' (6 m), condensation will form in the vent pipe. Insulation See Page 27 , Section 11 for venting accessories. -
Page 26: Condensate Tee Assembly
EP-300 S ERIES NSTALLATION PERATION AND ERVICE ANUAL FIGURE 17: Vertical Venting NOTE: Vacuum loss Bird Screen may occur when Optional using vent caps. The use of bird screen to cover vent terminations is recommended. Description Part Number 20 (51 cm) Tee 6"... -
Page 27: Condensate Trap And Condensate Tee
SECTION 9: V ENTING FIGURE 18: Condensate Tee Assembly at Pump Inlet Description Part Number Tee 4" (10 cm) 01330203 Tee 6" (15 cm) 01330204 Drain Cap 4" (10 cm) 02718851 Drain Cap 6" (15 cm) 02718852 Condensate Valve Assembly 01327001 FIGURE 19: Condensate Tee - Discharge Side 20”... -
Page 28: Figure 20: Condensate Tee Assembly At Pump Inlet
EP-300 S ERIES NSTALLATION PERATION AND ERVICE ANUAL Multiply the total input Btu/h / 100,000 by the condensate flow (gal/h) per 100,000 (Btu/h) 9.8.1 Condensate Neutralization Tube (optional) (600,000/100,000) x 0.3 = 1.8 (gal/h) If a condensate neutralization tube is specified to be used with the heating system, follow the steps below Step 3: Choose the condensate neutralization to choose the proper condensate neutralization tube. -
Page 29: Figure 22: Condensate Tee - Discharge Side
SECTION 9: V ENTING FIGURE 20: Condensate Neutralization Tube Calculated gal/h Description Part Number Less than 2 Condensate Neutralization Tube 200 01327002 Less than 6 Condensate Neutralization Tube 600 01327003 Less than 10 Condensate Neutralization Tube 1000 01327004 Less than 20 Condensate Neutralization Tube 2000 01327005 23 of 31... -
Page 30: Section 10: Servicing Instructions
EP-300 S ERIES NSTALLATION PERATION AND ERVICE ANUAL SECTION 10: SERVICING INSTRUCTIONS WARNING DANGER Electrical Shock Hazard Explosion Hazard Burn Hazard Cut/Pinch Hazard Turn off gas supply to Allow heater and Wear protective gear Disconnect electric heater before service. pump to cool before during installation, before service. - Page 31 SECTION 10: S ERVICING NSTRUCTIONS 5. The impeller can be removed by loosening the four set screws in the cooling disc, then remov- ing the hex head bolt (M8 x 1 x 50) and washer from the end of the motor shaft. With an appro- priate wheel puller, remove the impeller.
-
Page 32: Maintenance Checklist
EP-300 S ERIES NSTALLATION PERATION AND ERVICE ANUAL 10.3 Maintenance Checklist and safety, Roberts-Gordon LLC recommends that a qualified contractor conduct, at a minimum, annual Installation Code and Annual Inspections: ® inspections of your ROBERTS GORDON equipment ® All installation and service of ROBERTS GORDON and perform service where necessary, using only equipment must be performed by a contractor replacement parts sold and supplies by Roberts-... -
Page 33: Section 11: Replacement Parts And Accessories
SECTION 11: R EPLACEMENT ARTS AND CCESSORIES SECTION 11: REPLACEMENT PARTS AND ACCESSORIES WARNING DANGER Electrical Shock Hazard Explosion Hazard Carbon Monoxide Hazard Fire Hazard Use only genuine ROBERTS GORDON ® replacement parts per this installation, operation and service manual. Failure to follow these instructions can result in death, electric shock, injury or property damage. - Page 34 EP-300 S ERIES NSTALLATION PERATION AND ERVICE ANUAL Description Part Number Description Part Number 4" Aluminized Tee 01330203 6" Aluminized Non Heat Treated 10’ Tube 91409420 6" Aluminized Tee 01330204 4" Coated 10’ Tube 9141030D 4" Coated Tee 0133022D Aluminized Tube adapter (6" dia. x 4" dia.) 91418200 6"...
-
Page 35: Section 12: Specifications
12.1.1 Pump Frame, Inlet, Scroll and Impeller ® When using a CORAYVAC Heating Control, use 3 mm welded steel construction Starter Package P/N 10050010. 12.2 EP-301 Controls Specifications ® ® With ROBERTS GORDON CORAYVAC Modulating Motor controls and contactors are sold separately. - Page 36 EP-300 S ERIES NSTALLATION PERATION AND ERVICE ANUAL The data plate and/or serial number are removed, ® SECTION 13: THE ROBERTS GORDON EP-300 defaced, modified or altered in any way. SERIES PUMP WARRANTY ® The ownership of the ROBERTS GORDON EP-300 ROBERTS-GORDON LLC WILL PAY FOR: Series Pump is moved or transferred.
- Page 37 SECTION 13: T ROBERTS GORDON ® EP-300 S ERIES ARRANTY 31 of 31...
Need help?
Do you have a question about the EP-301 and is the answer not in the manual?
Questions and answers