Lunos 5/UNI-FT Installation Manual
Universal control
Hide thumbs
Also See for 5/UNI-FT:
- Installation manual (2 pages) ,
- Operating manual (2 pages) ,
- Installation manual (2 pages)
Table of Contents
Advertisement
Quick Links
Einbauanleitung / Installation Manual
Universalsteuerung/ Universal Control
Typ 5/UNI-FT
No: 040 089
- Bitte an den Nutzer weiterleiten / Please pass on to user -
Funktionen
DE
Abmessungen
Dimensions
Steuerung manuell, sensorgeführt
oder via TAC
Integrierter Zeitnachlauf
Codierschalter
Intervallbetrieb programmierbar
Coding switch
Filterwechselanzeige
Technische Daten:
Betriebsspannung:
12 V DC
Funktionsspannungsbereich:
0-10 V
Betriebsschaltstrom:
max. 5 A
Anschlussleistung:
max. 60 W
Netzteile und max. Geräteanzahl pro Typ.
Es kann immer nur ein Typ pro Steuerung
Steckkontakte für Funkmodul
betrieben werden.
Plug-in contacts for radio module
GO
Netzteil
e²
e
RA15-60
LED (rot/grün)
5/NT18
6
3
1
Feuchte-/Temperatursensor
5/NT60
10
5
2
LED (red/green)
5/NT100
10+10 5+5
2+1
Humidity-/temperature sensor
Am 5/NT100 können zwei Steuerungen
mit den oben genannten Geräteanzahlen
parallel betrieben werden.
Einbau in Abzweigdose
Installation in junction box
Functions
EN
Manual, sensor-guided or via TAC
24
36
controllable
Integrated time delay
Interval operation
Filter change indicator
Technical specifications
Operating voltage:
12 V DC
Functional voltage range:
0-10 V
Operational switching current: max. 5 A
Connected load:
max. 60 W
Einbau in Schalterdose
Power supplies and device per type. It's
Installation in switch box
only possible to use one type of device
per controller.
GO
power supply
e²
e
RA15-60
5/NT18
6
3
1
5/NT60
10
5
2
5/NT100
10+10 5+5
2+1
On 5/NT100 two controllers can operate
parallel with the device numbers above.
66
Elektrischer Anschluss
Vorsicht! Jede Montagearbeit (Netzanschluss und Einstellung der Miniaturschalter) darf nur bei abgetrennter
Netzspannung erfolgen!
Machen Sie vor Anschluss des Lüftungsgerätes an die Netzspannung alle Anschlussleitungen spannungsfrei!
(Abtrennung vom Netz mit mindestens 3 mm Kontaktöffnung, z.B. elektr. Sicherung).
Jeder zum Lüfter gehörende Stromkreis muss mit einem Fehlerstromschutz (z.B. Fl - Schalter) ausgestattet
sein!
Elektrischer Anschluss nur durch Fachmann
!
Zusätzliche Installationen und elektrische Bauelemente im Lüftungsgerät sind unzulässig! Anschluss-
bilder für weitere Lüfterfunktionen auf Anfrage!
Verwenden Sie folgende Kabel für den elektrischen Anschluss:
Kabel zu den Lüftungsgeräten: z.B. J-Y(St)Y(2x2x0,8), max. 1,5 mm²
Kabel zum Anschluss der Komfortsteuerung TAC: z.B. J-Y(St)Y(2x2x0,8), max. 1,5 mm²
Kabel für die Versorgungsspannung des Netzteils z.B. NYM 3x 1,5 mm²
Electrical connection
Caution! Any assembly work (connection to power supply and setting of the miniature switches) may only be
carried out after disconnecting the supply voltage.
Make sure that the supply voltage of all connection lines is voltage-free (dead). (Separation from the power
supply with a minimum contact opening of 3 mm, e.g. electric fuse).
Each electric circuit of this ventilation system must be fitted with a residual current protection (e.g. FI switch/
RCCB).
Electric connection only by a specialist.
Additional installations and electrical components in the ventilation unit are not allowed.
Connection diagrams for further fan functions upon request.
Use the following cables for the electric connection:
Cable to the ventilation units: e.g. J-Y(St)Y(2x2x0,8), max. 1,5 mm²
Cable to connect the Comfort Control TAC: e.g. J-Y(St)Y(2x2x0,8), max. 1,5 mm²
Cable for the supply voltage of the power supply unit e.g. NYM 3 x 1,5 mm²
Anschluss eines Tasters
Anschluss eines Schalters
Connection of a calliper
Connection of a switch
I III II
▲
▼
5/W2T Brücke bauseits
Bridge installation side
5/W2U
Ansicht von vorn
Front view
grau / grey
grau / grey
rot / red
rot / red
W1
W2
schwarz / black
schwarz / black
W1
W2
Standardmäßig ist an der 5/UNI-FT der Anschluss eines Schalters eingestellt.
By default, the 5/UNI-FT is set to the connection of a switch.
Wechsel von Schalter– auf Tasterbetrieb
Taster anschließen und die Taste „▲" 5 mal innerhalb von 6 Sekunden betätigen. Die rote LED be-
stätigt dies mit 5 mal Blinken.
Changeover from switch to push-button operation
To connect a push-button press the button „▲" 5 times within 6 seconds. The red LED will flash
5 times for confirmation.
Wechsel von Taster– auf Schalterbetrieb
Schalter anschließen und Wippe 1 oder 2 für 120 s einschalten, die grüne LED blinkt 5 mal kurz.
Changeover from push-button to switch operation
To connect a switch and turn on the switch rocker 1 or 2 for 120 seconds. The green LED will
flash 5 times for confirmation.
+ - S1 + - S2
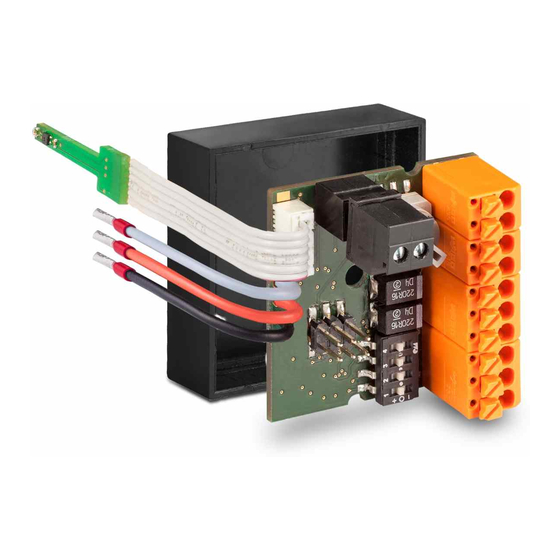
Geräteanschluss
Anschlussplatine
Junction board
Device connection
go
e
Wichtig! Codierschalter entspre-
chend Tabelle auf S.2 stellen.
+ 12V
Gerät / Unit
Important! Set the coding switch to
the desired functions according to
-
e² (1, 3, 5,...)
RA 15-60 (1, 3)
table on page 2.
rot / red
blau / blue
+ - S1
lila / purple
rot / red
blau / blue
lila / purple
25,6
Maße in mm
Dimensions in mm
Ø 70
Ø 60
DE
EN
e² (2, 4, 6,...)
RA 15-60 (2, 4)
+ - S2
1
Advertisement
Table of Contents

Subscribe to Our Youtube Channel
Related Manuals for Lunos 5/UNI-FT


Summary of Contents for Lunos 5/UNI-FT
- Page 1 / black Standardmäßig ist an der 5/UNI-FT der Anschluss eines Schalters eingestellt. By default, the 5/UNI-FT is set to the connection of a switch. Wechsel von Schalter– auf Tasterbetrieb Taster anschließen und die Taste „▲“ 5 mal innerhalb von 6 Sekunden betätigen. Die rote LED be- stätigt dies mit 5 mal Blinken.
- Page 2 Best.-Nr. / order.-no.: 039 974 Netzteil 5/NT100 90 Watt; 7,5 A Best.-Nr. / order.-no.: 040 096 Deutschland / Germany LUNOS Lüftungstechnik Phone: +49 30 36 20 01 - 0 GmbH für Raumluftsysteme Fax: +49 30 36 20 01 - 89 Wilhelmstr.
Need help?
Do you have a question about the 5/UNI-FT and is the answer not in the manual?
Questions and answers