Advertisement
Quick Links
Download this manual
See also:
User Manual
Do NOT plug the
USB 3.0
into the
Docking Station
computer until the driver is
completely installed.
Universal USB Docking Station
USB Multi Adapter
Boomerang station
JUD480
mini ultra station
JUD530
/
SE
GE
EN : Quick Installation Guide
ES : Guía De Instalación Rápida
Multi Adapter
FR : Guide D'installation Rapide
JUA375
JUA370/
DE : Kurzanleitung Für Installation
JUA370BE
CZ : Rychlý Průvodce Instalací
HU : Gyors Telepítési Útmutató
JP : クイックインストールガイド
TC : 快速安裝手冊
STOP!
If you have any problems with this product please contact our technical
support team before returning it to the store.
TECHNICAL SUPPORT
888-988-0488
Customer Service:
888-689-4088
Technical Support:
service@j5create.com
Email:
www.j5create.com/livechat
Live Chat:
tickets.j5create.com
Support Ticket:
SOPORTE TÉCNICO
TECHNIKAI SEGÍTSÉG
Número gratuito: +1-888-988-0488
Vevőszolgálat (angol nyelven): 888-988-0488
Horario de atención:
Technikai támogatás (angol nyelven): 888-689-4088
Lun-Vier. 10:00 a.m – 6:00 U.S.A-E.S.T
E-mail: service@j5create.com
Email: service@j5create.com
Live Chat: www.j5create.com/livechat
Support Ticket: tickets.j5create.com
TECHNISCHER SUPPORT
テクニカルサポート
Kostenloser Anruf bei:+1-888-988-0488
お客様相談センター : 03-5540-9010
Sprechstunden:
電子メール : j5_support@kagaht.co.jp
テクニカルサポー トやその他のご相談は下記
Mon.-Frei. 10.00 – 18.00 U.S.A-E.S.T
の時間にくださいますようお願い申し上げます
E-mail:service@j5create.com
営業時間 : 平日 : 9:30~11:30/13:30~17:30
SUPPORT TECHNIQUE
技術支援資訊
Numéro gratuit: +1-888-988-0488
美國客服專線:+1-888-988-0488
Heures d'ouverture:
台灣客服專線:+886-2-2269-5533#19
lun.-Ven. 10:00 a.m – 06:00 U.S.A-E.S.T
客服時間:
Email: service@j5create.com
星期一至星期五9:30 AM-6:00PM (台灣時間)
Email信箱:service.tw@j5create.com
TECHNICKÁ PODPORA
Zákaznická linka: 888-988-0488
Technická podpora: 888-689-4088
E-mail: service@j5create.com
Online Chat: www.j5create.com/livechat
Žádost o pomoc: tickets.j5create.com
201503-V5
English
Do NOT plug the j5create USB
3.0 Docking Station into the
computer until the driver is
completely installed.
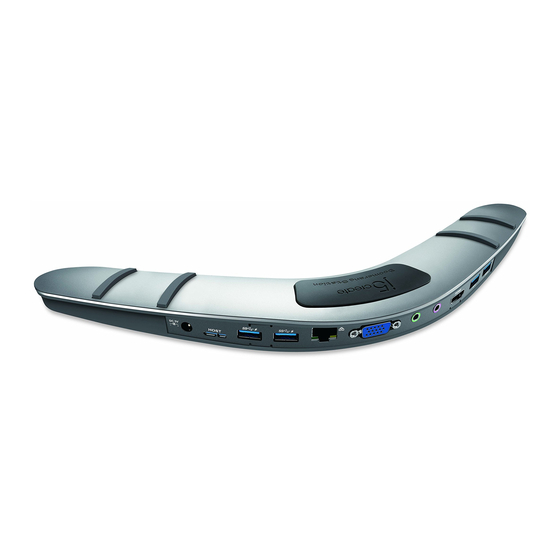
● Thank you for purchasing the j5create USB3.0 Docking Station! j5create's
USB3.0 Docking Station enables you to add a 2nd monitor instantly via HDMI
or VGA connectors. When you need to get things done fast, simply connect your
monitor, keyboard, mouse, Ethernet, speakers, microphone, etc. to your laptop
with a single USB3.0 cable. It is the perfect solution for expanding your
Ultrabook or MacBook
into a full sized workstation.
®
Windows - Driver Installation
Step 1
Step 2
Step 1
If you have internet access it is highly recommended that you download the latest
driver from www.j5create.com under Support & Services –scroll down to the
product's driver you are installing and download the latest driver for your operating
system. (Note: If possible run as an administrator)
If you do not have internet access insert the Driver CD into
your computer's CD-ROM drive. (The setup program should
launch automatically) If not, go to My computer and click
on your optical drive and manually run the setup CD by double-clicking on
Setup.exe (the prompt may take a minute to appear).
Step 2
Follow the prompts to install the driver (You may have to click on My Computer >
downloads and choose j5Usb3.0MultiAdapter to begin installation).
Step 3
Once initial installation has completed, click Restart to finish installing the software.
After your computer has restarted, first connect the j5create USB3.0 Docking Station
to your power adapter, HDMI, VGA, Ethernet, audio, etc. and then to your computer.
Now you are ready to use your j5create USB3.0 Docking Station!
Mac - Driver Installation
Step 1
Step 2
Step 1
If you have internet access it is highly recommended that you download the latest
driver from www.j5create.com under Support & Services –scroll down to the
product's driver you are installing and download the latest driver for your operating
system. (Note: If you have trouble downloading this driver your security settings may
need to be adjusted to allow for "downloading from anywhere")
If you do not have internet access, insert the Driver CD into your computer's CD-ROM
drive. Click on Finder under Devices and choose j5create. Then select the
mac-install folder and open the dmg file.
Step 2
Follow the prompts to install the driver (You may have to click on Finder>downloads
and choose j5Usb3.0MultiAdapter to begin installation).
Step 3
Once initial installation has completed, click Restart to finish installing the software.
After your computer has restarted, first connect the j5create USB3.0 Docking Station
to your power adapter, HDMI, VGA, Ethernet, audio, etc. and then to your computer.
Now you are ready to use your j5create USB3.0 Docking Station!
Step 4
Go to
, and then System Preferences and select Sound and speaker Output
options. Here you can select which device has sound output.
System Requirements
● Microsoft Windows 8.1 / 8 / 7 / XP (32-bit or 64-bit)
● Mac OS X 10.6~10.10 Compatible
● Available USB port (USB 3.0 is recommended)
● Minimum System Requirements
CPU : Intel i3 Dual Core 1.5 GHz
Intel Atom "Bay Trail" Quad Core 1.33 GHz
RAM : 2 GB or higher
* Windows XP users : "Windows Media Player" is recommended
* Windows XP & MAC USB 2.0 for "office applications only" is recommended.
Español
NO enchufe USB Docking Station
3.0 j5create en la computadora hasta
que el conductor esté completa-
mente instalado.
● ¡Gracias por adquirir la estación de conexión USB 3.0 j5create! La estación de
conexión inteligente USB 3.0 j5create le permite agregar un 2do monitor de forma
instantánea a través de los conectores HDMI y VGA. Cuando necesite llevar a cabo las tareas
de forma rápida, simplemente conecte el monitor, teclado, ratón, Ethernet, altavoces y
micrófono al equipo portátil con un cable USB 3.0. Es la solución perfecta para transformar
una Ultrabook o MacBook
®
en una estación de trabajo de tamaño completo y, además,
mejorar la productividad gracias a su capacidad multitarea en diferentes plataformas.
Windows - Instalación del controlador
Paso 1
Paso 2
Paso 1
Si posee acceso a Internet, le recomendamos que descargue el controlador más reciente
desde www.j5create.com dentro de la sección Support & Services (Asistencia y servicios).
Desplácese hasta el controlador del producto que desea instalar y descargue el controlador
más reciente para su sistema operativo. (Nota: Si es posible, ejecute como administrador).
Si no posee acceso a Internet, inserte el CD con controladores
en la unidad de CD-ROM del equipo. (El programa de
instalación deberá ejecutarse de forma automática). De lo
contrario, diríjase a Equipo , haga clic en la unidad óptica y ejecute manualmente el CD de
instalación haciendo doble clic en Setup.exe (el aviso podría demorarse 1 minuto en
aparecer).
Paso 2
Siga las instrucciones para instalar el controlador. (Es posible que deba hacer clic en Equipo
> Descargar y seleccionar j5Usb3.0MultiAdapter para iniciar la instalación).
Paso 3
Una vez que se instaló el controlador, seleccione Sí y haga clic en Finalizar para reiniciar el
equipo y completar la instalación del controlador. Una vez que se reinicia el equipo, conecte
en primer lugar la estación de conexión USB 3.0 j5create al adaptador de alimentación,
HDMI, VGA, Ethernet y audio y, a continuación, realice la conexión con el equipo. ¡Ahora ya
podrá utilizar la estación de conexión USB 3.0 j5create!
Mac - Instalación del controlador
Paso 1
Paso 2
Paso 1
Si posee acceso a Internet, le recomendamos que descargue el controlador más reciente
desde www.j5create.com dentro de la sección Asistencia y servicios. Desplácese hasta el
controlador del producto que desea instalar y descargue el controlador más reciente para
su sistema operativo.
(Nota: Si existe algún problema para descargar este controlador, es posible que deba ajustar
la configuración de seguridad para permitir las descargas desde cualquier ubicación).
Si no posee acceso a Internet, inserte el CD con controladores en la unidad de CD-ROM del
equipo. Haga clic en Finder y, dentro de Dispositivos, seleccione j5create. Haga clic en la
carpeta mac-install y abra el archivo dmg.
Paso 2
Siga las instrucciones para instalar el controlador. (Es posible que deba hacer clic en Finder
> Descargas y seleccionar j5Usb3.0MultiAdapter para iniciar la instalación).
Paso 3
Una vez que se haya completado la instalación inicial, haga clic en Reiniciar para finalizar la
instalación del software. Una vez que se reinicia el equipo, conecte en primer lugar la
estación de conexión USB 3.0 j5create al adaptador de alimentación, HDMI, VGA, Ethernet y
audio y, a continuación, realice la conexión con el equipo.¡Ahora ya podrá utilizar la
estación de conexión USB 3.0 j5create!
Paso 4
Diríjase a
y "Preferencias del sistema" y seleccione "Sonido" - "Salida". Puede
seleccionar un dispositivo para la salida de sonido haciendo clic en éste.
Entorno requerido
● Microsoft Windows 8.1, 8 , 7, XP (32 bits o 64 bits)
● Mac OS X 10.6~10.10
● Puerto USB disponible (USB 3.0 recomendado)
● Procesador : Intel i3 Dual Core 1.5 GHz
Intel Atom "Bay Trail" Quad Core 1.33 GHz
Memoria RAM : 2 GB o más
* Usuario Windows XP: "Windows Media Player" es recomendado
* Sugerimos el uso de Windows XP & Mac USB 2.0 para "aplicación de
ofcina" únicamente.
Française
Installez entièrement le pilote avant
d'insérer le câble j5create USB 3.0
Docking Station USB dans votre
ordinateur
●
Nous vous remercions d'avoir choisi la Station d'accueil USB 3.0 j5create Cette Station
d'accueil USB 3.0 j5create intelligente j5create vous permet d'ajouter un 2ème moniteur
instantanément via les connecteurs HDMI ou VGA. Lorsque vous avez besoin de faire des
choses rapidement, il suffit de connecter votre moniteur, clavier, souris, Ethernet,
haut-parleurs et microphone à votre ordinateur portable avec un câble USB 3.0. C'est la
solution idéale pour l'expansion de votre Ultrabook ou MacBook
®
en un poste de travail
complet et il augmente la productivité grâce à sa capacité d'effectuer plusieurs tâches
multi-plateformes.
Windows - Installation du pilote
Étape 1
Étape 2
Étape 1
Si vous avez accès à Internet, il est fortement recommandé de télécharger le dernier
pilote à partir de www.j5create.com dans Support & Services – faites défiler vers le bas
jusqu'au pilote du produit que vous installez et téléchargez le dernier pilote pour votre
système d'exploitation. (Remarque : Si possible, connectez-vous en tant qu'administrateur).
Si vous n'avez pas accès à l'Internet, insérez le CD dans le lecteur
de CD-ROM de votre ordinateur. (Le programme d'installation
devrait démarrer automatiquement). Autrement, allez dans
Mon ordinateur et cliquez sur votre lecteur optique et démarrez manuellement le CD
d'installation en double-cliquant sur Setup.exe (l'invite peut prendre une minute avant
d'apparaître).
Étape 2
Suivez les instructions pour installer le pilote. (Vous devrez peut-être cliquer sur Mon
ordinateur > Téléchargements et choisir j5Usb3.0MultiAdapter pour commencer
l'installation)
Étape 3
Une fois que le pilote a été installé, choisissez Oui et cliquez sur Finir pour redémarrer votre
ordinateur et finir l'installation du pilote. Une fois que votre ordinateur a redémarré,
connectez la Station d'accueil USB 3.0 j5create à votre Adaptateur secteur ; HDMI ; VGA ;
Ethernet ; Audio en premier et ensuite votre ordinateur. Maintenant, vous êtes prêt à utiliser
la Station d'accueil USB 3.0 j5create !
Mac - Installation du pilote
Étape 1
Étape 2
Étape 1
Si vous avez accès à Internet, il est fortement recommandé de télécharger le dernier
pilote à partir de www.j5create.com dans Support & Services – faites défiler vers le bas
jusqu'au pilote du produit que vous installez et téléchargez le dernier pilote pour votre
système d'exploitation.
(Remarque : Si vous avez des problèmes lorsque vous téléchargez ce pilote, vos paramètres
de sécurité peuvent avoir besoin d'être ajustés pour permettre le "téléchargement à partir
de n'importe où")
Si vous n'avez pas accès à l'Internet, insérez le CD du pilote dans le lecteur de
CD-ROM de votre ordinateur. Cliquez sur Trouver dans l'onglet Périphériques et
choisissez j5create. Cliquez sur le dossier mac-install et ouvrez le fichier dmg.
Étape 2
Suivez les instructions pour installer le pilote. (Vous devrez peut-être cliquer sur
Trouver > Téléchargements et choisir j5Usb3.0MultiAdapter pour commencer
l'installation).
Étape 3
Une fois l'installation initiale terminée, cliquez sur Redémarrer pour terminer
l'installation du logiciel. Une fois que votre ordinateur a redémarré, connectez la
Station d'accueil USB 3.0 j5create à votre Adaptateur secteur ; HDMI ; VGA ; Ethernet ;
Audio en premier et ensuite votre ordinateur. Maintenant, vous êtes prêt à utiliser la
Station d'accueil USB 3.0 j5create !
Étape 4
, puis "Préférences du système" et sélectionnez "Son" Les options
Allez dans
"Sortie" du haut-parleur. Vous pouvez sélectionne un périphérique pour la sortie du
son en cliquant dessus.
Environnement requis
● Microsoft Windows 8.1, 8 , 7, XP (32-bit ou 64-bit)
● Mac OS X 10.6~10.10
● Un port USB disponible (USB 3.0 recommandé)
● Configuration minimale requise
CPU : Intel i3 Dual Core 1.5 GHz
Intel Atom "Bay Trail" Quad Core 1.33 GHz
RAM : 2 Go ou plus
* Windows XP utilisateur :"Windows Media Player" est recommandé
* Suggérons Windows XP & Mac USB 2.0 pour « l'application de bureau » seulement
Deutsch
Installieren Sie zuerst den Treibererst
vollständig, bevor Sie das USB-Kabel
des j5create USB 3.0 Docking Station
an den Computer anschließen.
● Vielen Dank, dass Sie sich für die Dockingstation j5create USB 3.0 entschieden haben!
Diese intelligente Dockingstation j5create USB 3.0 ermöglicht es Ihnen, augenblicklich
einen zweiten Bildschirm über einen HDMI- oder VGA-Anschluss zu verwenden. Wenn Sie
eine Arbeit schnell erledigen müssen, schließen Sie einfach mithilfe eines USB 3.0-Kabels die
folgenden Geräte an Ihren Laptop an: Bildschirm, Tastatur, Maus, Ethernet, Lautsprecher und
Mikrofon. Dies ist die perfekte Lösung, um Ihr Ultrabook oder MacBook
®
in eine vollwertige
Workstation zu erweitern und so die Produktivität dank plattformübergreifender
Multitasking-Fähigkeiten zu erhöhen.
Windows - Treiberinstallation
Schritt 1
Schritt 2
Schritt 1
Wenn Sie über einen Internetanschluss verfügen, empfehlen wir, dass Sie den neuesten
Treiber von www.j5create.com unter Support & Services herunterladen – blättern Sie in der
Liste nach unten, bis Sie den Treiber für Ihr Produkt gefunden haben. Downloaden Sie dann
den neuesten Treiber für Ihr Betriebssystem. (Hinweis: Wenn möglich, sollten Sie diesen
Vorgang als Administrator durchführen.)
Falls Sie nicht über einen Internetanschluss verfügen, legen Sie die
Treiber-CD in das CD-ROM-Laufwerk Ihres Computers ein. (Das
Setup-Programm sollte automatisch starten. Ist das nicht der Fall,
gehen Sie zu (Mein) Computer, klicken auf das optische Laufwerk und starten die
Setup-CD durch Doppelklicken auf Setup.exe. Es kann eine Minute lang dauern, bis die
Benutzerführung erscheint.)
Schritt 2
Folgen Sie den Anweisungen zur Installation des Treibers. (Gegebenenfalls müssen Sie auf
(Mein) Computer > Downloads klicken und dann zum Starten der Installation
j5Usb3.0MultiAdapter wählen.)
Schritt 3
Nachdem der Treiber installiert wurde, wählen Sie Ja und klicken zum Durchführen eines
Computerneustarts und zum Abschließen der Treiberinstallation auf Beenden. Nachdem Ihr
Computer neu gestartet wurde, schließen Sie die Dockingstation j5create USB 3.0 zunächst
an Netzteil, HDMI, VGA, Ethernet und Audio und anschließend an Ihren Computer an. Ihre
Dockingstation j5create USB 3.0 ist jetzt einsatzbereit!
Mac - Treiberinstallation
Schritt 1
Schritt 2
Schritt 1
Wenn Sie über einen Internetanschluss verfügen, empfehlen wir, dass Sie den neuesten
Treiber von www.j5create.com unter Support & Services herunterladen – blättern Sie in der
Liste nach unten, bis Sie den Treiber für Ihr Produkt gefunden haben. Downloaden Sie dann
den neuesten Treiber für Ihr Betriebssystem.
(Hinweis: Wenn Sie Probleme beim Downloaden dieses Treibers haben, ist ggf. eine
Anpassung der Sicherheitseinstellungen erforderlich; wählen Sie bei „Download von
Programmen erlauben" die Option „Überall".)
Falls Sie nicht über einen Internetanschluss verfügen, legen Sie die Treiber-CD in das
CD-ROM-Laufwerk Ihres Computers ein. Klicken Sie auf Finder und wählen j5create unter
GERÄTE. Klicken Sie auf den Ordner mac-install und öffnen die dmg-Datei.
Schritt 2
Folgen Sie den Anweisungen zur Installation des Treibers. (Gegebenenfalls müssen Sie auf
Finder > Downloads klicken und dann j5Usb3.0MultiAdapter wählen, um mit der
Installation zu beginnen.)
Schritt 3
Wenn die anfängliche Installation abgeschlossen ist, klicken Sie zum Abschließen der
Softwareinstallation auf Neustart. Nachdem Ihr Computer neut gestartet wurde, schließen
Sie die Dockingstation j5create USB 3.0 zunächst an Netzteil, HDMI, VGA, Ethernet, Audio
und zuletzt an Ihren Computer an. Ihre Dockingstation j5create USB 3.0 ist jetzt einsatzbe-
reit!
Schritt 4
Rufen Sie
und dann „Systemeinstellungen" auf, wählen Sie „Ton" gefolgt von den
„Ausgabe"-Optionen für die Lautsprecher. Sie können das Gerät für die Tonausgabe durch
Anklicken wählen.
Systemanforderungen
● Microsoft Windows 8.1 / 8 / 7 / XP (32-bit or 64-bit)
● Mac OS X 10.6~10.10
● Verfügbarer USB-Port (USB 3.0 empfohlen)
● Systemvoraussetzungen (mindestens)
CPU : Intel i3 Dual Core 1.5 GHz
Intel Atom "Bay Trail" Quad Core 1.33 GHz
RAM : 2 GB oder mehr
* Windows XP-Nutzer : "Windows Media Player" Empfohlen
* Empfehlen Windows XP & Mac USB 2.0 nur für den 'Bürogebrauch
Advertisement

Related Manuals for J5create JUD480


Summary of Contents for J5create JUD480
- Page 1 Una vez que se instaló el controlador, seleccione Sí y haga clic en Finalizar para reiniciar el HU : Gyors Telepítési Útmutató connectez la Station d'accueil USB 3.0 j5create à votre Adaptateur secteur ; HDMI ; VGA ; Nachdem der Treiber installiert wurde, wählen Sie Ja und klicken zum Durchführen eines to your power adapter, HDMI, VGA, Ethernet, audio, etc.
- Page 2 A program a Support & Services menüpont alatt található, csak から最新ドライバーをダウンロー ドしてください。 of j5create; or (i) if any j5create serial number on the product has been removed or internetových stránek www.j5create.com v sekci Support & Services- vyberte Váš produkt 程式來進行安裝。...