
Related Manuals for Worx WA3847


Summary of Contents for Worx WA3847
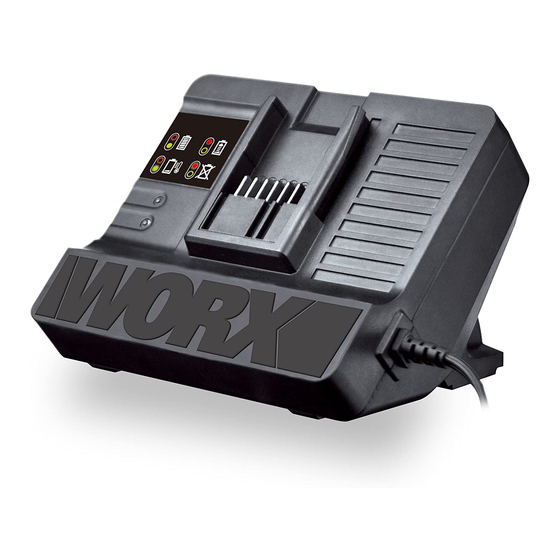
- Page 1 Battery Charger Chargeur Cargador WA3847 hElPliNE NUMBEr hElPliNE NUMBEr 1-866-354-WorX (9679)
-
Page 4: Technical Data
2. ChargEd iNdiCator light (grEEN) 3. ChargiNg iNdiCator light (rEd) Only use the appropriate accessories intended for this tool. Accessory information can be found on the product packaging, at a WORX dealer or on our website at www.worx.com. TECHNICAL DATA Charger voltage... -
Page 5: Safety Instructions
SAFETY INSTRUCTIONS Keep cord and battery charger away from heat to prevent damage to WarNiNg: rEad aNd housing or internal parts. UNdErStaNd all iNStrUCtioNS. do not let gasoline, oils, petroleum- Failure to follow all instructions listed based products, etc. come in contact below may result in electric shock, fire with plastic parts. -
Page 6: Extension Cords
SYMBOLS 11. disconnect battery charger from the power supply when not in use. This will reduce the risk of electric shock Before charging, read the or damage if metal items should fall into instruction manual the opening in the charging stand. It also will help prevent damage during a power Warning surge. -
Page 7: Charging Procedure
CHARGING PROCEDURE However, after several charge and discharge cycles the battery will accept a 100% charge. NotE: Before using the tool, read the instruction book carefully. 2. hoW to ChargE YoUr BattErY (See Fig. a) 1. ChargiNg YoUr BattErY PaCK Connect the battery charger to the power The battery charger supplied is matched to the supply and the green light (2) will illuminate. -
Page 8: Problem Solution
PROBLEM SOLUTION 1. i CaNNot Fit thE BattErY iNto thE BattErY ChargEr. WhY? The battery can be inserted into the charger only in one direction. Turn the battery around until it can be inserted into the slot, the red LED light should turn on when the battery is charging. -
Page 9: Données Techniques
2. téMoiN lUMiNEUX VErt (PilE ChargéE) 3. téMoiN lUMiNEUX roUgE (PilE EN ChargE) N’utilisez que les accessoires compatibles à cet outil. Les informations des accessoires peuvent être trouvées sur l’emballage du produit, chez un détaillant WORX ou sur notre site Web www.worx.com. DONNÉES TECHNIQUES... -
Page 10: Consignes De Sécurité
CONSIGNES DE SÉCURITÉ endommagé. Les cordons endommagés augmentent les risques d’électrocution. aVErtiSSEMENt! lisez et assimilez 4. assurez-vous que le cordon est placé toutes les instructions. le non- de manière à ne pas être foulé, tiré, respect des instructions ci-après peut ou à... - Page 11 de fil américaine) d’au moins 14 est outil, assurez-vous qu’elles ont ce mode recommandée pour un cordon de rallonge d’emploi. mesurant 25 pieds ou moins. L ’utilisation d’une épaisseur de 12 est recommandée pour un cordon de rallonge de 50 pieds. L ’utilisation de cordons de rallonge de 100 pieds ou plus est déconseillée.
- Page 12 SYMBOLES CordoNS dE ralloNgE Utiliser les bons cordons de rallonge. Assurez- vous que votre cordon prolongateur est en Avant d’utiliser le chargeur de pile, bonne condition. Lorsque vous utilisez un lisez le manuel cordon prolongateur, assurez-vous d’en utiliser un capable de soutenir l’intensité du courant que tire votre produit.
- Page 13 PROCEDURE DE prolongé, la batterie n’acceptera qu’un chargement d’environ 60%. Toutefois, CHARGEMENT après plusieurs cycles de chargement et déchargement, la batterie acceptera une rEMarQUE: Avant d’utiliser cet outil, chargement à 100%. assurez-vous de lire attentivement le manuel d’utilisation. 2. CoMMENt rEChargEUr lE BloC-PilE (Voir Fig.
-
Page 14: Problemes Et Solutions
PROBLEMES ET SOLUTIONS 1. PoUrQUoi NE PUiS-JE PaS iNSérEr lE BloC-PilE daNS lE ChargEUr? Le bloc-pile ne peut être insérée dans le chargeur que dans un sens. Retournez celui-ci jusqu'à ce qu'il s'insère correctement. Le voyant rouge doit s'allumer quand la pile est en charge. -
Page 15: Datos Técnicos
3. lUZ iNdiCadora dE Carga (roJa) Sólo utilice los accesorios apropiados diseñados para esta herramienta. Puede encontrar información sobre los accesorios en el embalaje del producto, consultando a un distribuidor de WORX o en nuestro sitio Web: www.worx.com. DATOS TÉCNICOS Datos de entrada del cargador 120V~60Hz Tensión nominal... -
Page 16: Instrucciones De Seguridad
INSTRUCCIONES DE el que nadie pueda pisarlo, tropezar con él o entrar en contacto con SEGURIDAD bordes afilados o piezas móviles, calor o aceite ni lo someta a daños ¡adVErtENCia! lea y comprenda o tensión. Ello reducirá el riesgo de todas las instrucciones. - Page 17 SÍMBOLOS VEriFiQUE que no existan daños en los cables de la herramienta. No utilice el cargador de batería si está Antes de utilizar el cargador de dañado el cable o el transformador/ baterías, lea el manual toma, lo cual podría causar un cortocircuito y una descarga Advertencia eléctrica.
- Page 18 CaBlES dE EXtENSiÓN Utilice cables de extensión apropiados. Cerciórese de que su cable prolongador esté en buenas condiciones. Asegúrese de utilizar un prolongador lo suficientemente resistente como para soportar la corriente que requiere su producto. Un cable pequeño causará una caída de corriente en la línea de voltaje, dando por resultado recalentamiento y pérdida de potencia.
-
Page 19: Procedimiento De Carga
PROCEDIMIENTO DE CARGA aceptará sólo el 60% de la carga. Sin embargo, luego de varios ciclos de carga y descarga Nota: Antes de usar la herramienta, lea aceptará el 100% de la carga. atentamente el manual de instrucciones. 2. CÓMo Cargar la BatErÍa 1. - Page 20 RESOLUCIÓN DE a cabo dichas operaciones, con el fin de evitar riesgos. PROBLEMAS 1. No PUEdo ColoCar la BatErÍa EN El Cargador. Por QUé? La batería se inserta en el cargador en una sola dirección. Dé vuelta la batería hasta que pueda ser insertada en la ranura.
- Page 22 designed in italy. Made in China Conçu en italie. Fabriqué en Chine diseñado en italia. Fabricado en China Copyright © 2013, Positec. All Rights Reserved. 2CGT04DPK11003A1...
Need help?
Do you have a question about the WA3847 and is the answer not in the manual?
Questions and answers