
Related Manuals for Detectortesters Testifire 1001

Summary of Contents for Detectortesters Testifire 1001
- Page 1 M U L T I - S T I M U L U S D E T E C T O R T E S T E R M U T I - S T I M U L U S D E T E C T O R T E S T E R User Manual detectortesters testing technology from No Climb www.testifire.com...
- Page 2 User Manual This manual provides information for the correct use of the testifire® 1000 and 2000 series of detector testers including: Testifire 1000 Head Unit ® Testifire 1001 Testing Kit ® Testifire 6001 Testing Kit ® Testifire 9001 Testing Kit ®...
- Page 3 Important Information Read this User Manual completely before using your Testifire. Save this User Manual - Save all safety and operational instructions for future reference. Take note of the Warnings - Read carefully and follow all warning labels on the product and those ...
- Page 4 Meanings of Symbols and Terms The following symbols are used throughout this User Manual. This symbol on the product indicates that there is a safety hazard. You must read the appropriate sections of the User Manual to understand the nature and severity of all the potential hazards present and the action you must take.
- Page 5 Safety General Safety Information CAUTION This product is intended to be used at height. Exercise great care and always wear appropriate PPE (personal protective equipment) when operating above head height in order to avoid the risk of injury. DO NOT OVER REACH .
-
Page 6: Table Of Contents
Table of Contents Page No. General Instructions Warranty Acknowledgement Recycling Introduction Parts Identification Preparation For Use Charging the Battery Using the Battery Removal and Replacement of the Smoke and Carbon Monoxide (CO) Capsules 9 Turning the Unit On Using the Menus Adjusting the Head Unit Angle Testing High Profile Detectors Using Your Testifire... -
Page 7: General Instructions
1. General Instructions 1.1 Warranty In addition to any other express warranty given in writing by the Company in relation to the Goods, the Company warrants that the Goods supplied under these terms and conditions will be in accordance with the specification (if any) contained in the Purchase Order, and will be free from defects in workmanship and material for a period of 18 months from the date of delivery to the Buyer or for a period of 12 months after the date of sale by the Buyer to the final customer whichever period is the shorter. -
Page 8: Introduction
2. Introduction Thank you for purchasing Testifire Multi-Stimulus Detector Tester. This manual is designed to assist you to get the best and most efficient use of the Testifire 1000 and 2000 model range, and provides all the information required to perform routine service and maintenance tasks with ease. -
Page 9: Parts Identification
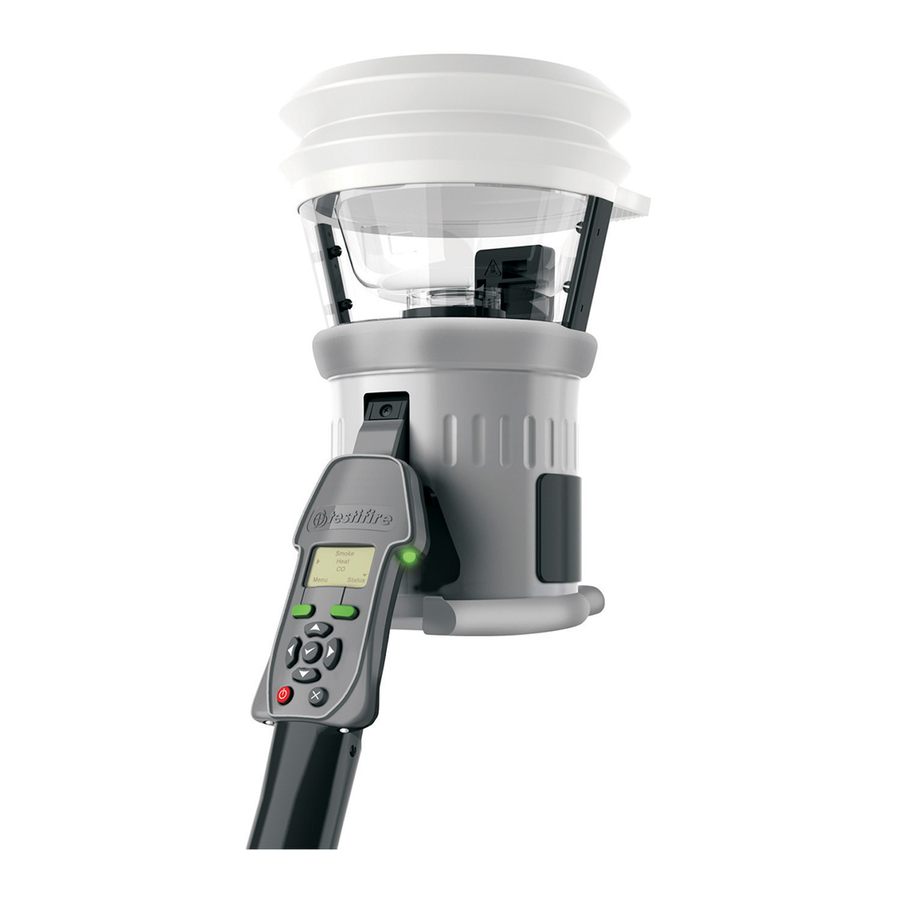
3. Parts Identification Bellows Replacement Capsules Testifire Smoke Capsule TS3 RFID Antenna** Inner Clear Infrared Beam Main Duct for Heat, Platform Smoke and CO* Testifire CO Clear Capsule TC3* Testifire 100 RFID ® Bluetooth Module** Smoke Capsule ‘Test Type’ LED CO Capsule TC3* ‘Status’... -
Page 10: Preparation For Use
4. Preparation For Use 4.1 Charging the Battery WARNING Do not attempt to use or charge the battery if either the unit or the battery connection point are damaged. Never connect AC and DC power at the same time. Solo NiMH Battery Batons are used to power Testifire and enable it to be fitted to Solo Access Poles. ... -
Page 11: Using The Battery
CAUTION Store charger in a dry place (indoor use only when connected to AC mains). Danger of fire and electric shock! Do not fast-charge a hot battery, allow the Battery Baton to cool down naturally before starting a charge cycle. Allow the charger to cool down for at least 15 minutes after one fast charge. -
Page 12: Removal And Replacement Of The Smoke And Carbon Monoxide (Co) Capsules
4.3 Removal and Replacement of the Smoke and Carbon Monoxide (CO) Capsules CAUTION This symbol on the product indicates that this part of the device is susceptible to static damage. DO NOT TOUCH the contacts on the PCB on the capsule. Static electricity may damage them and contamination of the contacts must be avoided. -
Page 13: Turning The Unit On
CO Capsule Removal Instructions (Testifire 2000 series only) Only replace the CO capsule when it is empty. Testifire should be turned off for five minutes to allow the ‘CO’ capsule to cool down before removing it. Release the lower access cover (Fig. -
Page 14: Using The Menus
4.5 Using the Menus Before turning Testifire on for the first time, it is recommended that you become familiar with system menus. Testifire’s menu system is simple to navigate. Using the ‘UP’ and ‘DOWN’ menu navigation keys , you can ... -
Page 15: Testing High Profile Detectors
4.7 Testing High Profile Detectors When testing high profile detectors, it may be necessary to remove the inner clear cup to enable the detector to sit in the correct position for a successful test. The inner clear cup has a semi-circular cut-out on the side nearest to the user interface. -
Page 16: Using Your Testifire
5. Using Your Testifire CAUTION This product is intended to be used at height. Exercise great care and always wear appropriate PPE (personal protective equipment) when operating above head height in order to avoid the risk of injury. DO NOT OVER REACH . -
Page 17: Sounder Option
Once the stimulus has been selected, the ‘Test Type’ LED will change colour to indicate the following: Red = Heat Test Blue = Smoke Test Green = Carbon Monoxide Test Clear = Clearing The ‘Status’ LED provides feedback on the modes of operation and alerts ... -
Page 18: Smoke Testing
NOTE: Lowering Testifire during a test will do the following: For less than 2 seconds: Nothing. The test will continue as soon as the detector re-enters the cup. For more than 2 seconds: During a Sequential Test, Testifire will advance to the next test that is programmed. - Page 19 A ‘Hi Heat’ setting for fixed temperature detectors which operate at more than 90ºC (194ºF) is available. It is recommended that for most tests the ‘Heat’ (normal heat) setting is used as this will conserve battery power. To select a ‘Hi Heat’ test, use the ‘UP’ and ‘DOWN’ ...
-
Page 20: Carbon Monoxide (Co) Testing
5.5 Carbon Monoxide (CO) Testing WARNING This product emits small amounts of carbon monoxide (CO) gas which is a harmful, odourless gas. DO NOT INHALE directly from the duct during a CO test or within 5 minutes of conducting a CO test. Note: Under normal operating conditions, this emission will present no harm to the user. -
Page 21: Capsule Fuel Level 1
5.7 Capsule Fuel Level The remaining level of ‘Smoke’ and ‘CO’ fuel available in the capsules can be displayed on the screen by highlighting ‘Smoke’ or ‘CO’ in the ‘MAIN’ menu by using the ‘UP’ and ‘DOWN’ keys on the keypad (Fig. -
Page 22: Simultaneous Testing
5.8 Simultaneous Testing Using Testifire to carry out a Simultaneous Test means that a number of operations (Smoke, Heat and CO) can be pre-programmed into the unit before it is raised up to the detector. This saves time, reduces handling and enables the testing of certain multi-sensor detectors if they are so enabled. -
Page 23: Combined Simultaneous And Sequential Testing 2
Another identical test sequence will automatically be ready to begin at this point, and there is no need to re- select the test on the keypad. Fig. 49 illustrates the procedure for a Sequential Test (in this example for ‘Smoke’... -
Page 24: Infrared Remote Control
5.11 Infrared Remote Control (Testifire 25) Infrared beam LED Operation indicator LED Some types of detector may not automatically initiate a test as they enter the clear cup of Testifire. The Infrared Remote Control can be used to manually start a test, and/or move on to the next test in the sequence. -
Page 25: Indicating Led Reference Chart
5.13 Indicating LED Reference Chart ‘Test Type’ LED ‘Status’ LED Blue Solid Green Slow Flashing Smoke Heat Smoke Test in progress ‘STANDBY’ Mode Menu Status Red Solid Green Fast Flashing Smoke Heat Heat Test in progress ‘OPERATIONAL’ Mode Menu Status (test in progress) Green Solid Red Flashing... -
Page 26: Troubleshooting
6. Troubleshooting If you experience any type of problem with your Testifire, turn the power off, wait for a few seconds and then turn the power back on. This may clear the fault. If the fault continues, the following information may help you solve the problem. -
Page 27: Error Messages And Indicating Led Reference Chart
6.3 Error Messages and Indicating LED Reference Chart Note: If a problem occurs with your Testifire unit, the ‘Status’ LED will flash or remain on in red and the ‘Test Type’ LED will not be illuminated. The error message will be displayed on the screen. If the ‘Status’... -
Page 28: Support
7. Support 7.1 Technical Support For support, service and further information, please contact: No Climb Products Ltd Edison House, 163 Dixons Hill Road, Welham Green, Herts, AL9 7JE United Kingdom Tel: +44 (0) 1707 282760 Fax: +44 (0) 1707 282777 Email: support@testifire.com Online help available at... -
Page 29: Servicing
7.5 Servicing To ensure that your Testifire unit continues to perform as intended, it is recommended Service Due that the unit is returned annually for a service. Refer to Manual Press any key In some countries, Testifire will require an annual, traceable service in accordance ... -
Page 30: Service Reminders
7.6 Service Reminders By default Testifire will notify the user when a Service is due or over due. If required the Service reminders can be turned off (Firmware version 5.4 or later). System Info To disable service reminders, press the 'MENU' key on the keypad and use the 'DOWN' Language key to navigate to 'Service' (Fig 61). -
Page 31: Testifire Flash Loader Software Instructions
7.7 Testifire Flash Loader Software Instructions For Testifire 1000 & 2000 Models Welcome to the Testifire Flash Loader Software Before connecting Testifire to the computer, first install the Flash Loader software. Introduction Testifire Flash Loader is a free Windows based application that allows you to update your Testifire firmware on your Testifire without the need to return it for service. - Page 32 Step 3 Step 6 Select "I don't have the disc. Show me other options." This driver may not yet be digitally signed, however it Windows will now install the Testifire USB drivers. was obtained from either www.testifire.com or the disc Click "Close" to exit the wizard which was supplied with your Testifire then it is safe to use on your computer.
- Page 33 Windows XP -Testifire Device Driver Installation Step 1 Step 5 Run the Flash Loader software and when prompted Select "Install from a This driver may not yet be tested by Windows Logo testing, however if it list or specified location" and connect Testifire to the computer using the was obtained from either www.testifire.com or the disc which was supplied then click "Next"...
- Page 34 Windows 2000 - Testifire Device Driver Installation Step 1 Step 5 Run the Flash Loader software and when prompted connect Testifire to the computer using the supplied USB cable. The USB drivers are located in the install directory of the Testifire Flash The "Found New Hardware"...
- Page 35 Updating Your Testifire Firmware Before connecting Testifire to the computer, first install the Flash Loader software. Step 4 Step 1 The application will now scan the computers USB ports to detect the After installing the Testifire Flash Loader software, start the application devices connected.
- Page 36 Step 5 When programming is completed successfully the following screen is shown. Click on the Next button. The next stage is to load the Testifire firmware file into the application. Use the Open button to select a file stored on the computers hard disk or use the Download button to automatically download the latest firmware version from the Testifire website.
-
Page 37: Technical Specifications
8. Technical Specifications Power source Battery Baton: nominal 7.2V 2.2Ah NiMH rechargeable battery pack with internal overcurrent protection connects directly to Testifire with no leads or wires. Must be charged by Solo 726 Battery Charger (using 100-230VAC or 12VDC input). Battery Charge Time Approx. -
Page 38: Field Replaceable Parts
Weights Testifire 1000: 990g (including Battery Baton) Testifire 2000: 1.23kg (including Battery Baton) Solo 760 Battery Baton: 0.5kg Dimensions Testifire 1000: Bellows width: 153mm max. Head Unit height: 224mm max. (397mm including handle) Testifire 2000: Bellows width: 153mm max. Head Unit height: 273mm max. (397mm including handle) Note: Product specifications may be subject to change without prior notice or obligation on the part of the manufacturer. -
Page 39: Product Selector
9. Product Selector Products Application Accessories Access Universal Protective Access Access Smoke Heat Smoke/Heat Smoke/Heat/ Battery Fast Removal Carrying Height Height Testing Testing Testing Testing CO Testing Testing Baton Charger Tool up to 6m up to 9m testifire 1000 testifire 2000 testifire TS3 testifire TC3... -
Page 40: Agreement For Supply Of Products And Associated Software
10. Agreement for Supply of Products and Associated Software IMPORTANT NOTICE: PLEASE READ CAREFULLY BEFORE EITHER: (A) DOWNLOADING ANY SOFTWARE FROM THIS WEBSITE, OR (B)OPENING THE PACKAGING, OR (C) INSTALLING THE SOFTWARE: This Agreement for Supply of Products and Software (Agreement) is a legal agreement between you (Licensee or you) and No Climb Products Limited (Licensor or we) for (i) the Licensor's Product and (ii) all related software and all future upgrades thereto (Software). - Page 41 3. INTELLECTUAL PROPERTY RIGHTS 3.1 You acknowledge that all intellectual property rights in the Software and the Licensor's Products and the Documentation anywhere in the world belong to the Licensor, that rights in the Software are licensed (not sold) to you, and that you have no rights in, or to, the Software or the Documentation other than the right to use them in accordance with the terms of this Agreement.
- Page 42 7. TRANSFER OF RIGHTS AND OBLIGATIONS 7.1 This Agreement is binding on you and us, and on our respective successors and assigns. SRH/SM/SM/573.4/502256.8 7.2 You may transfer, assign, charge or otherwise dispose of this Agreement, or any of your rights or obligations arising under it, without our prior written consent provided that the beneficiary of any such any transfer, assignment, charge or disposal must have agreed to abide by the terms of this Agreement prior to or at the time of any such transfer, assignment, charge or disposal.
- Page 43 No Climb Products Ltd Edison House 163 Dixons Hill Road detectortesters Welham Green Hertfordshire AL9 7JE testing technology from No Climb United Kingdom...
Need help?
Do you have a question about the Testifire 1001 and is the answer not in the manual?
Questions and answers