
Related Manuals for Tamasu Butterfly Europa GmbH AMICUS PRIME

Summary of Contents for Tamasu Butterfly Europa GmbH AMICUS PRIME
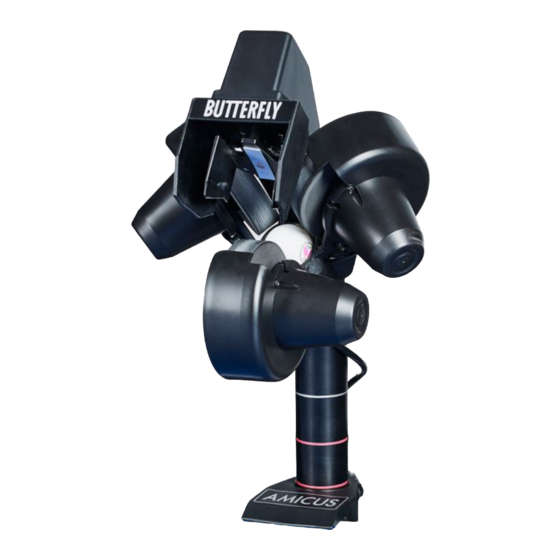
- Page 1 AMICUS PRIME Table Tennis Robot Owner’s Manual | Bedienungsanleitung | Manuel d’utilisation...
- Page 2 • The ball throw wheels rotate at high speed. Avoid touching the wheels during operation! • Use this product only in enclosed and dry rooms. Used properly, your AMICUS PRIME will always be a great training partner and friend (Amicus is Latin for Friend).
-
Page 3: Table Of Contents
IMPORTANT: Please read instructions carefully prior to use! The Control Panel chapter describes basic adjustments of the AMICUS PRIME table tennis robot. More detailed instructions can be found in the Operation chapter. Contents 1. Setup ..................................4 2. Control Tablet ................................. 6 3. -
Page 4: Setup
1. Setup Photo 1A a. Robot and Net Assembly b. Power Supply (Input: 100 – 240 V, Output: 24 V DC, 3 A) c. Control Tablet d. Control Tablet Power Supply e. Control Tablet Bracket Other parts: Hex wrenches (2 and 4 mm) for wheels, Wheel Adjust- ment Gauge (black tube with fins), spare rub-ber bands for the Side Nets, Velcro strips. - Page 5 Photo 3A Photo 3B 4. Standing behind the robot, grip the top points of the net and fold the net down on both sides until the net fully opens (as seen in Photo 4A). Fit the plastic Corner Brackets of the net around the corners of your table as seen in Photo 4B.
-
Page 6: Control Tablet
6. Plug your Power Supply into a power outlet Photo 6 and then into the power jack on the side of the Base (See Photo 6). 2. Control Tablet 1. Power Button — Used to turn the tablet on and off. 2. -
Page 7: Operation
Adjustment Of Head Height On most table tennis robots, the height of the head Photo 7 cannot be adjusted. In contrast, AMICUS PRIME offers 4 different heights to better simulate real- istic play. It is quite easy to adjust the head height. -
Page 8: Orienting The Robot To The Centerline
button. Soon you should see the Amicus logo appear and then the Exercise List screen should appear. Touch at bottom to go to the Home Screen. In the resulting screen, touch . The first setting is Wi-Fi, press it. Then click on your preferred Wi-Fi network. Type in your password (if required), and press Con- nect. - Page 9 the Ball/min setting for that one Ball) or reduce the time after a Photo 8 shot by using a positive setting (which increases the Ball/Min for that one Ball). Side spin changes the orientation of the spin on the ball. The “0” setting means there is no sidespin on the ball.
-
Page 10: Exercise Screens
20 Exercises named Exercise 79 to Exercise 99 These are all of the pre-programmed Exercises that come with your Amicus Prime. These Exercises were created by well-known Butter- fly Coach Richard Prause. Coach Prause recommends these drills for any player learning table tennis as a base upon which to develop more advanced skills. - Page 11 diagram of the Exercise. From these 2 diagrams, you can quickly Photo 11 see that this Exercise throws the 1st ball to the left corner and the 2nd ball to the right corner. Both balls have light topspin, a medium speed of 12, and a mid-table landing spot (about halfway between the table net and your endline).
- Page 12 You may also select 2 or all 3 options. For instance, selecting both Photo 14 Scatter and Place RND will enlarge the landing spot and randomize the placement of each ball. Tap outside of the popup window to make the popup go away and the selected options will be shown on the Random Button (see Photo 13).
-
Page 13: Changing Settings During Play
with a FH instead of a BH, tapping the Mirror button would be the Photo 17 quickest way to create an Exercise with the desired placements. The Reset Head Button causes the Head to go through its orienta- tion procedure. Use this as your first troubleshooting step if there is an irregularity in the way balls are thrown out. -
Page 14: Creating A New Exercise & Modifying An Exercise
the Speed for Ball 1 changing to 9 and for Ball 2, to 19. If all Balls in an Exercise are the same Spin, the Spins adjustment appears and allows you to step up or down the amount of Spin on all Balls. So if the Spin was set to 1 for Ball 1 and to 2 for Ball 2, tapping the Spins + symbol once would change the Spin for Ball 1 to 2 and for Ball 2 to 3. -
Page 15: Saving And Deleting An Exercise
Saving And Deleting An Exercise Photo 20 After verifying that the Exercise runs the way you intend it to, please save that Exercise so it is stored in memory and added to the list of Exercises in the Exercise List ( ). From either the Ball Screen or the Play Exercise Screen, tap Save at the top right. -
Page 16: Sequences
Sequences With Amicus Prime, you can string together 2 or more Exercises Photo 23 into a Sequence. Up to 10 Exercises can be saved in each Sequence. For each Sequence, one repetition for each included Exercise is played in a loop. For example, if Exercises 1, 2, and 3 are saved... -
Page 17: Creating And Saving Sequences
Creating and Saving Sequences There are 2 ways to create a Sequence: 1. From the Exercise List, select the first Exercise to be included in the Sequence and open its Play Exercise Screen. Tap Save at top right, then Save To Sequence. In the resulting dialog box, tap one of the already saved Sequences (if one is already saved) and the Exercise will be added at the end of the line to other Exercises already saved in that Sequence. -
Page 18: Modifying The Exercise List
1. Tap the Robot icon and in the resulting screen (the Connection Manager), touch Rescan at top right. If the tablet establishes a connection, it will show a list of all Amicus Prime robots within Bluetooth range. Select yours and tap the associated Connect button. -
Page 19: Calibration
If the Robot icon indicates a connection, there are several other functions that are available by clicking that icon. They are discussed in below. Calibration All robots differ to some degree as all motors can vary from the manufacturer, but even more so as they age. -
Page 20: Changing The Battery In Your Remote
Changing The Battery In Your Remote The Remote is powered by two 3 V, CR2016 button cell batteries. After long use, the batteries will run down and will need to be replaced. After purchasing replacement batteries, open your remote by inserting a coin or flathead screwdriver in the slot located on the wide end of the Remote and twisting to pop it open. -
Page 21: Take Down, Storage, & Transport
sage directly to the Amicus Support. Also can be used for downloading and sending Exercises and Sequences. 3. The Check For Update Button is used to check for and install the latest Amicus app. Takes only about 1 minute on most networks. This is different than the firmware update available on the Robot Screen. -
Page 22: Maintenance & Repair
5. Maintenance & Repair Cautions 1. Before performing any maintenance or repairs, unplug your robot from power. 2. Be sure no objects like dented balls, hair, string, etc. fall into the net and then work their way into the machine where they can cause ball jams or interfere with correct operation. 3. -
Page 23: Replacing The Wheels
the gauge, then wheel adjustment is called for. Photo 25C To adjust the wheels, push the gauge into the end of the Ball Tube where the ball comes out so it is held rigidly in place. Then use the 4 mm hex wrench found in the accessories to loosen the hex screw near the cover of the motor (see Photo 25B). -
Page 24: Ball Jams
Photo 26A Photo 26B Photo 26C Photo 26D Ball Jams Your robot is equipped with a special system Photo 27 to detect and react to problems in the ball channel. When the system detects a problem, it will attempt to automatically clear the ball jam by turning the Ball Feed Motor and the wheels forward and backward 7 –... -
Page 25: Other Maintenance
Once clear of balls, with the help of a flashlight, inspect inside the ball channel and clear out any foreign objects or dirt. With the ball channel empty, test ball feed to see if the ball stirring mechanism rotates when Ball/Min is turned up. Without any balls in the machine, the ball stirring mechanism should rotate approximately 11 –... - Page 26 Balls thrown at irregular A. Check wheel clearance. depths. B. Wheels worn. Replace all 3 wheels. C. Clean White Strip on Deflector Plate with isopropyl alcohol. Replace if worn. Double throws or missed A. Head height improperly adjusted. throws. A. Exercise needs at least 2 Balls. If only 1 Ball LED is lit, add a Random Place won’t turn on.
-
Page 27: List Of Replacement Parts
7. List of Replacement Parts ID # Part # Part Name ID # Part # Part Name 1–10 mobil-100 Net & Base Assembly Power Circuit Board Base Bottom Power Circuit Board Cover Base Top mobil-105 Control Panel Cable Ball Feed Gear Assembly Control Panel Bracket mobil-107 Ball Feed Motor... -
Page 29: Technical Data
#: AN 50091861 0001, Report #: 17004848 001. Also Test Reports # NTEK-2010NT1115351E and NTEK-2010NT1115353SS. The AMICUS PRIME table tennis robot is permitted to bear the CE trademark. Manufacturer: Tamasu Butterfly GmbH, Kommunikationsstr. 8, 47807 Krefeld, Germany 9. Warranty Information Full 2-year manufacturer‘s warranty... - Page 30 Tamasu Butterfly Europa GmbH Kommunikationsstr. 8 47807 Krefeld, Germany amicus@butterfly.tt +49 2151 9356-0...
Need help?
Do you have a question about the AMICUS PRIME and is the answer not in the manual?
Questions and answers