Table of Contents
Advertisement
Available languages
Available languages
Quick Links
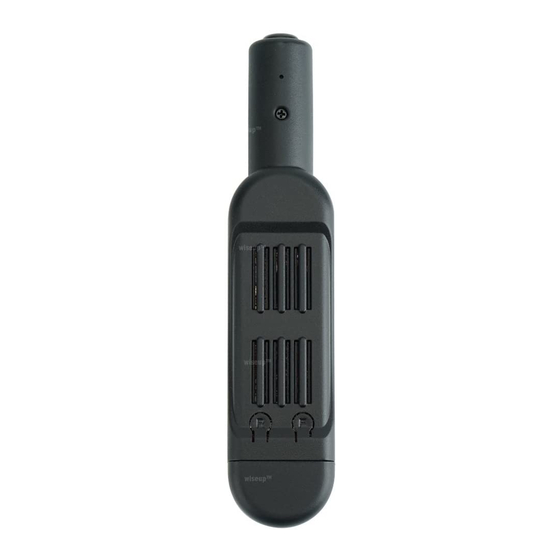
I. Product Overview
1. Microphone
2. Power Button
3. Camera Lens
4. Camera Button
5. Reset Button
II. What's In the Box
-1× Meeting Recorder Camera
-1× USB/AV Cable
III. Operation
>> Before using, make sure that the camera is fully recharged.
>> Please make sure the Micro SD card (4GB-32GB, format it for the first usage) is
P9000
User Guide
6. Yellow Indicator Light
7. Blue Indicator Light
8. Micro SD Card Slot
9. Mini USB Port
Advertisement
Table of Contents

Related Manuals for WISEUP SHOP P9000

Summary of Contents for WISEUP SHOP P9000
- Page 1 P9000 User Guide I. Product Overview 6. Yellow Indicator Light 1. Microphone 7. Blue Indicator Light 2. Power Button 8. Micro SD Card Slot 3. Camera Lens 9. Mini USB Port 4. Camera Button 5. Reset Button II. What’s In the Box -1×...
-
Page 2: Power On/Off
securely fitted into the camera’s SD card slot, or the camera will not work. A SDHC Class 10 Micro SD card is recommended. [Note]: If no Micro SD card is fitted into the camera or the SD card cannot be read, the blue and yellow indicator lights will flash four times and then turn off. - Page 3 3.3.3. Press Power Button once to stop recording video. The blue indicator light will stay illuminated, indicating the camera is back to standby mode. 3.4. CAMERA/STILL PHOTOGRAPHY 3.4.1. Power on the camera by pressing Power Button for two seconds. The blue and yellow indicator lights will be illuminated for five seconds.
- Page 4 5.4. Write the current date and time in the “TIMERSET.TXT” file with the correct format: YearMonthDayHourMinuteSecond Y. (For example: 20160412142432 Y). Save this file. If you don’t need the stamp on the video files, change “Y” into “N” in the file. 5.5.
- Page 5 9.2. Select the camera video signal source on the TV or monitor. 9.3. Power on the camera and start recording video (See 3.2 or 3.3), then you can watch the camera’s live video on the TV or monitor during the video recording process.
-
Page 6: Betrieb
P9000 Benutzerhandbuch I. Produktübersicht 6. Yellow Indicator Light 1. Mikrofon 7. blaue Anzeigelampe 2. Power-Taste 8. Micro SD-Karten-Slot 3. Kamera-Objektiv 9. Mini-USB-Anschluss 4. Kamera-Taste 5. Reset-Taste II. Was ist in der Box -1×Meeting-Recorder-Kamera -1× USB/AV Kabel III. Betrieb >> Vor der Verwendung, stellen Sie sicher, dass die Kamera vollständig aufgeladen... -
Page 7: Einschalten / Ausschalten
>> Bitte stellen Sie sicher, dass die Micro SD-Karte (4GB-32GB, formatieren Sie es für die erste Nutzung) sicher in den SD-Kartensteckplatz der Kamera angebracht sind, oder die Kamera wird nicht funktionieren. Eine SDHC Class 10 Micro-SD-Karte wird empfohlen. [Hinweis]: Wenn keine Micro-SD-Karte in die Kamera oder die SD-Karte ausgestattet ist, kann nicht gelesen werden, die blaue und die gelbe Anzeige leuchtet, wird viermal aufleuchten und dann wieder ab. - Page 8 drücken. Die blaue und gelbe Anzeige leuchtet, wird fünf Sekunden lang beleuchtet werden. Dann wird das gelbe ausschalten, während die blaue beleuchtet wird bleiben, was auf die Kamera hat sich automatisch in den Standby-Modus. 3.3.2. Halten Sie die Power-Taste für drei Sekunden Video mit 1920 × 1080p Videoauflösung aufzeichnen.
- Page 9 4.4. Alle Dateien können im Ordner "DCIM" zugegriffen werden. V. EINSTELLUNG VON UHRZEIT / DATUM-STEMPEL 5.1. Schließen Sie die Kamera an einen PC-Computer, wenn es ausgeschaltet ist, 5.2. Wechselplattenlaufwerk Ordner angezeigt wird. 5.3. Klicken Sie auf das Laufwerk im Stammverzeichnis und im Inneren des Root-Verzeichnis eine Datei mit dem Namen "TIMERSET.TXT".
- Page 10 Bedienung: Drücken Sie die Reset-Taste einmal, um die Kamera zu setzen. Die blaue und gelbe Anzeige leuchtet, schaltet sich die Kamera automatisch abgeschaltet. IX. Live-Video-Ausgang 9.1. Schließen Sie die Kamera an einen Fernseher oder Monitor mit dem AV-Kabel wie unten angegeben: 9.2.
-
Page 11: Présentation Du Produit
P9000 Mode d'emploi I. Présentation du produit 6. Lampe témoin jaune 1. Microphone 7. Lampe témoin bleu 2. Bouton d'alimentation 8. Micro SD Card slot 3. Caméra Lens 9. Port USB Mini 4. Bouton de l'appareil photo 5. Bouton de réinitialisation II. - Page 12 utilisation) est solidement fixé dans la fente de la carte SD de l'appareil photo ou la caméra ne fonctionnera pas. Une SDHC carte Micro SD de Classe 10 est recommandée s’il vous plaît. [Remarque]: Si aucune carte Mémoire Sd est insérée dans l'appareil photo ou la carte SD ne peut pas être lu, les voyants bleu et jaune sera étientes après clignoter quatre fois puis.
- Page 13 Ensuite, le jaune s'éteint, tandis que le bleu reste allumé, indiquant que l'appareil est entré en mode veille automatiquement. 3.3.2. Maintenez le bouton d'alimentation pendant trois secondes pour enregistrer de la vidéo avec résolution de 1920 × vidéo 1080P. Le voyant jaune clignote trois fois et éteignez.
- Page 14 V. Réglage de l'heure / Date Stamp 5.1. Branchez l'appareil photo à un ordinateur PC quand il est éteint, 5.2. dossier de disque amovible apparaît. 5.3. Cliquez sur le lecteur dans le répertoire racine et à l'intérieur du répertoire racine, créez un fichier nommé "TIMERSET.TXT". 5.4.
- Page 15 Opération: Appuyez sur le bouton de réinitialisation une fois pour réinitialiser la caméra. Les voyants bleu et jaune s'éteint et l'appareil photo arrête automatiquement. IX. En direct Sortie vidéo 9.1. Branchez l'appareil photo à un téléviseur ou un moniteur en utilisant le câble AV fourni comme ci-dessous: 9.2.
-
Page 16: Panoramica Del Prodotto
P9000 Guida utente I. Panoramica del Prodotto 6. spia gialla 1. Microfono 7. indicatore luminoso blu 2. Pulsante di alimentazione 8. Slot Micro SD Card 3. Camera Lens 9. porta mini USB 4. Pulsante Camera 5. Pulsante di ripristino II. Cosa c'è nella scatola -1×Fotocamera Meeting Recorder... - Page 17 prima fornitura) è montato saldamente nella slot per scheda SD della fotocamera, oppure la fotocamera non funziona. Si raccomanda un SDHC Classe 10 SD card Micro. [Nota]: Se nessuna scheda micro SD è montato nella fotocamera o la scheda SD non può essere letto, le spie blu e giallo lampeggiano quattro volte e poi si spegne.
- Page 18 3.3.2. Tenere premuto il pulsante di alimentazione per tre secondi per registrare video con risoluzione video 1920 × 1080p. La spia gialla lampeggia tre volte e spegnere. 3.3.3. Premere il pulsante di accensione una volta per interrompere la registrazione video. La spia blu rimarrà illuminato, indicando la fotocamera è in modalità standby. 3.4.
- Page 19 principale, creare un file denominato "TIMERSET.TXT". 5.4. Scrivere la data e l'ora correnti nel file "TIMERSET.TXT" con il formato corretto: giornomeseannooreminutisecondi Y. (per esempio: 20160412142432 Y). Salvare il file. Se non è necessario il timbro sui file video, cambiare "Y" in "N" nel file. 5.5.
- Page 20 9.2. Selezionare la sorgente del segnale video della telecamera sul televisore o monitor. 9.3. Accendere la fotocamera e avviare la registrazione video (vedere 3.2 o 3.3), quindi è possibile guardare video in diretta della telecamera sul televisore o monitor durante il processo di registrazione video. 9.4.
-
Page 21: Descripción Del Producto
P9000 Guía del usuario I. Descripción del producto 1. Micrófono 6. Indicador de luz amarilla 2. Botón de fuente de alimentación 7. Indicador de luz azul 3. Lente de la cámara 8. Ranura tarjeta de Micro SD 4. Botón de la cámara 9.Mini USB puerto... - Page 22 el uso ) está montado de forma segura en la ranura de la tarjeta SD de la cámara, en caso contrario, la cámara no funcionará. Se recomienda una tarjeta Micro SD de SDHC Clase 10. [Nota]: Si no hay ninguna tarjeta Micro SD está montado en la cámara o la tarjeta SD no se puede leer, el indicador azul y amarillo parpadean cuatro veces y luego se apagará.
-
Page 23: Formateo De La Tarjeta Micro Sd
3.3.1. Encienda la cámara por pulsar el botón de fuente de alimentación durante dos segundos. El indicador de luz azul y amarillo se iluminarán durante cinco segundos.Despúes, el amarillo se apagará, mientras que el azul permanece encendida, indica que la cámara ha entrado en el modo de espera automáticamente. - Page 24 4.1. Cuando la cámara está apagada, retire la tarjeta Micro SD y la inserta en un lector de tarjetas. 4.2. Inserte el lector de tarjetas en un ordenador PC. 4.3. La tarjeta Micro SD será reconocida como un controlador de disco extraíble. 4.4.
- Page 25 [Nota]: Usted podría experimentar otras funciones de la cámara en el proceso de carga. VIII. Restablecimiento Si por alguna razón la cámara deja de responder o no está funcionando correctamente, un reinicio rápido va a restaurar de nuevo a la operación normal. Operación: Pulse el botón de reinicio una vez para restablecer la cámara.
- Page 26 P9000 ユーザーガイド I. 製品の概要 1. マイクロフォン 6. 黄色のインジケータライト 2. 電源ボタン 7. 青色のインジケータライト 3. カメラレンズ 8. マイクロSDカードスロッ ト 4. カメラボタン 9. ミニUSBポート 5. リセッ トボタン II. ボッ クスについて -1×ミーティングレコーダーカメラ -1× USB/AVケーブル III. 操作 >> 使用する前に、 カメラが完全に再充電されていることを確認してください。 >> マイクロSDカード (最大4GB-32ギガバイトは、 第1の使用のためにそれをフォーマ...
- Page 27 ッ ト) を確認してくださいしっかりとカメラのSDカードスロッ トに装着されている、 また はカメラが動作しません。 SDHCクラス10マイクロSDカードをお勧めします。 [注意]: 何のマイクロSDカードがカメラに装着されていないか、 SDカードを読み取ることができない場 合は、 青と黄色のインジケータライトが4回点滅してから消灯します。 カメラが自動的にシャッ トダウンしま す。 3.1. 電源のオン/オフ 3.1.1. 2秒間電源ボタンを押してカメラの電源をオンにします。 青と黄色のインジケー タランプが5秒間点灯します。 青1が点灯したままになりながら、 黄色の1は、 自動的にス タンバイモードに入ったカメラを示す、 オフになります。 3.1.2. カメラが記録中またはスタンバイモードになっているときに7秒間電源ボタンを 押してカメラの電源をオフにします。 [注意]: それは1分以上何も操作せずにスタンバイモードになっている場合はカメラが自動的にシャッ ト ダウンします。 3.2. 720P録画 3.2.1. 2秒間電源ボタンを押してカメラの電源をオンにして。 青と黄色のインジケータ ランプが5秒間点灯します。 青のインジケータライトが点灯したままになりながら、 黄色 のインジケータライトが消えます、...
- Page 28 3.3.3. POWERボタンを押すと、 一度ビデオの録画を停止します。 青色のインジケータラ イトがカメラを示すが戻ってスタンバイモードにある、 照らされたままになります。 3.4. カメラ/静止画撮影 3.4.1. 2秒間電源ボタンを押してカメラの電源をオンにして。 青と黄色のインジケータ ランプが5秒間点灯します。 青のインジケータライトが点灯したままになりながら、 黄色 のインジケータライトが消えます、 自動的にスタンバイモードに入ります。 3.4.2. [カメラ]ボタンを押して、 写真を取ることができます。 黄色のインジケータランプ が一度点滅した後、 オフになります。 青色のインジケータライトがカメラを示すが戻っ てスタンバイモードにある、 照らされたままになります。 3.5. マイクロSDカードのフォーマッ ト 3.5.1. 2秒間電源ボタンを押してカメラの電源をオンにします。 青と黄色のインジケー タランプが5秒間点灯します。 青1が点灯したままになりながら、 黄色の1は、 自動的にス タンバイモードに入ったカメラを示す、 オフになります。 3.5.2. 3秒間カメラボタンを押したままにします。 青と黄色のインジケータライトは、 最 初に、...
- Page 29 年月日時分秒Y ( 例 : 20160412142432 Y) 。 このファイルを保存してください。 あなたが ビデオファイルにスタンプを必要としない場合は、 ファイル内の 「N」 に 「Y」 に変更しま す。 5.5. カメラを再起動し、 システムが自動的にプログラムをアップグレードします。 VI. 充電のみ 6.1. カメラからのマイクロSDカードを取り外します。 6.2. 付属のUSBケーブルを使用して、 カメラをパソコンに接続してくたさい。 6.3.完全充電になるために3時間かかります。 6.4. 青色のインジケータライトは、 充電中に着いたたままになります。 6.5. カメラが完全に充電されると、 青と黄色のインジケータランプが点灯したままにな ります. VII. 充電と同時に録音 7.1. カメラにマイクロSDカードを挿入します。 7.2. 付属のUSBケーブルを使用して、 カメラをパソコンに接続してくたさい。 7.3.
- Page 30 9.2. テレビやモニターにカメラ映像信号源を選択してください。 9.3. カメラの電源をオンにして、 録音を開始したビデオ (3.2または3.3を参照) 、 その後、 テレビでカメラのライブ映像を見ることができるか、 録画処理中に監視します。 9.4.ライブビューモードの途中で、 他の機能を使用することができます。...
Need help?
Do you have a question about the P9000 and is the answer not in the manual?
Questions and answers