cetoni neMESYS Hardware Manual And Reference
Hide thumbs
Also See for neMESYS:
- Hardware manual and reference (28 pages) ,
- Operating manual (55 pages)
Table of Contents
Advertisement
Quick Links
Advertisement
Table of Contents

Subscribe to Our Youtube Channel
Related Manuals for cetoni neMESYS


Summary of Contents for cetoni neMESYS
- Page 1 NEMESYS Hardware Manual and Reference ORIGINAL INSTRUCTIONS 2.08–AUGUST 2018...
- Page 2 CETONI GmbH Wiesenring 6 07554 Korbussen Germany +49 (0) 36602 338-0 +49 (0) 36602 338-11 info@cetoni.de www.cetoni.de neMESYS Hardware Manual...
- Page 3 If you control the products with a software from CETONI GmbH, you agree to the applicable license agreement, which can be read in the corresponding software manual. This and all other current product manuals can be found at https://www.cetoni.de/en/downloads/manuals.
-
Page 4: Table Of Contents
Safety Devices on the System 2.4.7 Condition of the Devices Warranty and Liability Scope of Supply Initial Start-Up Software Installation System Configuration 3.2.1 Connecting the Base Module 3.2.2 Connecting Additional Modules Module Configuration Base Module BASE 120 neMESYS Hardware Manual... - Page 5 Transport and Storage Maintenance and Care Hardware Operation 5.4.1 Mounting a Syringe 5.4.2 Fluidic/Valve Mid Pressure Syringe Pump Technical Data 6.1.1 Environment 6.1.2 Mechanical Data 6.1.3 Electrical Data 6.1.4 Interfaces 6.1.5 Dosing Performance Transport and Storage Maintenance and Care neMESYS Hardware Manual...
- Page 6 7.4.2 Fluidic Connections 7.4.3 Mounting a Syringe 7.4.4 Pressure Sensor Accessory Port RS232 Connection Pin Assignment of Module Interfaces OEM RS232 Cable Set 9.2.1 RS232 Wiring 9.2.2 Communication Settings 9.2.3 Pin Assignment of the RS232 Cable Disposal neMESYS Hardware Manual...
-
Page 7: Revision History
Correction of the pin assignment of the I/O-Interface for the High Pressure Syringe Pump 2.05 10.03.2016 New Corporate Design 2.06 21.11.2016 Correction of pin assignment table 2.07 29.05.2017 Pictures BASE module and USB cable updated 2.08 06.08.2018 Pressure sensor type in High Pressure Syringe Pump changed neMESYS Hardware Manual... -
Page 8: Introduction
Thank you for deciding to purchase a CETONI product. We would like to support you with this handbook as far as possible in your interaction with the neMESYS syringe pump system. We are directly available for any questions or suggestions that you may have. -
Page 9: Norms And Guide Lines
2.4.2 Intended Use The neMESYS syringe pump system serves for precise and pulsation-free dosing of fluids in the range of nanolitres per second up to millilitres per second. Pressures of up to several hundred bar can be reached depending on the device. -
Page 10: Safety Advice
Regarding the maximum operating temperature, the specification from the section "Technical Data" must be observed. CETONI GmbH is not liable for consequences that may arise if the user expands the system by peripheral devices, such that one of the values or both values are exceeded. -
Page 11: Measures For Safe Operation
With this in mind, always carry out a visual check of the components mentioned before use. Pay particular attention to crushed cables, damaged tubing, and deformed plugs. If you should notice any damage, please do not use the devices and inform CETONI GmbH without delay. CETONI will put neMESYS Hardware Manual... -
Page 12: Warranty And Liability
CETONI GmbH considers itself responsible for the devices with regard to safety, reliability and function only if assembly, new settings, changes, extensions and repairs are carried out by CETONI GmbH or an authorized centre, and if the devices have been used in accordance with the instruction manual. -
Page 13: Scope Of Supply
The delivery should correspond to the order. The following items should be included in the scope of supply of the base module: COUNTRY SPECIFIC POWER CABLE FOR NON- HEATING APPARATUS USB CABLE 10 m ACTIVE BUS TERMINATING PLUG HARDWARE-MANUAL AND CD WITH SOFTWARE- MANUAL, SOFTWARE AND DRIVERS neMESYS Hardware Manual... -
Page 14: Initial Start-Up
PC via USB. System Configuration Place your neMESYS modules on a firm and level surface in the desired sequence, without connecting them. You can arrange the system horizontally or vertically. neMESYS Hardware Manual... -
Page 15: Connecting The Base Module
Never operate the device with damaged power lines or plugs! Only use supplied cables. CAUTION. Danger of stumbling due to connecting cables! Place cables in such way as to avoid any danger of stumbling! neMESYS Hardware Manual... -
Page 16: Connecting Additional Modules
The exact process is described in the respective software manuals and will be touched on briefly here: In case of the neMESYS UserInterface the modules are added to the base module one by one, before being configured. According to this sequence, each module is assigned a number internally. - Page 17 Otherwise, there may be disruptions in data communication. IMPORTANT. Always insert the bus termination plug into the socket of the final connected system. Otherwise there may be disruptions in data communication. neMESYS Hardware Manual...
-
Page 18: Module Configuration
If software actions become necessary, the manual will point you to the software manual at the appropriate time. There you will also find additional and helpful information. neMESYS Hardware Manual... -
Page 19: Base Module Base 120
STORAGE TEMPERATURE -20°C to 75°C OPERATING AIR HUMIDI TY 20% to 90%, non-condensing STORAGE AIR HUMIDITY 20% to 90%, non-condensing 4.1.2 Mechanical Data DIMENSIONS (L X W X H) 310 x 100 x 56 mm WEIGHT ≈1800 g neMESYS Hardware Manual... -
Page 20: Electrical Data
When used properly, the device is maintenance-free. In case of problems that you cannot fix yourself or that require opening the device, please contact CETONI GmbH to coordinate any further actions. The device may be opened only by CETONI GmbH or authorized service personnel. Failure to adhere to this rule will void the warranty. -
Page 21: Hardware Operation
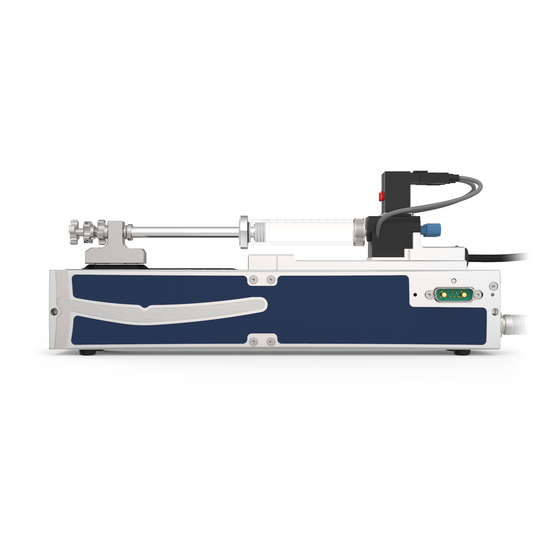
The power switch is located to the right of the power socket and will light up red when the device is turned on. The type B USB-connector is used to connect the device to your PC. USB connector (type B) Fuse Power socket Power switch neMESYS Hardware Manual... -
Page 22: Low Pressure Syringe Pump
STORAGE TEMPERATURE -20°C to 75°C OPERATION AIR HUMIDITY 20% to 90%, non-condensing STORAGE AIR HUMIDITY 20% to 90%, non-condensing 5.1.2 Mechanical Data DIMENSIONS (L X W X H) 310 x 47 x 56 mm WEIGHT ≈1300 g neMESYS Hardware Manual... -
Page 23: Electrical Data
0,065 1,042 Min. pulsation–free speed [µm/s] 14,648 0,502 6,33 Max. speed [mm/s] 3,06 0,065 Min. flow [µl/min] 0,065 0,065 1 ml syringe with 60mm 1,042 Min. pulsation-free flow [µl/min] 14,648 0,502 stroke 6,33 Max. flow [ml/min] 3,05 neMESYS Hardware Manual... -
Page 24: Valve
Please do not lift or transport the modules while they are plugged into each other. Transport in assembled state is only permissible when using the original packaging. Use the original packaging for shipping the modules. Please observe the information provided in 5.1.1 with respect to storage. neMESYS Hardware Manual... -
Page 25: Maintenance And Care
When used properly, the device is maintenance-free. In case of problems that you cannot fix yourself or that require opening the device, please contact CETONI GmbH to coordinate any further actions. The device may be opened only by CETONI GmbH or authorized service personnel. Failure to adhere to this rule will void the warranty. -
Page 26: Mounting A Syringe
The respective process is described in the software manual. You need the volume (scale volume), the nominal stroke (scale length) and the total stroke (piston stroke), which may be different. Scale Length Scale Volume Piston Stroke neMESYS Hardware Manual... - Page 27 Place an empty syringe on the remaining base of the syringe holder in such way that the piston touches the piston holder. The syringe position can be varied somewhat by moving the piston holder. For this purpose loosen the screw with a 4 mm Allen wrench. neMESYS Hardware Manual...
- Page 28 “piston plate” is located between piston holder and adapter plate. The piston is locked in place by slightly tightening the knurled screw on the back. Make sure that syringe and syringe piston are in alignment. neMESYS Hardware Manual...
-
Page 29: Fluidic/Valve
(3). In the following image the syringe is connected with the outlet (blue), while the intake is closed (red). A FFKM membrane connected to the rocker (shaded in green) seals the fluidic system. This membrane limits the operating pressure of the valve to 3 bar. neMESYS Hardware Manual... - Page 30 To remove the valve press the rocking catch at the plug and remove the plug. When replacing it later please observe the orientation of the plug (the white surface must face the valve, the rocking catch must face away from the valve). neMESYS Hardware Manual...
- Page 31 ATTENTION. Observe the orientation of the valve plug (the white surface must face the valve, the rocking catch must face away from the valve). Rocking Catch In the next step you can simply pull up the valve to remove it. neMESYS Hardware Manual...
-
Page 32: Mid Pressure Syringe Pump
STORAGE TEMPERATURE -20°C to 75°C OPERATING AIT HUMIDITY 20% to 90%, non-condensing STORAGE AIR HUMIDITY 20% to 90%, non-condensing 6.1.2 Mechanical Data DIMENSIONS (L X W X H) 310 x 59 x 60 mm WEIGHT ≈2000 g neMESYS Hardware Manual... -
Page 33: Electrical Data
6.1.3 Electrical Data SUPPLY VOLTAGE 24 VDC CURRENT DRAIN 0,3 A POWER CONSUMPTION 15 W 6.1.4 Interfaces 1 Mbit/s RS-232 section 9 ACCESSORY PORT section 8 neMESYS Hardware Manual... -
Page 34: Dosing Performance
1 ml glass syringe with a 60 mm stroke as well as CETONI stainless steel syringes. Dosing precision slowly decreases below the speeds and flow rates referred to as pulsation-free. -
Page 35: Transport And Storage
When used properly, the device is maintenance-free. In case of problems that you cannot fix yourself or that require opening the device, please contact CETONI GmbH to coordinate any further actions. The device may be opened only by CETONI GmbH or authorized service personnel. Failure to adhere to this rule will void the warranty. -
Page 36: Mounting A Syringe
(scale volume), the nominal stroke (scale length) and the maximum stroke (piston stroke), which may be different. The scale volume and scale length values are engraved on CETONI stainless steel syringes. Unless otherwise stated, the piston stroke is 60 mm. These values can also be found in the table in section 6.1.5. - Page 37 Loosen the screws on the syringe holder and push it all the way to the front, or completely remove it from the device. Loosen the knurled screws of the holding-down clamp, if installed. Knurled screws Fasting screw neMESYS Hardware Manual...
- Page 38 Lock the syringe piston with the knurled screw. To avoid bending the syringe in case of high pressure, lower the blank holder onto the syringe and fasten the two knurled screws. neMESYS Hardware Manual...
-
Page 39: Fluidic/Valve
(outlet) and a reservoir (intake) and thereby automatic refilling of the syringe. Please refer to the associated valve manual for more detailed information about valves. The valves are simply plugged onto the corresponding pins on the module. neMESYS Hardware Manual... - Page 40 Connect tubes between the syringe holder and the valves as follows: Intake Outlet ATTENTION. Before using the valve please check its chemical resistance against the media you intend to pump. neMESYS Hardware Manual...
-
Page 41: Mounting The Blank Holder
As a consequence syringe wear is decreased as well. To mount the blank holder simply place it into the two gaps on the device and fasten it on both sides with the provided screws (2 mm Allen head). neMESYS Hardware Manual... -
Page 42: High Pressure Syringe Pump
-20°C to 75°C OPERATING AIR HUMIDI TY 20% to 90%, non-condensing STORAGE AIR HUMIDITY 20% to 90%, non-condensing 7.1.2 Wetted Parts SYRINGE HOLDER AND FITTING Stainless steel 1.4404 (316L) PRESSURE SENSOR Aluminium oxide (Al2O3) PRESSURE SENSOR SEAL Perfluoroelastomer FFKM neMESYS Hardware Manual... -
Page 43: Mechanical Data
DIMENSIONS (L X W X H) 310 x 110 x 136 mm WEIGHT ≈4500 g 7.1.4 Electrical Data SUPPLY VOLTAGE 24 VDC CURRENT DRAIN 1,9 A POWER CONSUMPTION 45 W 7.1.5 Interfaces 1 Mbit/s RS-232 section 9 ACCESSORY PORT section 8 neMESYS Hardware Manual... -
Page 44: Dosing Performance
Dosing Performance The following table provides an overview of minimum and maximum dosing speeds. The resulting flow rates shown here are based on CETONI stainless steel syringes. Dosing precision slowly decreases below the speeds and flow rates referred to as pulsation-free. -
Page 45: Transport And Storage
When used properly, the device is maintenance-free. In case of problems that you cannot fix yourself or that require opening the device, please contact CETONI GmbH to coordinate any further actions. The device may be opened only by CETONI GmbH or authorized service personnel. Failure to adhere to this rule will void the warranty. -
Page 46: Mounting The Safety Hood
CAUTION. Only use the High Pressure Syringe Pump with the mounted safety hood! Do not touch any moving parts on the device during operation! IMPORTANT. If you remove the safety hood during operation, the High Pressure Syringe Pump will stop automatically. neMESYS Hardware Manual... -
Page 47: Fluidic Connections
Rotate the nut with open-end wrench to the previously pulled-up position as indicated by the marks you made before; at this point you will feel a significant increase in resistance. Retighten the nut slightly. Done! You can purchase additional connecting material from Swagelok, such as replacement clamping rings (ordering number SS-100-SET). neMESYS Hardware Manual... - Page 48 There is a metal bushing behind the conduit fitting for sealing purposes. This bushing can remain in the borehole while the conduit fitting is replaced. Firmly tighten the newly mounted conduit fitting to achieve a sealed connection. neMESYS Hardware Manual...
-
Page 49: Mounting A Syringe
(scale volume), the nominal stroke (scale length) and the maximum stroke (piston stroke), which may be different. The scale volume and scale length values are engraved on CETONI stainless steel syringes. Unless otherwise stated, the piston stroke is 60 mm. These values can also be found in the table in section 7.1.6. - Page 50 7.4.1. Screw the syringe into the syringe holder as far as it will go. Put the safety hood back on the device and advance the piston holder until it touches the piston. Take off the safety hood and attach the piston to the piston holder using the knurled screw. neMESYS Hardware Manual...
-
Page 51: Pressure Sensor
There is an integrated pressure sensor in the syringe holder of the High Pressure Syringe Pump. This allows the device to stop automatically upon reaching the preset maximum pressure. ATTENTION. Before using the device, check the chemical resistance of wetted materials against the fluid to be metered. neMESYS Hardware Manual... - Page 52 (e.g. 0.5 – 4.5 V). These values can be found on the nameplate on the side of the device under sensor: ATTENTION. Configure the pressure sensor before use, to avoid damaging the device or your application. neMESYS Hardware Manual...
-
Page 53: Accessory Port
The pin assignment of the connector at the module and the wire colors of the connecting cable, which can be purchased from CETONI, can be found in the table on the next page. Of course, you can also purchase ready-made periphery devices from CETONI GmbH. - Page 54 Switch valve Inactive: open NPN Max. 1 A Digital output 3 Active: 0 V (GND) Inactive: open Digital ground +24 V Out +24 VDC / <1 A +5 V Out +5 VDC / <150 mA Analog ground neMESYS Hardware Manual...
-
Page 55: Rs232 Connection
RS232 cable already contains a bus termination resistor. Now, plug the 9-pin D-Sub socket of the cable into an RS232 connection on your PC or other controller. For greater distances to the socket please use a 1:1 cable with a 9-pin D-Sub plug. neMESYS Hardware Manual... -
Page 56: Communication Settings
9.2.3 Pin Assignment of the RS232 Cable The OEM RS232 cable adapts the neMESYS device interface to a standard 9-pin D-Sub plug. The following table shows the pin assignment of the neMESYS interface and the 9-pin D-Sub: neMESYS Interface (socket) -
Page 57: Disposal
10 Disposal Please send your old devices back to CETONI GmbH. We will take care of proper disposal according to electric devices regulations. If necessary, please decontaminate the device before sending it back and attach a completed decontamination declaration with your shipment.
Need help?
Do you have a question about the neMESYS and is the answer not in the manual?
Questions and answers