Advertisement
Section 1
General Description
Camden Lazerpoint™ Radio Controls comprise the following
models:
• CM-TX-9 Wall switch ready transmitter
• CM-TX-99 Plug-in transmitter
• CM-TXLF 1, 2 & 4 button fob transmitters
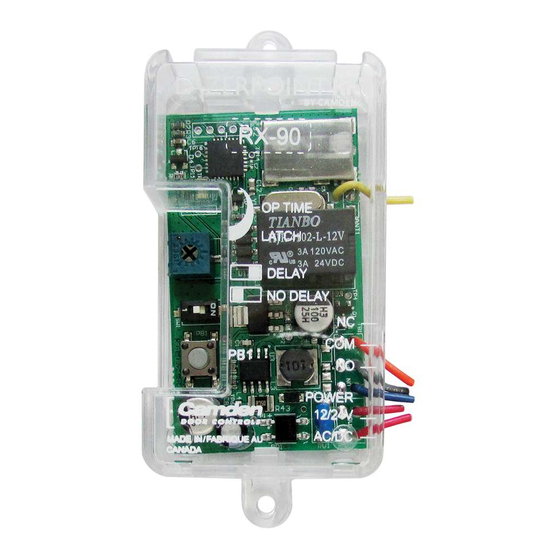
• CM-RX-90 Advanced single relay receiver
• CM-RX-91 Basic single relay receiver
• CM-RX-92 Full function (dual relay) receiver.
Camden Lazerpoint™ RF is the first system designed to
address the specific needs of the Automatic Door industry.
Unlike typical "garage door" RF, Camden's Lazerpoint™
operates at 915 MHz frequency to "cut through" the noise
and clutter, and penetrate typical building materials to ensure
a reliable installation every time.
Three receiver models are offered – the basic single relay
RX-91, the full function RX-92 and the advanced single relay
RX-90. The RX-90 offers 3 operating modes including delayed,
no delay and latched.
Camden CM-RX-90 features a convenient wiring harness,
18" in length, visual relay status, and 40 code memory with
push-and-learn technology.
Lazerpoint
Advanced Single Relay Receiver
Installation Instructions
Section 2
Features
• 3 Modes of Operation:
- Delayed (1 - 15 Seconds)
- No Delay (1 – 30 Seconds)
- Latching
• 40 Transmitter capacity, either delayed, non-delayed or both
• Form 'C' Relay Output
• 12/24V AC/DC operation
• 915 MHz Lazerpoint Technology
• Small Size: 2 5/8"H x 1 1/2"W x 13/16"D
(67mm x 38mm x 21mm)
Section 3
Installation
Mounting
The RX-90 receiver is designed to mount inside the automatic
door header. Screw holes are located at each end of the
receiver case, or the included velcro may also be used to hold
it securely.
For dimensional information refer to RX-90 electrical and
mechanical Drawing on Page 4.
Wiring
Note: Do not use the Lazerpoint RF system as a Safety
device!!. If safety devices are used, always wire them
directly to the operator control box.
Refer to the RX-90 Wiring Diagram on Page 5, and wire the
receiver as follows:
Wire the device (electric lock / operator) to the Relay output -
terminal 3 is N.O. 4 is Common, and 5 is N.C.
Connect 12 or 24 Volt AC or DC to terminals 1 & 2 on the
receiver. (The terminals are not polarity sensitive).
RF RX-90
TM
Page 1 of 7
Advertisement
Table of Contents

Related Manuals for CAMDEN Lazerpoint RF RX-90


Summary of Contents for CAMDEN Lazerpoint RF RX-90
-
Page 1: Section 3 Installation
• CM-RX-92 Full function (dual relay) receiver. For dimensional information refer to RX-90 electrical and Camden Lazerpoint™ RF is the first system designed to mechanical Drawing on Page 4. address the specific needs of the Automatic Door industry. -
Page 2: Setup Instructions
Lazerpoint™ RF RX-90 Advanced Single Relay Receiver Installation Instructions small blade screwdriver or similar. Within 10 seconds, press the switch connected to a TX-9 transmitter or a button on Wire Description a Lazerpoint FOB. The Green LED Array will flash to confirm Power In enrolment. -
Page 3: Warranty
Section 6 Deleting Transmitters Warranty Delay Mode Transmitters Camden Door Controls guarantees the Lazerpoint RF to be Set SW1 to ON. free from manufacturing defects for 3 years from date of Pressing and holding PB1 for 8 seconds will delete all sale. - Page 4 Lazerpoint™ RF RX-90 Advanced Single Relay Receiver Installation Instructions Page 4 of 7...
- Page 5 Lazerpoint™ RF RX-90 Advanced Single Relay Receiver Installation Instructions POT1 Page 5 of 7...
- Page 6 Lazerpoint™ RF RX-90 Advanced Single Relay Receiver Installation Instructions POT1 POT1 Page 6 of 7...
- Page 7 —Connect the equipment into an outlet on a circuit different from that to which the receiver is connected. —Consult the dealer or an experienced radio/TV technician for help. Changes or modifications made to this equipment not expressly approved by Camden Door Control could void the user’s authority to operate the equipment. Push Buttons...
Need help?
Do you have a question about the Lazerpoint RF RX-90 and is the answer not in the manual?
Questions and answers