Table of Contents
Advertisement
Advertisement
Table of Contents

Subscribe to Our Youtube Channel
Summary of Contents for E-RM Multiclock
- Page 1 U S E R M A N U A L E - R M E R F I N D U N G S B Ü R O...
- Page 2 Copyright © 2018 e-rm erfi nd ungs bü r o - h t t ps:/ w w w.e -r m .de E-RM Erfindungsbüro Rest & Maier GbR Wikingerufer 7 10555 Berlin Germany Version 1.1 - August 2018...
-
Page 3: Table Of Contents
Contents 1 The Purpose of the Multiclock 2 Machine Overview 3 Configuring the machine 3.1 Clock Source ...... - Page 4 Simply play together.
- Page 5 Introduction Hello Stranger! Congratulations for purchasing your multiclock. You have just purchased an avant-garde machine: you are now able to solve sync and timing issues in the studio and on stage once and for all. This multi-format sync box builds a bridge between DAWs and external MIDI, DIN/sync24 and analog modular gear.
-
Page 7: The Purpose Of The Multiclock
DAW. The key feature of the multiclock is it’s ability to derive a variety of sync signals from a special Audio Sync track instead of using for example a MIDI Clock signal. -
Page 8: Machine Overview
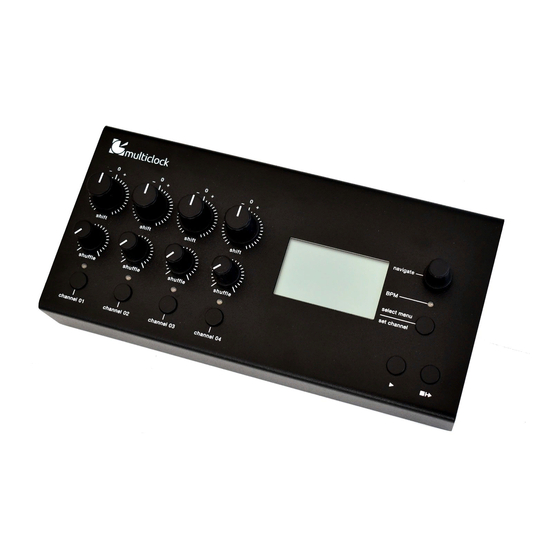
Machine Overview The front panel of the multiclock can be roughly divided into a real-time and a configuration section. On the left half, there are four identical channel stripes for real- time control of each output channel. They consist of a shift and a shuffle knob, a status led and a start/stop button. - Page 9 2+3 work in sync mode and Channel 4 is used as a MIDI controller. The rear panel of the multiclock provides connectivity and input for the power supply. It can also be divided into two sections: inputs on one side, outputs on the other. DC input and a power switch are located on the rightmost edge.
-
Page 10: Configuring The Machine
Configuring the machine Configuring the settings of your multiclock is as easy as following the menu on the screen if you keep two things in mind: • The screen is always divided into a main and a bottom section. To toggle the cursor between both sections, simply push the select menu button. -
Page 11: Channel Setup
co n fi g u ri n g t h e m a c h i n e 11 get to the respective configuration page. Set all machines in your setup to the same value. You can change the signature from 3/8 to 32/8, changes are saved automatically. -
Page 12: Channel Mode
12 mul ticl ock - us er man ual Offset Offset calibration process is initiated by selecting It is recommended to program a simple percussive sound on every full the menu. You are asked to start the clock source first. If you are note of the machines involved in the using the internal generator, please press the global play button, calibration process. -
Page 13: Channel Dividers
co n fi g u ri n g t h e m a c h i n e 13 Channel Dividers Clock dividers are fun to create polyrhythmic patterns, thus you can set them on all output ports. Channel Divider Configuration. MIDI Chn Divider Knob... -
Page 14: Midi Controller Configuration
Midi Controller Configuration If you happen to have unused clock channels on your multiclock and need a basic MIDI Controller for one of your synths, simply configure the knobs to emit MIDI Control Change commands by... -
Page 15: Presets
Load Presets. ’empty Name’ loads a factory default preset. Advanced Settings CONF By hitting the virtual button on the homescreen, you can configure some advanced settings which affect the multiclock’s general behaviour. Advanced Settings. Machine Mode NEG/POS With you can choose between... -
Page 16: System Setup
Free Wheel option is implemented for stage. If you set it , the multiclock will automatically turn on it’s internal mas- terclock generator when the external master clock source is in- terrupted. This prevents headache when DAWs crash or cables break during performance. -
Page 17: Using Audio Sync
0 dB Here you go, that’s it. Set the multiclock to accept Audio In accord- ing to section 3.1 and hit play on your DAW. The BPM led on the multiclock starts to flash and the display shows the actual tempo. - Page 18 24 notes per beat = 24 ppq = 64th note triplets = 64T beat Set the multiclock to accept Audio In according to section 3.1 and hit play on the master you have just programmed. The BPM led on the multiclock starts to flash and the display...
-
Page 19: Using Midi In
Using MIDI In MIDI Mapper Due to the fact that the multiclock features more than one MIDI Out, there is a MIDI Mapper to route incoming messages on the MIDI In conveniently to the outputs. MIDI In Mapper. You can both replace MIDI Channel numbers and select output ports. -
Page 20: Using Usb Midi
Using USB MIDI MIDI Forwarding If your multiclock has a USB module installed, you are able to add other MIDI commands from a DAW to the timing accurate MIDI clock streams. There is one virtual USB MIDI output for every physical channel. -
Page 21: Parameter Remote Control
Start channel Note #36 On 0x9n 0x26 0x7F Stop channel Note #38 On When the multiclock has received a snapshot or your own automa- tions, the on the homescreen changes to to indicate the remote operation. To exit remote operation and return to the knobs, simply unlock the channel by pressing set channel and the respective channel number during playback again. -
Page 22: Daw Transport Control
22 mul ticl ock - us er man ual DAW Transport Control To control the transport of your DAW from the multiclock buttons even when using the audio sync solution, MIDI control change messages are sent via USB MIDI at all times. -
Page 23: Tips And Limitations
Sync Track audio output on the DAW. Example: Set the track delay to -100 ms on the DAW and the shift range of the channels to +200 ms. The zero position in time on the multiclock is at +100 ms then and you can move back and forth from there. -
Page 24: Audio Sync
10 dBu. If you have ensured proper wiring, you can adjust both the Audio Threshold of the multiclock (p. 15) or audio level on the sound- card. -
Page 25: Updating The System Software
Updating the System Software To update the system software of your multiclock, it is vital to ensure steady power supply for at least 10 minutes. Then follow the instructions below to update the software using the internal MIDI Sysex bootloader: •... -
Page 26: Declaration Of Conformity
Declaration of Conformity It is hereby confirmed, that the multiclock meets all rules and regulations regarding EU-directive 2004/108/EG for electromagnetic compliance to protect humans and the environment. The multiclock is compliant with the RoHS directive. If you wish to dispose your multiclock, please contact your local dealer for recycling. -
Page 27: Contact
Contact We, that is E-RM Erfindungsbüro, make the multiclock to meet our own high expectations on value and functionality of a product. If you have any questions or suggestions, do not hesitate to con- tact us. E-RM Erfindungsbüro Rest & Maier GbR support@e-rm.de...
Need help?
Do you have a question about the Multiclock and is the answer not in the manual?
Questions and answers