Table of Contents
Advertisement
Available languages
Available languages
PPRH5DS_ManualENSP_061914.indd 28-1
28
PROFESSIONAL DIGITAL POWER STATION
INSTRUCTION MANUAL
FUENTE DE ENERGÍA DIGITAL PROFESIONAL
MANUAL DE INSTRUCCIÓN
SAVE THIS INSTRUCTION MANUAL FOR FUTURE REFERENCE.
CONSERVE ESTE MANUAL PARA FUTURAS CONSULTAS.
© 2014 Baccus Global LLC
Boca Raton, FL 33432
(877) 571-2391
PPRH5DS
English
Español
pagina 14
BC
1
6/19/2014 4:16:41 PM
page 3
Advertisement
Table of Contents

Related Manuals for Stanley FatMax PPRH5DS


Summary of Contents for Stanley FatMax PPRH5DS
- Page 1 PPRH5DS PROFESSIONAL DIGITAL POWER STATION INSTRUCTION MANUAL FUENTE DE ENERGÍA DIGITAL PROFESIONAL MANUAL DE INSTRUCCIÓN English page 3 Español pagina 14 SAVE THIS INSTRUCTION MANUAL FOR FUTURE REFERENCE. CONSERVE ESTE MANUAL PARA FUTURAS CONSULTAS. © 2014 Baccus Global LLC Boca Raton, FL 33432 (877) 571-2391 PPRH5DS_ManualENSP_061914.indd 28-1...
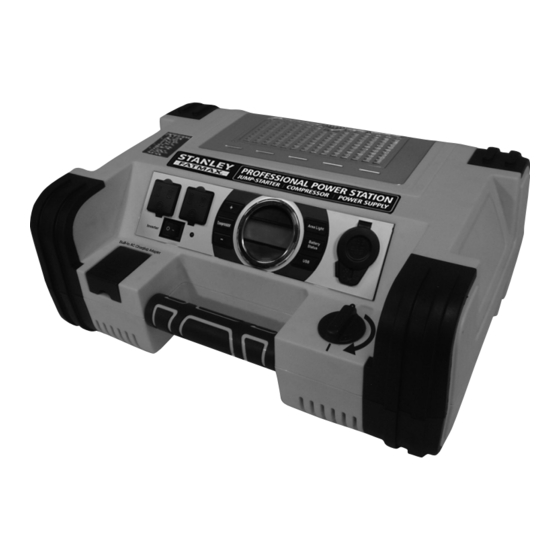
- Page 2 FEATURES FEATURES CARACTERÍSTICAS 1. Built-in 120 volt AC charger (under protective cover) 1. Cargador de CA de 120 voltios incorporado (bajo cubierta protectora) CARACTERÍSTICAS 2. Rubber grip handle 2. Manija de goma 3. Jump-starter power switch 3. Interruptor del puente auxiliar de arranque 4.
-
Page 3: Safety Guidelines - Definitions
• Do not operate this appliance near flammable liquids or in gaseous or explosive atmospheres. Motors in these tools This device complies with part 15 of the FCC rules. Operation is subject to the following two conditions: (1) this device may not normally spark, and the sparks might ignite fumes. -
Page 4: First Aid
SPECIFIC SAFETY INSTRUCTIONS FOR COMPRESSORS • Do not expose battery to fire or intense heat since it may explode. Before disposing of the battery, protect exposed terminals with heavy-duty electrical tape to prevent shorting (shorting can result in injury or fire). CAUTION: TO REDUCE THE RISK OF INJURY OR PROPERTY DAMAGE: Never leave the compressor unattended while in use. - Page 5 CHARGING/RECHARGING 1. Insert the large grooved tip of the 12 Volt DC Charging Adapter into the vehicle’s 12 volt DC accessory outlet or other 12 volt DC power source. Lead-acid batteries require routine maintenance to ensure a full charge and long battery life. All batteries lose energy from self- 2.
-
Page 6: Protective Features
10. Disconnect the negative (–) engine or chassis clamp first, then disconnect the positive (+) battery clamp. Using the Dual 120 Volt AC Outlets The two 120 volt AC outlets each are located under a protective cover on the left hand side of the front panel (refer to the WARNING: TO REDUCE THE RISK OF INJURY OR PROPERTY DAMAGE: Features section to locate). - Page 7 PORTABLE COMPRESSOR 3. Insert the nozzle adapter (i.e., needle) into item to be inflated. 4. Follow steps 2 through 6 of the “Inflating Tires or Products With Valve Stems” section. The built-in 12 volt DC compressor is the ultimate compressor for all vehicle tires, trailer tires and recreational inflatables. IMPORTANT: Small items such as volleyballs, footballs, etc.
-
Page 8: Specifications
12 volt DC accessory outlet will not power appliance Este dispositivo cumple con la parte 15 de las normas de la Comisión Federal de Comunicaciones de Estados Unidos (FCC). La • Make sure the the appliance does not draw more than 5 amps. operación está... - Page 9 • Uso de accesorios y suplementos. El uso de accesorios o dispositivos no recomendados para utilizar con este aparato puede INSTRUCCIONES DE SEGURIDAD ESPECÍFICAS PARA INVERSORES resultar peligroso. Consulte la sección "Accesorios" de este manual para obtener detalles adicionales. • No utilice este inversor con dispositivos médicos. No se prueba para aplicaciones médicas. •...
-
Page 10: Primeros Auxilios
a) Para los sistemas con negativo a tierra, conecte la pinza del positivo (roja) al borne sin conexión a tierra de la batería y Presione el botón de alimentación USB. Sonará un bip y la pantalla retroiluminada LCD mostrará el estado de la la pinza del negativo (NEGRA) al bastidor del vehículo o al bloque del motor, lejos de la batería. - Page 11 del cable a una toma de corriente CA estándar de 120 voltios. Cuando la unidad esté bien conectado a una fuente de 4b. Conecte la pinza negra del negativo (-) al bastidor o a un componente metálico no móvil y sólido, o una parte de la alimentación de CA, la pantalla LCD mostrará...
- Page 12 LUZ DE ÁREA LED CARACTERÍSTICAS DE PROTECCIÓN La luz de área LED incorporada del tres LEDs es controlada por el en el panel de control El inversor supervisa las siguientes condiciones: botón de encendido de la luz de área (refiera a la sección de las características para localizar). Presione el botón de encendido de la luz de área una vez encender la Voltaje interno bajo de la batería: El inversor cerrará...
- Page 13 manguera del compresor. Consulte la sección “Características” para conocer las ubicaciones de la manguera del compresor. Los Cómo inflar otros artículos inflables sin vástago de válvula botón con./desc. (power) del compresor y botones del control de presión del compresor están situados en el panel de control en El inflado de otros artículos requiere el uso de uno de los adaptadores (picos).
-
Page 14: Especificaciones
La unidad no puede saltar comienzo el motor ESPECIFICACIONES • Asegúrese de que el Interruptor del puente auxiliar de arranque de la unidad está en la posición encendido (on). Amperios de impulso: 12VCC, 1,000A batería máximo , 500A instante • Controle que el puente auxiliar de arranque tenga la carga completa. Recargue la unidad en caso de necesidad. Tipo de batería: De plomo sin necesidad de mantenimiento, sellada, 12 voltios CC, 17Ah •...
Need help?
Do you have a question about the PPRH5DS and is the answer not in the manual?
Questions and answers
How to fill a tire with air
To fill a tire with air using the Stanley PPRH5DS:
1. Insert the nozzle adapter into the tire valve.
2. Turn on the air compressor.
3. Monitor the pressure carefully to avoid overinflation. Small items like sports balls inflate quickly.
4. When the desired pressure is reached, turn off the compressor.
5. Remove the nozzle from the tire valve.
6. Store the hose in its compartment.
7. Fully recharge the unit after use.
This answer is automatically generated