
Related Manuals for Humless HOME 6.5


Summary of Contents for Humless HOME 6.5
- Page 1 USER MANUAL HOME POWER SERIES 6.5 kWh ATTENTION: Strictly follow this user manual and pay close attention to all warnings. Please DO NOT operate before reading this USER MANUAL.
- Page 2 Neither Humless nor any of its affiliates or subsidiaries shall be responsible or liable for misuse of the information contained herein.
-
Page 3: Table Of Contents
TABLE OF CONTENTS 1. BRIEF INTRODUCTION ........1 1.1 Foreword . -
Page 4: Brief Introduction
1. BRIEF INTRODUCTION 1.1 Foreword This manual gives detailed product information and instructions for the Home Power Series 6.5 kWh products. Please read this manual carefully before using this product. Please keep this manual in a safe easy to get to place. 1.2 Applicable Personnel After reading the manual, users will be able to use the Home Power Series 6.5 kWh product. -
Page 5: Use & Maintenance
1.4 Use & Maintenance 1. The working and store conditions influences the using life and reliability of this product, so please pay attention to avoid the following environment. • Out of the specifications (temperature 0‘C~40°C, relative humidity 5% to 90%) of high or low temperature and over humid place •... -
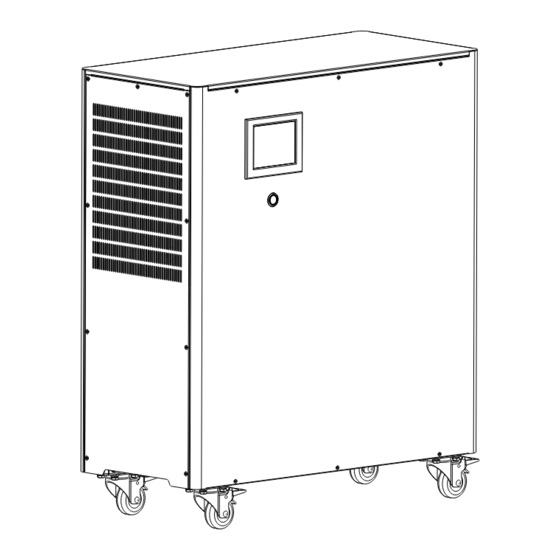
Page 6: Appearance
2.1 Apperance... -
Page 7: Back & Side Sketch
2.2 Back & Side Sketch 2.3 Power on/off introduction 3. UNPACKING Before opening the package, please check if the packaging is damaged. After unpacking, please check if product appearance is damaged or there is missing parts. If so, please contact us. Box Contents: ITEM QUANTITY... -
Page 8: Installation
4. Installation 4.1 Installation Precautions 1. Place the product where is well-ventilated and away from water, flammable gases, corrosive and other dangerous articles. Installation environment should meet the specified requirements. 2. Keep the air outlet on housing rear panel and the air intake on housing side unobstructed. -
Page 9: Operation
5. OPERATION 5.1 Operation Display Panel 5.2 Operation Display Panel 1. Power On: Press onloff button for one second or longer, the LCD display and button LED light on and system powers on. 2. Power Off: Press onloff button for three seconds or longer, the LCD display and button LED light off and system powers off. -
Page 10: System Homepage
5.3.2 System Homepage System homepage after Initialization Touch the icons or works on LCD to see related information or setting parameters. 5.3.3 System Time Setting The bottom right corner of system homepage displays system time and touch the related area to set system time. 5.3.4 User Setting Interface Touch “Setting”... - Page 11 1. Touch the number after “Min Capacity Retention “to set minimum battery capacity retention percentage. 2. Touch the number after “Max Capacity Retention “to set maximum battery capacity retention percentage. 3. Touch the number after “System Output Voltage “to set System AC output Voltage.
- Page 12 5.3.4.2 Peak-Avoiding Mode Setting After confirming Peak-Avoiding Mode, next step should be set the Peak-Avoiding time. Touch “Peak-Avoiding Time” below “Peak-Avoiding Mode”. 5.3.4.3 Factory Reset Setting...
-
Page 13: System Information
5.3.4.4 Alarm/Buzzer Setting 5.3.5 System lnlormation 5.3.7 Administrator System Setting Touch “System Info’ area on system homepage to check system running status and alarm information. -
Page 14: Language Setting
5.3.6 Language Setting Touch ‘Language’ area on system homepage to set system language. 5.3.7 Administrator System Setting Touch on system homepage and input passwords to administrator setting page. Note: administrator setting is only for prolessional, maintainer or other alter-service technician. Type in correct password to access and next page as below. - Page 15 5.3.7.1 Bi-directional Inverter Setting “Inverter Maximum Charge Current” stands for battery maximum charge current from grid. “Inverter Maximum Discharge Current” stands for the maximum feedback current to grid.
- Page 16 5.3.7.2 PV Charger Setting “PV Maximum Charge Current” refers to the maximum charge current for battery from PV module.“PV Maximum Charger Voltage” refers to the maximum charge voltage for battery from PV module. 5.3.7.3 BMS Setting This page tells detailed battery information including battery single cell voltage.
- Page 17 5.3.7.4 Password Setting The fault password is 123456. Only the administrator is supposed to change or set these passwords. If the password is forgotten, the user can touch “Setting” in homepage, then touch “Factory Reset” this will reset the password back to the default setting 123456. Note: When the user enters the wrong password more than three times, the system automatically resets the password to the factory preset.
-
Page 18: Functional Characteristics
6. FUNCTIONAL CHARACTERISTICS 6.1 Working Mode Features Under any certain working mode. system use solar energy firstly and choose energy source automatically based the custom setting parameters or defaults. Besides, system offers uninterrupted power supply automatically when mains fail. 6.1.1 Peak-Avoiding Mode The system can store electricity when rates are low and power your home when rates are high based on the setting charge and discharge time. -
Page 19: Power Off
6.2.2 After the system shutting down because of low battery capacity, if there is input from grid or solar panels, system will turn on automatically and keep operating on previous working mode. 6.2.3 After the system shutting down because of low battery capacity, if there is only input from solar panels, the system will restart output automatically after battery capacity 6.3 Power Off... -
Page 20: Troubleshooting
8. TROUBLESHOOTING Our products have been strictly tested before delivery. If you have any difficulty during installation or operation, please contact your local installer or contact us. In the event a machine does not work. please inform us and provide product related information. -
Page 21: Specifications
SPECIFICATIONS System Storage Capacity 6.5 kWh System Work Model On and Off-Grid Hybrid UPS Function AC INPUT 2,000 W Nominal AC Input Power 3,000 W Maximum AC Input Power Maximum Input Current 25 A AC Voltage Range 106-132 V AC Output Nominal AC Output Power 2,000 W Maximum AC Output Power... - Page 22 PV INPUT Maximum Input Power 2,400 W Start-up Voltage 70 V MTTP Strings Amount MTTP Voltage Range 70 V / 140 V Maximum Input Current 34 A Maximum Input Voltage 150 V >97% I-Feedback Isc. PV (Short Circuit Current) 40A ELECTRICAL PROTECTIONS DC/AC DC Lighting Arrester...
- Page 24 ©2015 HUMLESS LLC, All Rights Reserved Humless is a registered trademark of HUMLESS LLC 1374 West 200 South, Lindon UT, 84042 Publication Number: HPS-65001 humless.com • 102617...
Need help?
Do you have a question about the HOME 6.5 and is the answer not in the manual?
Questions and answers