Table of Contents
Advertisement
Quick Links
INSTRUCTIONS MANUAL FOR USE
AND MAINTENANCE
STOVE WITH OVEN
Model ATLAS
Versions: Atlas free standing, Atlas corner version, Atlas Insert
Model HERMES
Versions: Hermes free standing, Hermes corner version
CERTIFICATION ACCORDING TO EN 13240 and EN 13229 STANDARDS
CARBEL
C/ Ciudad de Cartagena, 22
46988 Polígono Industrial Fuente de Jarro (Paterna)
Valencia
Tel. 96 1340716
E-mail:
carbel@carbel.net
www.carbel.net
Advertisement
Table of Contents

Subscribe to Our Youtube Channel
Related Manuals for CARBEL ATLAS


Summary of Contents for CARBEL ATLAS
- Page 1 INSTRUCTIONS MANUAL FOR USE AND MAINTENANCE STOVE WITH OVEN Model ATLAS Versions: Atlas free standing, Atlas corner version, Atlas Insert Model HERMES Versions: Hermes free standing, Hermes corner version CERTIFICATION ACCORDING TO EN 13240 and EN 13229 STANDARDS CARBEL C/ Ciudad de Cartagena, 22 46988 Polígono Industrial Fuente de Jarro (Paterna)
-
Page 2: Installation
NOTE FROM THE MANUFACTURER Thank you for choosing one of our models. Please read this manual carefully. It has been written to give you tips on installation, use and maintenance. If you need further clarification, please contact your dealer or the manufacturer directly. INSTALLATION All our models are designed and manufactured for optimal performance. -
Page 3: External Air Inlet
- When a metal chimney is fitted inside a brick chimney, it must exceed the height of the latter and protrude a few centimetres at the top. - The installation of the pipe and cap must strictly prevent water from getting into the appliance on rainy days. -
Page 4: General Installation Instructions
In any case, it is always better to have a professional do the installation. If you are determined to do your own installation, consult a professional. ATLAS INSERT INSTALLATION: 1-Fumes exhaust pipe diameter 180 2- Entry of fresh air by natural convection into the insert convection chamber. -
Page 5: Lighting A Fire
The building work must be finished in such a way that the woodburner can expand during operation: the brickwork must never be supported on or against the sides of the appliance. Leave a minimum expansion joint of 0,5 cm on each side and at least 1 cm the top of the front. LIGHTING A FIRE 1. - Page 6 Warning.- In woodburners and inserts, prolonged and continuous use at a very low rate of combustion or with very wet wood can cause highly flammable creosote to build up in the flue. When lighting the fire for the very first time, smoke and smells may be produced by the paint.
- Page 7 DURING THE LIGHTING: Air inlet It is essential to open to maximum position when lighting the fire and to leave he door ajar to avoid the condensation of fumes on the glass, closing it again once the appliance has warmed up. DURING THE COMBUSTION CICLE: Air inlet Air inlet regulation will provide greater control of combustion, slowing down combustion and making the most of...
- Page 8 FUEL Woodburner performance also depends greatly on the fuel used. The wood must be dry to get more heat. It will also be easier to regulate heat and keep the woodburner and flue in better condition. Store firewood in a dry, ventilated place protected from the rain for at least two years. - You can also use compressed-wood logs, such as briquettes.
-
Page 9: Maintenance
TIPS FOR GOOD COMBUSTION Good combustion is necessary for optimum performance and a better view of the flames through the glass. Guidelines: - Maintain a high and constant temperature in the fireplace. Accordingly, the fireplace door must be closed at all times and opened only to load firewood, which must be done as quickly as possible. - Do not take a long time when loading firewood and wait for the end of the combustion cycle, when the flames of the previous load disappear. - Page 10 It is very important not to wet the woodburner with window-cleaner, water or special cleaning products. Heatproof paint is not waterproof. Failure to observe this indication voids the warranty. TIPS AND SAFETY STANDARDS Woodburner performance also depends greatly on the fuel used. The wood must be dry to get more heat. It will also be easier to regulate heat and keep the woodburner and flue in better condition.
- Page 11 ASSEMBLY OF CORNER COVER HERMES AND ATLAS MODELS. The model you have purchased can be easily turned into a corner model. Ask your dealer about how to acquire the “corner cover." To mount the corner cover, follow these simple instructions.
-
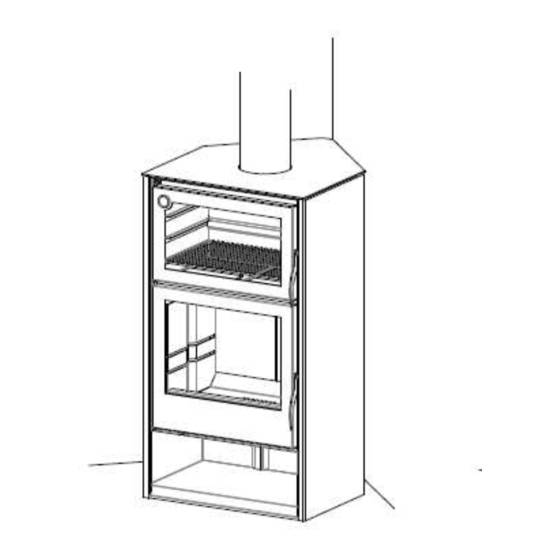
Page 12: Technical Specifications
TECHNICAL SPECIFICATIONS HERMES model drawings Model HERMES Performance 83.7% Nominal thermal power 8.7 kW CO at 13% O2 0.06% Firewood load for nominal power. 1.8 kg Reload interval for nominal power 0.75 h Maximum firewood load 2.2 kg Weight 125 kg Required chimney flue 12 Pa Minimum safety distance... - Page 13 TECHNICAL SPECIFICATIONS ATLAS model drawings Model ATLAS: Performance 83.9% Nominal thermal power 10 kW CO at 13% O2 0.03% Firewood load for nominal power. 2.2 kg Reload interval for nominal power 0.75 h Maximum firewood load 2.8 kg Weight 150 kg...
-
Page 14: Certificate Of Warranty
For the warranty to take effect, the manufacturer must be sent a copy of this certificate and a copy of the customer invoice. ’ ’ DEALER S SIGNATURE AND STAMP CUSTOMER S COPY Cocinas Carbel, S.L C/ Ciudad de Cartagena, 22 Polígono Industrial Fuente del Jarro 46988 (Paterna) VALENCIA carbel@carbel.net CERTIFICATE OF WARRANTY NAME...
Need help?
Do you have a question about the ATLAS and is the answer not in the manual?
Questions and answers