Humanware Prodigi Connect 12 User Manual
Hide thumbs
Also See for Prodigi Connect 12:
- User manual (76 pages) ,
- Getting started (7 pages) ,
- User manual (80 pages)
Table of Contents
Advertisement
Quick Links
Advertisement
Table of Contents

Subscribe to Our Youtube Channel
Related Manuals for Humanware Prodigi Connect 12


Summary of Contents for Humanware Prodigi Connect 12
-
Page 3: Table Of Contents
TABLE OF CONTENTS Chapter 1: Introduction 3 Chapter 2: Getting to know your Prodigi 4 Box Contents 4 Prodigi Connect at a glance 5 Setting up 12 Chapter 3: Using Prodigi 15 The Button Banner 15 Magnifying 16 Capturing 19 Full page capture 20 Multi-Capture 21 Reading 22... - Page 4 Chapter 6: Changing your Settings 49 Chapter 7: Bluetooth Keyboard 55 The HumanWare Keyboard 55 Connecting a Bluetooth Keyboard 55 Chapter 8: Accessing Android 57 Chapter 9: Help Menu 57 Chapter 10: Recharging your Tablet 58 Chapter 11: Recharging your Distance Camera 59...
-
Page 5: Chapter 1: Introduction
HumanWare Customer Service by consulting the contact information in the back of this user guide. Copyright 2018 by Technologies HumanWare Inc., all rights reserved. No part of this publication may be reproduced or distributed in any form or by any means, or stored in a database or retrieval system, without the prior written permission of Technologies HumanWare Inc. -
Page 6: Chapter 2: Getting To Know Your Prodigi
CHAPTER 2: GETTING TO KNOW YOUR PRODIGI BOX CONTENTS Tablet Box Prodigi™ Connect 12 Power Supply Cable USB Cable Getting Started Guide Quick Start Guide User Guide Warranty Sheet Protective Carrying Case Folding Stand Distance Viewing (Optional) ... -
Page 7: Prodigi Connect At A Glance
PRODIGI CONNECT AT A GLANCE Front Face 1. Front-facing camera 2. Micro-SD slot 3. USB-C port 4. Recharge port 5. Micro-HDMI port 6. Headphone jack 7. Speakers... - Page 8 Bottom Edge 1. Volume Down-Up 2. Power Button Back Side 1. Camera...
- Page 9 Button Banner 1. Back button 2. Settings button 3. Light Button 4. Capture/Read Button 5. Zoom Out Button 6. Zoom In Button...
- Page 10 1. Open Banner Button Folding stand...
- Page 11 Distance camera 1. Distance camera 2. Distance camera stick...
- Page 12 Front view Top view 1. Power button 2. Microphones...
- Page 13 Left view 1. Zoom lever 2. Shutter button IMPORTANT: It is essential to keep the Quick Start guide provided with your distance camera as it contains your camera’s pairing information.
-
Page 14: Setting Up
SETTING UP 1. On a flat and stable surface, hold your stand upright, making sure the panel with the word “Connect” is facing towards the back. Hold the handle with one hand, and unfold the lower panel with your other hand until it is flat on the table. - Page 15 2. Unfold the top panel until it is roughly parallel with the lower panel.
- Page 16 3. Hold your Prodigi Connect with the screen side facing you, making sure the HumanWare logo is at the top. Carefully insert the top of your tablet into the slot and slide it forward until you reach the back end of the slot. Push the bottom part of the tablet down;...
-
Page 17: Chapter 3: Using Prodigi
5. Press and hold the power button to power on your tablet. The HumanWare and Android logos will appear on screen. Your tablet will take about 30 seconds to initialize. CHAPTER 3: USING PRODIGI THE BUTTON BANNER Most of Prodigi Connect’s actions are performed through the Virtual Button banner located at the bottom of your screen. -
Page 18: Magnifying
Tap this button or swipe upward or tap on the button to display the Button Banner. MAGNIFYING Power on the tablet. Align the tablet above the document or object you wish to view. It is recommended to use the folding stand to stabilize your tablet above the document you wish to view. - Page 19 Tap the Zoom In-Out buttons to adjust the zoom level. To increase character size, tap the Zoom In button (+). To decrease character size, tap the Zoom Out button (-). You can also tap and hold the Zoom In-Out buttons to progressively adjust the zoom level, and release once you reach your desired zoom level.
- Page 20 To toggle between color, positive, and negative contrasts, simply swipe vertically on the right side of the tablet’s screen (see Chapter 4: Choosing your contrast for more details). Note: Prodigi Connect allows you to decide whether to lock or unlock the camera’s autofocus.
-
Page 21: Capturing
CAPTURING Using the folding stand, position the tablet above the document or object you wish to capture. Note: The tablet does not need to be perfectly aligned above your document; by default, Prodigi Connect will automatically correct the angle of your tablet. On screen, two triangular shapes on each side of your document will indicate angle correction. -
Page 22: Full Page Capture
FULL PAGE CAPTURE To capture a full page: Instead of laying your sheet vertically, place your sheet sideways (landscape position) so that the top of your text is located under the left edge of your Prodigi Connect, and the bottom of your text is located under the right edge of your tablet. -
Page 23: Multi-Capture
MULTI-CAPTURE To capture a multipage document, toggle to Multi- Capture mode by swiping vertically on the left side of the tablet’s screen: Note: You can also toggle to Multi-Capture mode from the Settings. Tap the Settings button, swipe up to select Mode, and tap to set it to Multi-Capture. -
Page 24: Reading
Tap on the first page of your document to open it. Tap the Read button to start reading. When you are done reading, tap the Back button to return to your document. Tap Back again to return to Magnifier mode. - Page 25 To pause, tap Read again or long press anywhere on the screen. While paused, tap Back to exit reading view, and Back again to return to the camera view. To resume, tap Read again or long press. When in magnifier mode, reading mode allows you to zoom in and out of your captured document.
- Page 26 If you are in a zoomed level over 1X, you can move around your zoomed document by doing a Pan Gesture (slowly move your finger on the screen without lifting it). Pan to reach other parts of the enlarged image. ...
- Page 27 Prodigi Connect will beep and announce “End of document” when you reach the end of your document; tap Read to start reading from the beginning again. To set a different Reading Mode, tap the Settings button and swipe up to select Reading Mode. ...
-
Page 28: Handwriting Tool
Note: You can also increase or decrease the speech rate permanently from the Settings. Tap the Settings button, select Speech Rate, and select a value. Tap Back twice to exit Settings. Note: You will be able to change the reading speed (text scrolling speed) by swiping left or right, or from the Settings even when speech is deactivated. - Page 29 Tap the Pen and Ruler icon from the button banner. This is the Handwriting Tool button. Once in the Handwriting Tool, you will notice 4 new buttons on the button banner. The Tool Selection button allows you to select between the Pen, the Highlighter or the Text Tool.
- Page 30 The Size Selection button opens the size menu. Tap it to choose the size of your text or the pen/highlighter strokes of your selected tool. To use the pen or highlighter: Select either the pen or highlighter by tapping the Tool Selection button on the Button banner (second button).
- Page 31 A virtual keyboard will appear on your screen; use it to type in your text. You can also use a physical Bluetooth keyboard if you have one paired with your device. When you are done typing, press the Paper Plane button on the top right corner of your screen to validate your text.
-
Page 32: Using The Carousel Menu
To Pan in an image that is being edited: Place two finger on the image. Drag your fingers up, down, right or left. When finish lift your fingers of the image. Note that if the distance between the fingers vary while panning, the image will zoom in or out. -
Page 33: Downloading Books
Note: You can access the Carousel menu from anywhere in the system by double tapping with two fingers anywhere on the screen. DOWNLOADING BOOKS Prodigi Connect’s Books application allows you to download eBooks using Bookshare, the world’s largest online library of accessible books. - Page 34 To search by title, author, or content, select your choice, enter your search criteria using the virtual keys on screen, and tap the blue Search button on the right side of the keyboard. Swipe up or down in the result list to select a book or category and tap to view book details.
- Page 35 To download a book you would like to read, tap the Download button while viewing book details. The book will be added in My Library submenu. To read a book or periodical issue you downloaded, select My Library submenu. Select the book or issue from your list and tap to open it.
-
Page 36: Using The Calculator
USING THE CALCULATOR Prodigi Connect allows you to perform calculations with the Calculator application. To use the Calculator: Select and tap on the Calculator icon in the carousel menu: Tap on the numbers and signs. Your calculation will appear on the top section of the screen. -
Page 37: Viewing Saved Documents
the lower center of the screen to access scientific mathematical functions. Tap the Back button to return to the carousel menu. VIEWING SAVED DOCUMENTS The Gallery contains all the documents you have saved. Select and tap on the Gallery icon in the carousel menu: ... -
Page 38: The Action Menu
Once you are in a zoomed level over 1X, you can move around your zoomed document by doing a Pan Gesture. Pan to reach other parts of the enlarged image. Tap or tap Back to return to the full image view. ... - Page 39 To access the Action menu, simply long press on a document or category icon in the Gallery. You will be directed to a menu listing available actions for your selected file. To share an image through other Android apps Long press on the image you want to share ...
- Page 40 Type in the name of your new category. Tap DONE. Categories will be sorted alphabetically in Gallery. To move a document to a category Long press on the document you want to move. Tap Move. Tap the category where you wish to move your image. To export a document to a JPG, text or PDF file in the Android file system ...
-
Page 41: Using The Distance Camera
The file can be then moved into a Category if required. To delete, replace, insert, or append a page in a multipage document Open the multipage document you wish to modify. To delete a page, long press on the page you wish to delete and tap Yes to confirm deletion. - Page 42 Turn camera On. Insert your camera into the camera stick slots, located on either side of the folding stand’s frame. Enter the Carousel menu by tapping the Back button in the magnifier mode.
-
Page 43: Toggling Between Distance Camera And Magnifier
Select the Distance Camera icon, then tap. You are now in your camera’s live view. To take a picture, Tap the Capture button. Alternatively, you can take a picture by holding down the Shutter button located next to the Zoom lever on the left side of your camera. ... -
Page 44: Using Distance Camera And Magnifier Simultaneously
USING DISTANCE CAMERA AND MAGNIFIER SIMULTANEOUSLY It is possible to use the distance camera and magnifier simultaneously. To do so, simply touch the arrow on the left side of the screen and your screen will split into two with the distance camera in the top section and the magnifier view in the bottom section. -
Page 45: Reading With The Distance Camera
Swipe right until you have selected the Distance camera picture icon (a spyglass in front of a folder), then tap once. The currently selected document is in the center of the screen. Prodigi Connect will announce and indicate the date the picture was taken. -
Page 46: Viewing Text Files In Prodigi
With your other hand, locate the thumbscrew located underneath the camera, and begin loosening it until the camera is detached from the stick. Warning: The camera is very fragile, so make sure you are holding it properly before removing it from the stick. VIEWING TEXT FILES IN PRODIGI Prodigi Connect allows you to paste text files into the gallery and then open them using the Prodigi Connect interface. - Page 47 Swipe until the Paste icon is selected, then Tap to paste the text you copied earlier: Your text will appear in Diamond Edge in column reading mode (original layout and images are not available). Tap back to return to the Text section of the Gallery. ...
-
Page 48: Chapter 4: Choosing Your Contrast
CHAPTER 4: CHOOSING YOUR CONTRAST Prodigi allows you to view documents, pictures and objects in 3 types of contrast: color, positive or negative. For documents containing text, a 4 type of contrast can be used: Diamond Edge™. Positive, negative, and Diamond Edge contrasts are enhanced;... - Page 49 Color contrast is useful if you want to view documents, objects, and photographs in their original color. Positive contrast shows text and images in 2 colors according to your selected color combination, the default combination being Black on White. This is a practical way to view text in the best color combination for your vision.
-
Page 50: Chapter 5: Simple Mode
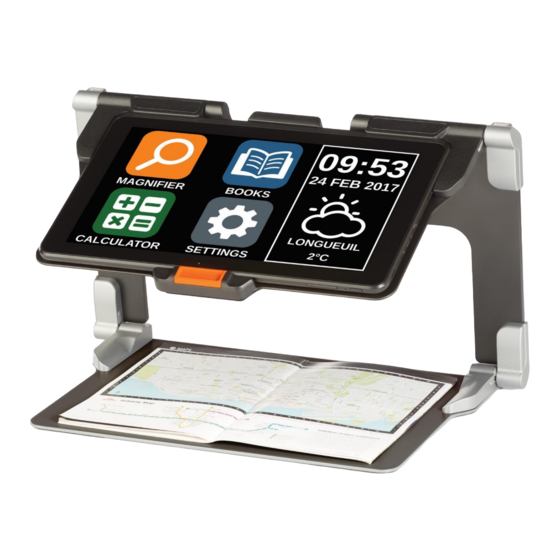
CHAPTER 5: SIMPLE MODE The simple mode allows you to access Prodigi’s main applications from the same screen. By default, Prodigi is set to standard mode. To activate simple mode: From the carousel menu, swipe and select the Settings icon and tap. -
Page 51: Chapter 6: Changing Your Settings
Tap and hold your finger down on each app to hear their name and to know the time, date, and weather. CHAPTER 6: CHANGING YOUR SETTINGS Prodigi’s settings menu is contextual; different settings will be displayed depending on what you are doing or where you are in the system. - Page 52 Purple on black, Black on green, Green on black, Blue on yellow, Yellow on blue, White on blue, Blue on white, Beige on black, Black on beige Mode (Standard mode only): Live*, Multi-Capture Autofocus (Live mode only): Locked, Unlocked* ...
- Page 53 Saved Networks: Saved networks configurations. To forget a network configuration, tap network, tap Forget, and tap Yes. Mode (in Calculator app, press and hold Back to reach this setting): Standard*, Scientific Grid (in Calculator app, press and hold Back to reach this setting): Locator color*, Red, Orange, Yellow, Purple, Cyan, Green, Blue ...
- Page 54 You will see 5 main menus and 1 item: User Interface, Audio, System, Applications, Exit to Android, and About. Scroll up or down in the Settings to select a menu or item. Prodigi will announce “submenu” if a selected menu contains submenus and display an arrow on the right edge of the screen.
- Page 55 Tablet/Base Volume: 0 to 15 (9*) OCR Sound: On, Off* System: Wi-Fi Setup: Wi-Fi: Turn Wi-Fi On or Off. Wi-Fi Networks: List of available networks. When connected, shows network you are connected to. Saved Networks: Saved networks configurations. To forget a network configuration, tap network, tap Forget, and tap Yes.
- Page 56 Applications: Books: Checked*, Unchecked Calculator: Checked*, Unchecked Exit to Android: Exits Prodigi. You can return to Prodigi by pressing the Home button and tapping the Prodigi icon. About: Software (Version) Voices (Version) OCR (Version) Books (Version) ...
-
Page 57: Chapter 7: Bluetooth Keyboard
Though any Bluetooth keyboard will work, we encourage you to use the HumanWare keyboard shown below. One of the advantages of using the Humanware keyboard is that all keys are printed in large, easy-to-read characters. In addition, icons of frequently used Prodigi commands are printed on the keyboard as a quick reminder of the key’s... - Page 58 Make sure your Bluetooth keyboard is turned on. Access the general settings by tapping the Settings icon in the Carousel menu. Select and enter the System submenu. Select and enter Bluetooth Setup. Bluetooth will be off by default. Turn it on by tapping the Bluetooth menu item.
-
Page 59: Chapter 8: Accessing Android
CHAPTER 8: ACCESSING ANDROID Prodigi Connect allows you to access Android applications. Please note that HumanWare provides limited support for Android and Android applications. Android is accessible from the Settings in the carousel menu. Tap the Settings icon and swipe down to select Exit to Android. -
Page 60: Chapter 10: Recharging Your Tablet
Upon entering the help menu, you will have the following options: Youtube tutorials: Here you have access to webinars and many useful tutorials on how to use your Connect tablet. Make sure to check it out occasionally to see if there’s anything new. -
Page 61: Chapter 11: Recharging Your Distance Camera
IMPORTANT: tablet becomes warm during recharging. Do not recharge the tablet near a heat source. IMPORTANT: Do not close your folding stand while recharging. Doing so could damage your cable or the tablet. To recharge the battery: Connect the power supply cable to the recharge port and plug it to an outlet. -
Page 62: Chapter 12: Software Update
The charge indicator will be orange when your camera is charging and turn green once the battery is fully charged. CHAPTER 12: SOFTWARE UPDATE SETTING UP YOUR Wi-Fi Before initiating a software update, the Wi-Fi network needs to be configured. ... -
Page 63: Manual Update
MANUAL UPDATE At times, you may want to manually update your Prodigi tablet. Access the settings from the main menu, then select System. To initiate a software update, select Software Update and tap. Prodigi will verify if your software is up to date or if an update is available. -
Page 64: Chapter 13: Troubleshooting
CHAPTER 13: TROUBLESHOOTING If the screen is blank: Zoom out of the image for minimum magnification. The Tablet could be powered off or in Standby Mode. Tap Power to power it on or to exit Standby Mode. If colors are difficult to detect: ... - Page 65 If the audio reading does not make sense: Make sure the voice setting is the same as your document’s language. Change it in the Settings if necessary. If the Tablet is not responding: Make sure the battery is not empty. Recharge it if necessary.
- Page 68 ACCD-0171 REV 06...
Need help?
Do you have a question about the Prodigi Connect 12 and is the answer not in the manual?
Questions and answers