Table of Contents
Advertisement
Advertisement
Table of Contents

Related Manuals for Apex Digital UV4060


Summary of Contents for Apex Digital UV4060
- Page 1 MT-FP4060-UV Operating Manual MT-FP4060-UV Direct Printing Machine Manual Model UV4060 Fast installation and configuration maintenance instructions Microtec Technology Co., Ltd TEL: 0086-755-28220535 FAX: 0086-755-28220535 www.apex-jet.com Email: support@apex-jet.com...
-
Page 2: Table Of Contents
MT-FP4060-UV Operating Manual Part One: Machine Knowledge 1.1 Machine structure overview and instruction ………………………….…..…..…..……...… .. P3 1.1.1 Machine Installation and Relevant Parameter ................P4 1.1.2 Machine Use Notices ........................P4 1.2 Machine main parts and assemblies instruction…………………………….………..….………… P6 1.2.1 Carriage assembly………………………………..…....….……..…...……….……... -
Page 3: Part One: Machine Knowledge
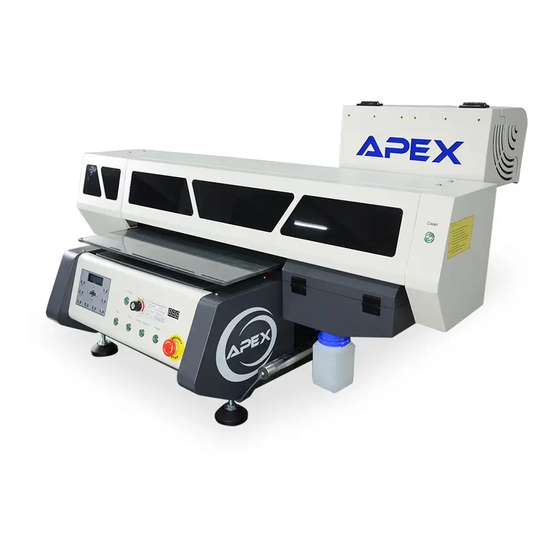
MT-FP4060-UV Operating Manual PART ONE: MACHINE KNOWLEDGE Machine structure overview and Instruction Ink Supply UV Power UV Adjustable Switch Cleaning button Waste Tank Printing Distance Display Control Panel Emergency Stop Printer Bridge UP Power Power Indicator Printer Bridge Down Front-side appearance of printer... - Page 4 MT-FP4060-UV Operating Manual Cartridge Printing Bridge Encoder Strip UV LED Printing Table General Power Switch USB Cable Ground connection sign and machine serial number Power Cable Back-side appearance of printer...
-
Page 5: Machine Installation And Relevant Parameter
MT-FP4060-UV Operating Manual 1.1.1 Machine Installation and Relevant Parameter Machine Brand Name MT-FP4060-UV (The short name: 4060-UV Direct Printer) Interface USB2.0 Power Requirement 50/60HZ 220V(±10%) <20A Environment 20 ~ 28 ℃ HR40-60% Print Head Epson DX5 (Nozzles 180x8) UV Curing System LED UV Lamp (air cooling) X/Y/Z-axis motors Servo Motors... - Page 6 MT-FP4060-UV Operating Manual Reflective materials, like stainless steel, mirror, etc are not allowed to print, Because their reflective surface will reflect UV light onto print head nozzles and get nozzles clogged by UV ink. Holder for platform(to remove them from the left and right side of the printer body before using) Please put the red fixed plated removed before using the machine...
-
Page 7: Machine Main Parts And Assemblies Instruction
MT-FP4060-UV Operating Manual the print gap between print head and print object set to 1-2mm 1.2 Machine main parts and assemblies instruction 1.2.1 Carriage assembly Carriage assembly is the key part of print unit and the carrier of print heads. When carriage is back to home position, the carriage assembly is just above of capping pump station with cap top sealed with print head nozzles surface. - Page 8 MT-FP4060-UV Operating Manual Carriage Head board(inside) (inside) Raster encoder cable Ink tubes Head cables Dampers Print Head Carriage Assembly Head cables Raster encoder cable Head Board...
- Page 9 MT-FP4060-UV Operating Manual Encoder Strip Raster Encoder Home position sensor for carriage assembly Cap top When carriage assembly returns to home position, the cap top will seal with print head nozzles surface...
-
Page 10: Print Head
MT-FP4060-UV Operating Manual 1.2.2 Print head 1.2.2.1 MT-4060-UV printer is assembled with Epson DX5 print head. In order to ensure the ink injection be smooth and printing be fluent continually, the print head nozzles need to be kept moist always and not clogged. Besides, don’t let the print head port gets in any water or other liquid, otherwise the print head will get burned down. -
Page 11: Damper
MT-FP4060-UV Operating Manual Nozzle check pattern of white Testing strips 1.2.3 Damper Damper is the part to connect print head with ink supply and stock the ink temporarily for print head. Damper must be kept sealed when machine is working. ... -
Page 12: Encoder Strip
MT-FP4060-UV Operating Manual 1.2.4 Encoder strip When machine is under printing, the carriage assembly moves leftwards and rightwards along a transparent strip, 1.2.4- which is called encoder strip Figure 1. The encoder strip controls the movement of carriage assembly where to move to and where to stop. -
Page 13: Capping System
MT-FP4060-UV Operating Manual Raster Encoder Encoder strip 1.2.5 Capping System Capping system is the cleaning unit to make ink supply system runs normally and keep print head nozzles moist all the time. Before every print job, the capping pump station will make a small ink suction automatically. When to make head cleaning, besides ink automatic suction, the wiper blade will move accordingly to scrape the print head to ensure no remains to block the nozzles. -
Page 14: X-Axis And Y-Axis Servo Control System
MT-FP4060-UV Operating Manual If the wiper gets too much stained, use some cleaning liquid to clean it Wiper blade Normally the seal rubber of cap top will properly seals with print head nozzles surface, after the carriage assembly is back to home position and locked. The seal between cap top and print head is to ensure the smooth ink suction of all nozzles and is also important for printing. -
Page 15: Main Circuit Boards
MT-FP4060-UV Operating Manual X-axis servo Electric circuit control system Y-axis servo Y-axis servo X-axis servo motor motor Integrated servo Servo motors 1.2.7 Main circuit boards We use advanced motherboard, chip does not need ink and decoder, thereby reducing the volume of machines Main board Cleaning board Sensor transfer... - Page 16 MT-FP4060-UV Operating Manual Main board cables Main Board Power supply Air extractor Control panel motor Cleaning board Sensor transfer board Ink suction pump Main board cable Cleaning motor Wiper sensor Cleaning Board Left position sensor Back position sensor Front position sensor Power supply Main board cable (signal) Sensor Transfer Board...
-
Page 17: Led Uv Lamp And Uv Lamp Power Supply Control
MT-FP4060-UV Operating Manual 1.2.8 LED UV lamp and UV lamp Power Supply Control The LED UV lamp power supply control device is located inside the chassis, and connect with LED UV lamp by cable. When start to print, turn the LED UV lamp switch on by press the third button from right side in machine front cover. The exhaust fan will start sucking air. -
Page 18: X-Axis, Y-Axis And Z-Axis Mute Linear Guideways
MT-FP4060-UV Operating Manual air out air in LED UV lamp cable Exhaust fan air in LED UV Lamp 1.2.9 X-axis, Y-axis and Z-axis Mute linear Guideways Linear guideways Linear guideways... -
Page 19: Auto Height Sensor System
MT-FP4060-UV Operating Manual 1.2.10 Auto height sensor system Automatic height sensor system can detect the height of objects, rise to the required height, makes nozzle height adjustment easier and more accurate. Steps: 1. Press the up key, make the height of the nozzle up to certain height for putting the items you need in print platform, items need between the 2 infrared sensors. -
Page 20: Part Two: Machine Installation And Operation
MT-FP4060-UV Operating Manual press the button for 3 seconds to clear nozzle, it can prevent the nozzle from clogging.(the machine need to be switched off after press the cleaning button , moved ink carriage to the left manually, clean the nozzle and top cap with cleaning cloth first, then move the ink carriage back to original place manually. - Page 21 MT-FP4060-UV Operating Manual a stirring system , the ink must be shaking before use : color inks five minutes , the white ink 10 minutes ) below after the ink filling is complete, open the ink on the ink bottle hole switches, push button switches to the left to open up is down, white ink bottle without ink hole switch.
- Page 22 MT-FP4060-UV Operating Manual 2.5.As shown in Figure, Use a screwdriver to open the lid of the ink carriage . (Note : When doing , please careful; do not move the ink carriage strike to the ink nozzle ) 2.6 As shown in Figure, after opening the lid, in turn using the syringe to pump ink to the correct color ink dampers . (Note : Be sure ,don’t insert syringes into the ink damper ,only to the ink damper hole is ok )
-
Page 23: Platform Operation
MT-FP4060-UV Operating Manual 2.7 Platform Operation 2.7.1 Platform Operation Power indicator Printing Quality Cancel Emergency Cleaning Pause Testing Power Printer Bridge down Enter Origin Printer Bridge up Menu 2.7.2 Control panel setting 2.7.2.1 Origin Setting “Origin” is to set the printing start location. Any place on control panel can be set as origin.When the carriage assembly is back to home position,screen will display“H 0mm V 0mm”. -
Page 24: Print Direction Setting
MT-FP4060-UV Operating Manual Press the "up and down" button to adjust the origin, then press the "origin" key, the origin point is reset. After origin location resetting, press on button “ENTER”, the carriage will be back to home position 2.7.2.2 Print direction setting Press on button “QUALITY”, the screen will show “UNI-DIRECTION”... -
Page 25: Print Eclosion Setting
MT-FP4060-UV Operating Manual Press button “RIGHTWARD”,choose “BI-DIRECTION”,Press on button “ENTER” to save the setting 2.7.2.3 Print Eclosion Setting “Eclosion” is a print parameter to control print quality.When Eclosion is turned off, there will be probably horizontal lines created during printing.After the Eclosion is turned on, print speed will be slower ,but there will be no horizontal lines.Usually we choose“ECLOSION TYPE1”... -
Page 26: Automatic Cleaning Nozzle
MT-FP4060-UV Operating Manual 2.7.2.4Automatic cleaning nozzle Note: Cleaning option, START: cleaning, INKFILL: power cleaning 2.7.2.5 Printing Testing strips Notice: Press “left forward” to got back to below display after cleaned printer head, it can work well to print out testing strips. - Page 27 MT-FP4060-UV Operating Manual Press “PRINT” button to print out testing paper. Color ink testing from left to right: KCMY White ink testing...
-
Page 28: Bi-Direction Readjustment
MT-FP4060-UV Operating Manual 2.7.2.6 Bi-direction readjustment When Bi-direction is selected to make printing, Bi-direction readjustment is required in order to make an accurate printing quality for 1, 2, 3, H. Press on button “MENU” to enter menu interface Press button “downward” to find “BIDIRECTION”... - Page 29 There’s 4 options here: 1, MT-FP4060-UV Operating Manual 2, 3, H Under “TEST PRINT B” press button “ENTER” to make the test printing Press the "confirm" button that can print in Bi-direction The fine-tuning data of Bi-direction readjustment is on the left, the offset adjustment data is on the right, pls. refer to printed calibration chart as follows.
-
Page 30: Driver Installation
MT-FP4060-UV Operating Manual When the Calibration chart confirmed ,press ▼ button to enter Settings menu of Bi-direction readjustment , using ◄ And ► to change the setting, the following picture display the status of testing, To increase the number if the direction of the + are straight, and decrese the number if the the direction of the - are straight. - Page 31 MT-FP4060-UV Operating Manual 2.8.3 Double click Drivers to open the file folder as below: 2.8.4 The driver types include 32BIT and 64BIT. Pls install the proper driver according to the specific PC software. Before driver installation, pls get the printer powered on by turning on the power supply. Connect the printer and PC with USB cable.
- Page 32 MT-FP4060-UV Operating Manual 、After installation of USB driver ,double click the working procedure in English version in the folder . A same sign will appear on the lower right corner of the computer (As shown below) after double click: At the same time, the carriage will move rightwards to the right limit switch of the printer. Then the limit switch will turn red and the platform will move toward to limit switch on the back.
- Page 33 MT-FP4060-UV Operating Manual ④、Then 32BIT driver installation is finished. Pls click trust and allow the driver installation when there is prompt by anti-virus and firewall reminding you the program being installed is virus: 2.8.5 64BIT driver installation instruction shown as below: Double click to open the file folder: 、...
- Page 34 MT-FP4060-UV Operating Manual 、 Choose “Enable Test Mode” and click “ Next”: ④、The option box pops up and informs to restart computer. Then click “OK”:...
- Page 35 MT-FP4060-UV Operating Manual ⑤、 Choose Exit and click Next to restart the computer: ⑥、 Pls turn off the anti-virus software to install USB driver after restarting computer. Double click , install options will pop up and then click “Start”:...
- Page 36 MT-FP4060-UV Operating Manual ⑦、 The install options will pop up after installation and click Finish: ⑧、 Open the file folder after USB driver installation: After installation of USB driver ,double click the working procedure in English version in the folder , A same sign will appear on the lower right corner of the computer (As shown below) after double click:...
- Page 37 MT-FP4060-UV Operating Manual At the same time, the carriage will move rightwards to the right limit switch of the printer. Then the limit switch will turn red and the platform will move toward to limit switch on the back. The platform stops moving when the limit switch turns red.
- Page 38 MT-FP4060-UV Operating Manual 、 Right-click , then choose the option, click the Adjust Param Setting..enter the engineering mode. 、Engineering mode Setting Note: Please do not change the data of the engineering mode if no special requirement. ④、Click the User Mode, then enter the User Mode.
-
Page 39: Photoprint Printer Control Software Installation
MT-FP4060-UV Operating Manual 2.9 Photoprint Printer Control Software Installation 2.9.1、Preparation before installation computer hardware and software configuration recommend: hardware: CPU:2.50GHZ Memory:2.00GB 2.9.2、Photoprint Printer Control Software Installation Note .:Turn off the antivirus software on the computer before installing, plug in the white dongle. (1) To find card USB disk, connect it to the PC to open it to open folder find “software”: (2) double click to open folder“Software”: Installation instructions:... - Page 40 MT-FP4060-UV Operating Manual Select “I accept the terms of the license agreement”, then “Next” Find “Choose Destination Location” dialog box, and choose Destination Folder, then click “Next”...
- Page 41 MT-FP4060-UV Operating Manual Above several options are necessary,another features can be selected according to different requirement. Click “Next” Keep default selection as above steps, do not choose other option, then “Next”. Installing status will be shown as below.
- Page 42 MT-FP4060-UV Operating Manual When the program to run the installation is complete , as shown below: After completion of the program will run automatically pop up" Install Manager ", please choose according to the diagram , after the selection is complete click Done, as follows :...
- Page 43 MT-FP4060-UV Operating Manual From the next dialog box “Install Manger”, click “OK”. Then installing continues, click “OK”.
- Page 44 MT-FP4060-UV Operating Manual Click “Finished” on next dialog box, as shown:.
- Page 45 MT-FP4060-UV Operating Manual Photoprint software programs need to be updated after the installation is completed : First turn off antivirus software after restart the computer , as shown below Go back to RIP software disc folders and find and open it. To copy both of them to the Photoprint software install folder, NOTE: The update program in the process shown in Figure: need to re- start the computer again carry on to operate.
- Page 46 MT-FP4060-UV Operating Manual Find the RIP software icon on desktop, and double click it. Then the software opens and comes the dialog box “Add Setup”...
- Page 47 MT-FP4060-UV Operating Manual From the combo box “What is the model name of Apexjet Apexjet FlatBed, Then click “Next” Note : If there are no options in the choice of these two options Apexjet Apexjet FlatBed,because 12-step program no updates. As below select “TCP/IP”, Then on the pop-up dialog box “Communication”...
-
Page 48: Add Icc Profiles
MT-FP4060-UV Operating Manual From left to right please check button function: Wizard: Set Print Wizard Job: Add a new job RIP: View job records Send: send the newly added jobs Estimate: not in use Nest: multiple sheets of different sizes simultaneously print map Unnest: not in use Abort: Abort ongoing operations Delete: Delete the job... - Page 49 MT-FP4060-UV Operating Manual 2.10.2 .: Double-click to open the ICC folder shown: Apexjet 2.10.3 Finally copy the necessary ICCProfiles into the folder “ ”. 2.10.4 Here to all the installations are finished.
-
Page 50: Software Operation Introduction
MT-FP4060-UV Operating Manual 2.11 Software Operation Introduction 2.11.1 Software notices Note : You can open the image via software or use the mouse to drag images directly into the software area to be printed , the picture only in the printing area can be set up , the software supports JPG, PNG, TIFF, AI, CDR, PSD and other image format. - Page 51 MT-FP4060-UV Operating Manual 2.11.2. Double-click on the picture to be hold will appear settings printing page . Icon: print position, size and number of settings. Platform horizontal printing area :60cm Platform Vertical printing area: 40cm Image printing size settings area Image printing position settings area Image print quantity settings area...
- Page 52 MT-FP4060-UV Operating Manual Illustration: After the print job is completed whether to “delete” or “hold” settings. After printing to save image or not Priority: in default, “high”...
- Page 53 MT-FP4060-UV Operating Manual ICC profile settings To select ICC profile Illustration: print white ink and color ink option Remark: 1, double white: to print white color 2 times 2, double varnish: to print varnish liquid 2 times 3,white(varnish)only: only print white(varnish) White ink option: None: won’t print on white ink...
-
Page 54: Part Three: Maintenance
MT-FP4060-UV Operating Manual Illustration: spot color white ink print settings, follow the image (Note : to set it when you want to print spot white ink ) PART THREE: MAINTENANCE ※After work each day, press “testing”button to print testing strip to check the nozzle work well or not. ※After work each day , to wipe the cap top with clean cloth. - Page 55 MT-FP4060-UV Operating Manual 3.1 Printer head maintenance 1.After disassembly and cleaning the print head, put it on some plastic wrapper, and cover the print head inlets and nozzles with clean cloth, which could be dipped with a little cleaner liquid. (Notice: Don’t get the cloth dipped with too much cleaner liquid, in case that over abundant liquid flows into the cable ports of print head)
- Page 56 MT-FP4060-UV Operating Manual Figure 3 2). After the print head inlets and nozzles are covered with clean fabric, wrap the print head in plastic wrapper. Then place the print head to somewhere dry and out of sunshine (Notice: The whole surface of print head nozzles needs coverage with fabric) Figure 4...
- Page 57 MT-FP4060-UV Operating Manual Figure 5...
Need help?
Do you have a question about the UV4060 and is the answer not in the manual?
Questions and answers