Table of Contents
Advertisement
Advertisement
Table of Contents

Subscribe to Our Youtube Channel
Related Manuals for Apex Digital MT-FP4060-UV


Summary of Contents for Apex Digital MT-FP4060-UV
-
Page 1: User Manual
DIGITAL PRINTER MT-FP4060-UV INSTALLATION AND OPERATION USER MANUAL... -
Page 2: Table Of Contents
CONTENT PART ONE INSTRUCTION 1-1Structure And Function ---------------------------------------------Page3 1-2 Front structure-------------------------------------------------------Page4 1-3 Back structure--------------------------------------------------------Page5 PART TWO INSTALLATION AND OPERATION 2-1Before installation----------------------------------------------------Page6 2-2How to install ink system--------------------------------------------Page7 2-3How to install the driver---------------------------------------------Page8 2-4How to use the control panel---------------------------------------Page9 2-5How to install and operate the software--------------------------Page10 2-6Printing and precautious-----------------------------------Page12 PART THREE MAINTENANCE AND TROUBLE SHOOTING 3-1MAINTENANCE-----------------------------------------------------Page14... -
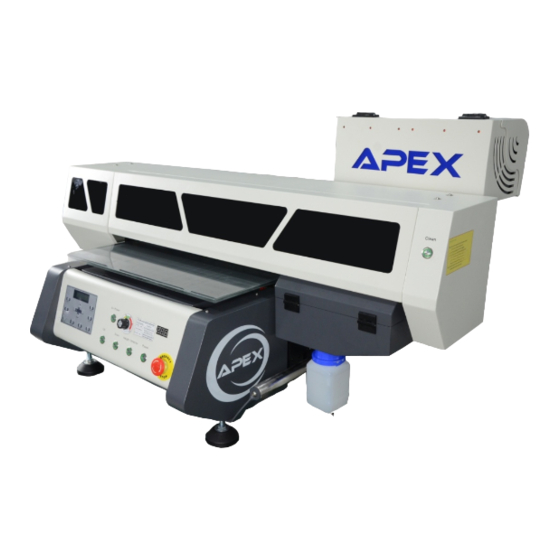
Page 3: 1-1Structure And Function
Control Panel Dust Handle Head Cleaning System Ink Bottle Parameters Model:MT-FP4060-UV Printing size:60cm x 40cm Curing system:UV LED Lamp (Air cooling system) Max. Height:14cm (5.5in) Power: 50/60HZ 220V(±10%)<2A 110V(±10%)<4A Environment Requirement: 20 ~ 28 C HR40-60% Printer head: Epson DX5 (Nozzles 180x8) -
Page 4: Front Structure
Front Structure Figure Dampers Printer Head UV Lamp Height display Emergency Down Ink Pump Wiper Control Panel Power Spurt Ink Switch UV Brightness UV Lamp Sensors Automatic Cap top Switch Height Adjustment detection... -
Page 5: Back Structure
Back structure White Ink Stirring System Ink Bottles Limit Switch General Switch General Power Connecter Label... -
Page 6: Preparation Before Installation
Preparation before installation 1. Put the machine on the table with at least 2cm thickness and good stability. (Desktop instability will cause poor print quality) 2. Clean up the platform to make the surface clean. 3. Remove the corresponding fixed component following the diagram. Remove white foam Remove the red-head holder iron sheet... -
Page 7: 2-2How To Install Ink System
How to install the ink system 1. Install the ink case: 1) Unwrap the cables, 2) Place the ink case here 3) Fix the screws of the ink and get the screws case, place move the case as far as possible from the carriage 4) Check from side panel, and make sure the case... -
Page 8: 2-3How To Install The Driver
How to install the driver Before Installation: Notes: Please closed or shut down all the anti-virus software before installation of the driver. Then copy UV-4060udisk file to computer. Power on printer, connect the USB cable and plug the USB dongle, please kindly follow the below steps: How to Install it FOR WINXP OR WIN7 - 32BIT: DOUBLE CLICK TO INSTALL... -
Page 9: 2-4How To Use The Control Panel
How to use the control panel * Control panel is working when printer is online * Below are the basic operation, and more info please check the more skill folder CANCEL: Cancel the printing job during printing PAUSE: Push it, the printing will he pause. -
Page 10: 2-5How To Install And Operate The Software
How to install and operate the software *Copy UV-4060disk into D disk, start printer, make USB line connected and plug dongle. *Open"2. software" folder and install according to "installation instruction". Open photoprint, Pop up this page drage a image into this area, double click the image to proceed further setting. - Page 11 Choose hold to save image and settings; Choose delete to delete image automatically. Repeated printing Suggest use color correction Choose resolution. Higher resolution with slower speed White ink: substrate: full white under color: white under the colors none: No white underneath: White ink under the color ink,...
-
Page 12: 2-6Printing And Precautious
Printing and precautious 1) Pre-requisite 1. The printer is installed as previous description, press test button to print the completed nozzel checking picture. 2. All software and driver installed. Open software and the machine is in online status. 2) Printing process( For example: Print on cellphone case) Precautious:... - Page 13 Cautions. 3. Software Content Settings: 1. The pic size and position setting, Drag the image into the Photoprint, Set the pic size, and direction. the start print position(1cm,1cm), with reference to 2. Select whether to use Mirror Printing. Page11--- "Software Installation and Use" 3.
- Page 14 Maintenance Records 1. Continuous use and maintenance requirements Daily Task 1.Do a cleaning, check the https://www.youtube.com/ nozzles. watch?v=59vLBEtVMLY 2 Clean up wiper and rubber parts of Cap Top. https://www.youtube.com/ watch?v=AVzehgadhKI Weekly Task 1.Clean encoder strip. https://www.youtube.com/ 2.Clean the surface of watch?v=O7yFdrJotFo UV light.
-
Page 15: Trouble Shooting
Trouble Shooting Q1: The checklist for nozzles when test strip not complete Step 1: https://www.youtube.com/watch?v=59vLBEtVMLY Do a small cleaning, press TEST to check the nozzles. If there is more than 10% break line of a certain color, follow Step 2. Step 2: https://www.youtube.com/watch?v=VaEOob7rPS Replace the corresponding damper of the break... - Page 16 www.apex-jet.com E-mail:support@apex-jet.com Tel: +86-755-28220390 youtube facebook...
Need help?
Do you have a question about the MT-FP4060-UV and is the answer not in the manual?
Questions and answers