Table of Contents
Advertisement
Advertisement
Table of Contents

Subscribe to Our Youtube Channel
Related Manuals for Bea-fon SL590


Summary of Contents for Bea-fon SL590
- Page 1 User Guide SL590...
-
Page 2: General Information
The content of this User Manual is presented as it is. Bea-fon does not assume any responsibility for the accuracy and completeness of the content of this user manual. - Page 3 Please check the supplied accessories to ensure that the accessories are all there. Should one of the components be missing or defective, please contact the dealer where you purchased the telephone. Bea-fon SL590 includes: 1 Phone (SL590) 1 Charging station (SL590) ...
-
Page 4: General Information
General Information Should the font be too small and hardly legible for you, you may view a larger version of the user manual on our website. Go to Products on our website: www.beafon.com Device Code: The use of this code can prevent unauthorized persons from using this telephone. -
Page 5: Table Of Contents
Table of Contents General Information ......4 Device Code: ........4 PIN Code: ........4 Table of Contents ........ 5 My Telephone ........9 External display ......11 LED description ......12 Getting Started ......... 13 What is a SIM card? ....... 13 Inserting the SIM cards .... - Page 6 Answering a call ......26 Functions during a conversation ..27 Menu ..........28 Phonebook ........29 Accessing your telephone numbers ..29 New contact ........29 Edit a contact: ....... 30 Delete all contacts from Phonebook or SIM card ........30 Copy all contacts from Phonebook or SIM card ........
- Page 7 Calculator........41 Calendar ........42 Services ........42 Multimedia ........43 Camera ......... 43 Taking photographs ......43 Photos .......... 45 FM radio........46 File manager ......... 47 Copy pictures to the computer ..48 Settings ........... 49 Profiles (sound settings) ....49 SOS ..........
- Page 8 Security settings ......56 SIM security ........56 Telephone security: ......56 Connections ........57 Bluetooth ........57 Data account ......... 58 Restore factory settings ....59 Specifications: ....... 59 Troubleshooting ........ 60 Intended operation/use ...... 64 Phone ........... 64 Battery .........
-
Page 9: My Telephone
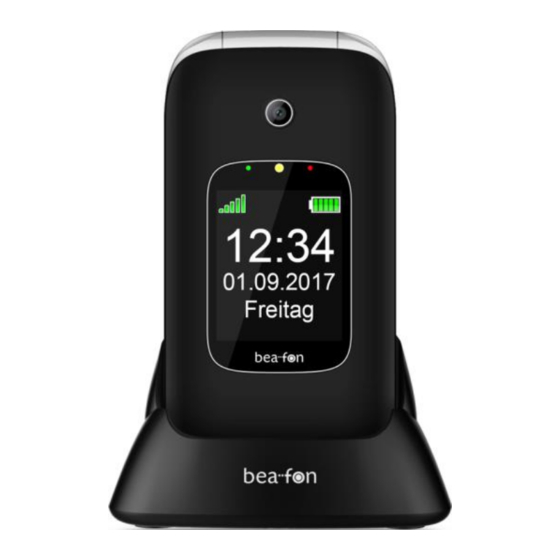
My Telephone Figure of SL590 One touch key M1 Left menu key/Main menu Green Call key/Call logs In order to access the call logs in standby mode * Key Press this key in standby mode in order to enter the following characters: */+/P/W. - Page 10 Camera key OK key One touch key M2 Right menu key/in standby mode, enter the phonebook Turn on/off, end a call, decline a call 4-way navigation key Arrow key (downwards) In standby mode, enter the photo contacts Arrow key (upwards): In standby mode, enter the SMS menu,...
-
Page 11: External Display
Flashlight Press and hold down the volume up 17 or down 19 key to enable/disable the torch Volume down key (-) External display To enable the external display for a few seconds, press the side keys briefly. The external display shows the following information: ... -
Page 12: Led Description
LED description Green Call, Recent call or Unread message Red LED Low battery (flashing)/Charge mode (steady light) White Flashlight Note: Press and hold down the side keys to turn the torch on/off Camera LEDs External display... -
Page 13: Getting Started
Getting Started What is a SIM card? Every mobile telephone requires an SIM card (Subscriber Identity Module); without the SIM card, you cannot make phone calls. The SIM card is a microprocessor that saves your data and contacts. Therefore, handle the card with care and exercise caution when inserting or removing the card. -
Page 14: Inserting The Micro Sd Card
Should the battery be in the device, please remove it. You see 2 card holders: the upper left one for the SIM card and the lower right one for the Micro SD card. Carefully insert the SIM card in the SIM card slot (1). -
Page 15: Charging The Battery
Press the other end of the battery until it snaps into place. Slide the battery cover on the device until it locks into place. Charging the Battery You have two options to charge the SL590 battery: Charging station Charger Insert the charger connector into the telephone. -
Page 16: Switching The Telephone On/Off
Connect the charger to a power outlet. It could take several hours to charge the battery. If the telephone is charged while it is switched off, it takes a few seconds before the charging indicator appears in the display. If the telephone is charged while switched on, the battery indicator begins to go up. -
Page 17: Standby
code; please enter it and confirm your entry with Please select your language and confirm your selection with Press and hold the red key 2-3 seconds in order to switch off the telephone. Without the SIM card, only the emergency call number can be dialed. Note: If you enter the PIN code incorrectly 3 times, the phone will ask for the PUK code that you have received... -
Page 18: Display Information Distribution On The Default Screen
Display information distribution on the default screen 1. Reception strength 2. Status symbols 3. Battery status 4. Network operator 5. Time 6. Date 7. Menu 8. Phonebook... -
Page 19: Display Symbols
Display symbols Reception strength The vertical bars show the strength of the reception of your network operator. New Messages This symbol is displayed once you have received a new message. SIM card has an unread message. This symbol blinks when the Inbox folder is full. You have to delete some messages in order to be able to receive new messages. - Page 20 Call signal Only ring Silent mode and vibrate Vibrate and ring Silent Alarm This symbol is displayed when the alarm is on. Bluetooth This symbol is displayed when Bluetooth is on. Battery indicator Battery status indicator GPRS This symbol is displayed when GPRS is enabled or available.
-
Page 21: Headset/Bluetooth Mode
Headset/Bluetooth mode If a headset is connected using a 3.5 mm jack plug (also a Bluetooth headset), you can answer the call using the button on the headset. Hands-free You can press the right menu key (FSP.ein) during the call to enable/disable the hands-free function. - Page 22 Arrow key Photo contacts (downwards) Arrow key (left) Calendar Arrow key (right) Alarm OK key Main menu...
-
Page 23: Call Functions
Call functions Call Enter the telephone number including the area code and press the green key. International Calls: Prior to entering the area code, enter a + - symbol by pressing twice as well as the country (or regional) code. (If necessary, omit 0 before the area code). -
Page 24: Making Calls Using The Photo Contacts
Press the green key to call the number. Press the red key in order to cancel or end the call. Making calls using the Photo Contacts In the default screen, press the downwards arrow key. Here you can select up to 8 photo contacts. - Page 25 In the third line, press the left menu “Options” and add a photo; you can select the following: Select from file: Select a picture you have already saved. From camera: Take a picture directly using the camera. In the fourth line, you can select a ringtone.
-
Page 26: Answering A Call
Answering a call When you receive a call and the phone rings or vibrates, the number or name appears on the display. If you would like to answer the call, press the green key or OK. You can also answer the call automatically by opening the phone;... -
Page 27: Functions During A Conversation
Functions during a conversation Click on the Options button during a call to be able to access the following functions: Hold: Sets up a call queue. End single call*: End call. New call: Make another call. Phonebook: To go to the Phonebook. Call logs: Shows the call list Messages:... -
Page 28: Menu
Menu 1. Phonebook 4. Extras 1. Phonebook 1. Alarm 2. Add new 2. Reminders contact 3. Calculator 3. Speed dial 4. Calendar 4. Direct dial 5. Services 5. Photo contacts 5. Multimedia 6. Settings 1. Camera 2. Messages 2. Photos 1. -
Page 29: Phonebook
Phonebook You can save up to telephone numbers in your SL590 telephone. On the SIM card, there is room for up to telephone numbers. Accessing your telephone numbers You have two options to go to the contacts: In the default mode, press the... -
Page 30: Edit A Contact
storage: Only the Name Mobile number can be stored. 3. Telephone storage: Name, Number Dial tone can be saved. To save the contact press Options and Save. Edit a contact: Select a name and press Options select Edit and confirm with OK. Edit the entries. -
Page 31: Copy All Contacts From Phonebook Or Sim Card
Copy all contacts from Phonebook or SIM card Select Main menu Phonebook press Select Settings and press Select Copy contacts and press Select From phone From SIM press Press again to confirm the copying process. Speed dial Select Main menu Phonebook press Select... -
Page 32: Direct Dial Numbers M1 M2
Direct dial numbers M1 M2 Select Menu, Phonebook and press Select Direct dial numbers and press Here you can edit the numbers. In default mode, press the M1 or M2 key for your SL590 to select the saved phone number. -
Page 33: Messages
Messages You can receive and send messages: SMS/MMS , however, it is dependent on the carrier. For more information, please contact your carrier. Write messages Select Menu, Messages and press Select Write message Select and press Text input The following functions are available: ... - Page 34 attention to the symbol at the top left-hand side of the display. Word recognition: To enter the desired word, press the keys for individual letters only once. The suggested word changes after each key stroke. To type, for example, “Hello”, press the keys “42556”...
-
Page 35: Inbox
Inbox In this menu, you can view new or already read Messages. Depending on the mode, the phone vibrates or rings, and the green LED flashes when you receive a new Message, and this symbol appears on the default screen of the display. Press Options for the following functions:... -
Page 36: Sent Messages
Sent messages In this menu, you can view already sent Messages. The following functions are available: Forward, Delete Advanced: Use number, Copy to SIM* Move to SIM card*. *This option depends on where the SMS was saved. Voicemail server Voice mail is a network function. If a voice mail has been received, the receipt of a new message will be shown on the display of your telephone. -
Page 37: Settings
On the default screen: Press and hold the number 1 and your telephone will call the corresponding number saved in the Voicemail server. Note: This service must be supported by the network operator. Settings Text Messages You can define the SMS settings. The following functions are available: SIM (Profile settings): Here you can set, among others, the... -
Page 38: Mms (Setting)
In order to be able to send or receive MMS messages, you require a memory card that supports the SL590, Micro SD cards with up to 16GB memory. For a correct configuration of the MMS settings, please contact your carrier; you... -
Page 39: Calls
Calls Call history Your telephone stores logs for Missed calls, Dialed calls, and Received calls The newest entries are at the top of the list. Under Option, the following functions are available to you: Show, Call, Send SMS, Send MMS, To black list, Save to phonebook Delete Delete call logs:... -
Page 40: Extras
Extras Alarm Select Menu, Extras and press Select Alarm and press Up to a maximum of 5 alarms can be set. Setting the alarm: 1. Select an alarm and press Edit. Setting the alarm: or Off, Time, Repeat, as well as Alarm tone. -
Page 41: Calculator
Add reminders: Press Options and select Add. Enter the desired details. To save the event, press Options Save. In the Reminders menu, the following options are available: Show, Add, Edit, Delete, Delete completed, Delete all, Jump to date, Show not completed View. -
Page 42: Calendar
Calendar Select Menu, Extras and press Select Calendar and press In the calendar interface, press the arrow keys to scroll to different days. Press the left menu key (Options) to be able to add, view or delete events. Services This is a service that is dependent on the network operator. -
Page 43: Multimedia
Multimedia Camera Press the camera key! Taking photographs Point the camera lens at a position or an object and press the Camera key or the key to take a photo. After the snapshot has been taken, the photo is shown on the display and automatically saved. - Page 44 Send, Use, Rename, Delete, Sort by, Save Image information. Camera settings: Shutter sound, EV, Contrast, Anti-flicker, Self timer. Image settings: Defining the Image size, and Image quality. White balance: Adapt to the ambient lighting conditions. Scene mode: Select between Automatic Night Effect settings: Here you can add different photo effects.
-
Page 45: Photos
Function Change image resolution Image quality White balance Delay timer Burst images Arrow key Underexpose image (left) (EV-) Arrow key Overexpose picture (right) (EV+) Note: with a maximum image resolution of 3.0 MP, a short delay may occur when taking a picture. Please wait one second after release, before you take the camera off the object photographed. -
Page 46: Fm Radio
View the saved photos (in .jpg format). You can send and also receive the photos via Bluetooth. The following functions are available to your under Options: Show, Send, Use, Rename, Delete, Sort by, Save Image information. FM radio This function allows you to listen to FM radio. -
Page 47: File Manager
Your options include: List of stations: Play, edit, or delete the saved channels. Manual search: Manual channel search. Automatic search: Automatic search. Settings Play in the background: This function also enables you to listen to the radio even though you have left the Radio menu. -
Page 48: Copy Pictures To The Computer
Copy pictures to the computer To copy the images you have taken with the SL590 camera onto your PC, please proceed as follows: Connect the telephone to the computer using the supplied micro USB cable. -
Page 49: Settings
Settings Profiles (sound settings) 1. Select Menu, Settings and press 2. Select Profiles and press Displays the profile mode list, including: General, Silent, Conference, Outdoors. Select the mode and enter the option menu: Enable: Enable the profile mode. Adjust: Set ringtones and other sounds as desired Reset: Reset profile to default settings. -
Page 50: Sos
The SOS app is a simple function that can save lives at a crucial moment. You can save any number of contacts and an SMS notification. These SOS numbers, which can be initially saved in sequence, will be dialled automatically in an emergency as soon as you press and hold the emergency call button at the back of the mobile phone for approx. - Page 51 In most carriers in Europe, call forwarding to the mobile box starts after about 20 - 25 seconds. Attention: Please ensure that your SOS contacts set the mobile box activation no sooner than 20 seconds. Note: If you want to stop or cancel the emergency call, press the red key or the SOS button.
-
Page 52: Sos Status
Note: If you save emergency call numbers such as rescue, police, fire department, etc., you must clarify this in advance with the respective institutions. No liability is assumed for possibly incurred costs if you call by mistake. Important: During an emergency call, the hands- free function is enabled automatically. -
Page 53: Sos Message
SOS message If the SOS call is started and not answered, this text will be sent to numbers. The text can be changed as desired. Phone settings Select Menu, Settings and press Select Phone settings and press OK. The following menu items are available: Time and date Time zone, Date,... -
Page 54: Lcd Illumination
LCD illumination Setting the brightness and display illumination duration Call settings Select Menu, Settings and press Select Call settings and press Depending on the network operator, you can use the following services: Caller ID Here you can define whether your number is withheld or visible for the person being called. -
Page 55: Block Function
Call barring With this network service, you can restrict your calls. Advanced settings: Black list: In this menu, it is possible to add phone numbers to the Exclusion list (black list) in order to block them for incoming calls. Call duration reminder You can determine a signal tone to sound during the call. -
Page 56: Network Selection
Network selection: Here you can select between automatic or manual Network selection. Security settings Select Menu, Settings and press Select Phone settings and press OK. The following functions are available: SIM security PIN lock When switching the prompt for a or off, you will be prompted to enter the correct PIN code... -
Page 57: Connections
Note: The factory default code is: 0000. Connections Select Menu, Settings and press Select Connections and press The following menu items are available: Bluetooth With Bluetooth, you can connect your telephone with a compatible Bluetooth device. The following functions are available: Bluetooth: Press the left menu key to turn the Bluetooth function on or off. -
Page 58: Data Account
Use details: In this menu, you can: Define the Audio path and Storage and under Addresses you see the MAC address of your telephone. Search for Bluetooth audio device To begin a search for another Bluetooth device, press OK. Select the desired device and press Pair. -
Page 59: Restore Factory Settings
Restore factory settings With this function, you can reset the telephone settings to the factory default configuration. You have to enter the password to restore the factory settings. The default password is: 0000. Specifications: Dual Band GSM 900/1800 Network: Battery Li-ion 3.7V - 1000mAh Dimensions: 101x50.5x20.5mm... -
Page 60: Troubleshooting
Troubleshooting If problems or irregularities occur while using the phone, please refer to the information in the following table. If a particular problem cannot be solved using the following information, please contact the dealer where you purchased the phone. The phone cannot be turned on: ... - Page 61 SIM card is not inserted properly, insert the SIM card correctly. SIM card does not function or is damaged? Get your SIM card checked by your network operator. Network connection cannot be made: Bad reception? Move to an open space or if you are in an enclosed space, near the window.
- Page 62 Try turning the volume up louder. Outgoing calls cannot be made: Check the phone number and try again. Have you activated call barring? If so, please disable all call barring. Check whether the SIM card is registered on the network.
- Page 63 Display is black: Check the battery status, charge the battery, or replace it. Check the background image. Did the phone get wet? Blocked PIN: Check whether the PIN code was entered correctly. If the PIN code has been entered incorrectly 3x, the SIM card is locked and you will need the PUK code: (Please contact your...
-
Page 64: Intended Operation/Use
Intended operation/use Phone If you follow the recommendations below, you will prevent the warranty from early becoming null and void, and you will continue to enjoy your product for years to come. Please use original accessories only or accessories approved by your mobile phone manufacturer. - Page 65 electronic devices, e.g., a TV set, a telephone, a radio, and a computer. Never leave the mobile phone exposed to sunlight or in an environment with strong radiation as high temperatures will significantly shorten the life of the electronic components.
-
Page 66: Battery
the mains outlet. Therefore, the device must be positioned in such a way as to ensure unhindered access to the mains outlet at all times, so that you can pull out the plug from the mains outlet immediately in an emergency. -
Page 67: Your Battery
compared to the normal operating time, you should buy a new battery. Disconnect the charger from the network and from the device when it is no longer needed! When the battery is fully discharged, it may take a few minutes for the charge indicator to appear on the display or for you to make calls. - Page 68 poles may cause damage to the battery or the connecting object. Do not throw batteries into fire as there is risk of explosion! Batteries can also explode if they are damaged. Batteries must be disposed of properly! Do not attempt to open or destroy batteries.
-
Page 69: Recycling
Recycling Always return your used electronic products, batteries, accumulators, and packaging materials to dedicated collection points. In this way you help prevent the uncontrolled waste disposal and promote the reuse of material resources. The crossed out wheeled bin symbol found on the product, battery, packaging material, and in the documentation means that electrical and electronic... -
Page 70: For Your Safety
For your safety Read these simple guidelines. Failure to observe these rules can have harmful consequences or contravene regulations. Do not turn on the phone if the use of mobile phones is prohibited, or may cause interferences or danger. Traffic safety Do not use your phone when driving a vehicle. -
Page 71: Traffic Safety
Turn off the phone at filling stations The mobile phone must be turned off in the vicinity of filling stations and other places with explosive goods. Interferences Mobile phones may cause interferences that could affect the performance. Traffic safety: Do not use your phone when driving a vehicle. -
Page 72: Electronic Equipment
Always keep the device in its normal operating position. Parts of the phone are magnetic. Metal parts can be attracted by the phone, and people with hearing aids should not hold the phone to the ear with the hearing aid. Always secure the phone in its holder as metal parts can be attracted by the handset. -
Page 73: Hearing Aids
Technology Research. For people with a pacemaker: You should always keep a minimum distance of 20 cm between the mobile phone and the pacemaker when the phone is turned on. You should not keep the phone in the breast pocket. -
Page 74: Approved Locations
to adequately shield a medical device from external RF energy, or have questions about other subjects, please contact a physician or a medical device manufacturer. Turn off your phone in healthcare facilities when prompted by signs, notices or other written regulations. -
Page 75: Vehicles
and distribution areas), chemical plants, or where blasting operations are in progress. Areas with a potentially explosive atmosphere are often, but not always, clearly marked. They include, e.g., the below deck on boats, chemical transfer or storage facilities, vehicles using liquefied petroleum gas (such as propane or butane), areas where the air contains chemicals or particles such as grain, dust, or metal powders, as well as... -
Page 76: Information
Information Certification information (SAR): This phone model meets the requirements for electromagnetic fields. The SAR (specific absorption rate) regulates a standard value of 2.0 W/kg as the mean value per 10 grams of body tissue, and this mobile phone type has a test value of: 0.972W/kg, that is in line with the EU Radio Equipment Directive (RED) 2014/53/EU. -
Page 77: Declaration Of Conformity
Declaration of Conformity: Bea-fon Mobile GmbH hereby declares that the SL590 model complies with the essential requirements and other relevant provisions of EU Directive 1999/5/EC. The full text of the declaration of conformity can be requested at any time. Limitation of liability: ... -
Page 78: More Information
More information Should you have questions or want to get more information about any of our products, you can visit our websitewww.beafon.com. or even contact E-mail: support@beafon.com Address BEAFON MOBILE GmbH 4722 Peuerbach Enzing 4 Austria V.2.0...
Need help?
Do you have a question about the SL590 and is the answer not in the manual?
Questions and answers