Table of Contents
Advertisement
Quick Links
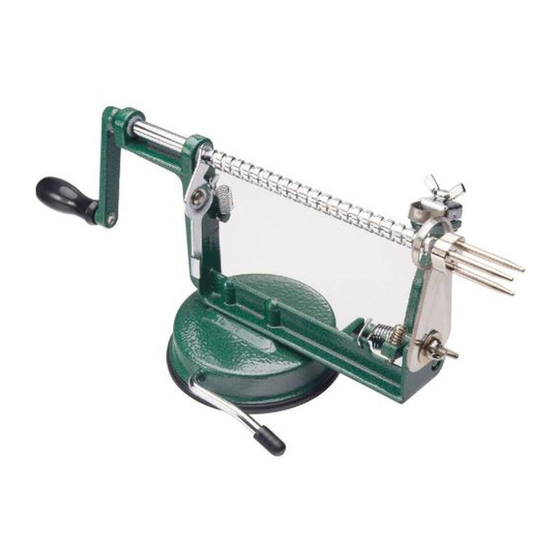
LEM Apple/Potato Peeler Use & Care Instructions
CAUTION! Please be careful when handling this machine - blades are exposed.
SET UP
1. Secure machine onto a clean, dry, smooth surface, such as a counter or table top,
by turning the lever on the suction base.
2. Using a screwdriver, attach crank handle with the screw provided to the handle arm.
3. Check the alignment of the 3 pronged gripper fork and the position of the corer/slicer
blade. (See diagram A&B.)
PEEL, COR E, AND SLICE
1. To release the groove clamp push down on the release switch, and pull the crank
handle all the way back.
2. Push produce securely onto the 3 pronged gripper fork.
3. Turn the crank handle until the produce comes in contact with the blade. If necessary,
change the depth at which the blade peels the produce by loosening the wing nut on the
peeler blade and adjust the gap between the blade and blade shelf lip. (See diagram C.)
NOTE: A little adjustment goes a long way.
4. To remove an apple core, release the groove clamp and firmly pull back on the
crank handle. The apple core will pop off the gripper fork.
COR E AND SLICE ONLY
Carefully pull back on peeler arm and flip the retaining latch in place to hold the peeler
arm in place. Leave corer/slicer blade in position.
PEEL ONLY
Loosen the corer/slicer blade wing nut and slide the corer/slicer blade
out of the way and retighten the wing nut.
CLEANING
Immediately after use, rinse the machine with warm water and dry at once.
THIS MACHINE IS NOT DISHWASHER SAFE. Handwash only.
CHANGING THE BLADES
COR ER /SLICER BLADE
1. When attaching this blade to the frame, make sure the 3 prong gripper fork is all
the way forward by releasing the groove clamp.
2. Center corer/slicer blade over the 3 prong gripper fork and tighten the wing nut.
(See diagram A.) NOTE: It is very important to attach the blade with the coring ring facing
out, not toward the prongs. (See diagram B.)
PEELER BLADE
Loosen the wing nut to replace or adjust the blade. The blade can be adjusted for minimum
to maximum peel thickness. (See diagram C.)
TR OUBLESHOOTING
Problem
Three prong gripper fork must be centered through corer/slicer blade as in
Unit will not peel
diagram A and peeling blade is set as in the diagram C.
Unit still will
Adjust blade (See diagram C.) by increasing gap no further than 1/16" at a
not peel
time. If the gap is too big it will gouge instead of peel produce.
Produce breaks up
Produce is too soft. Use only fresh, firm products.
Produce is
Corer/Slicer blade is on backwards. (See diagram B.)
not slicing
Suction Cup
R ub a very small amount of petroleum jelly on Suction Cup.
won't hold
Solution
LEM Apple/Potato Peeler Use & Care Diagrams
LEM Products West Chester, OH 45011-9767 • PH: 877-536-7763 • www.lemproducts.com
If you have questions
or for information on ordering
replacement parts, please
contact LEM Products at
1-877-536-7763.
Advertisement
Table of Contents

Related Manuals for LEM 662


Summary of Contents for LEM 662
- Page 1 1-877-536-7763. Produce is Corer/Slicer blade is on backwards. (See diagram B.) not slicing Suction Cup R ub a very small amount of petroleum jelly on Suction Cup. won’t hold LEM Products West Chester, OH 45011-9767 • PH: 877-536-7763 • www.lemproducts.com...
- Page 2 Please take a few minutes to review this information before you begin using your LEM Apple/Potato Peeler. With proper use and care it will serve you well for many years. It’s so much fun and so easy to operate that you’ll find the whole family wanting to help when there is produce to be peeled or sliced.
Need help?
Do you have a question about the 662 and is the answer not in the manual?
Questions and answers