
Subscribe to Our Youtube Channel
Related Manuals for Ashley P775


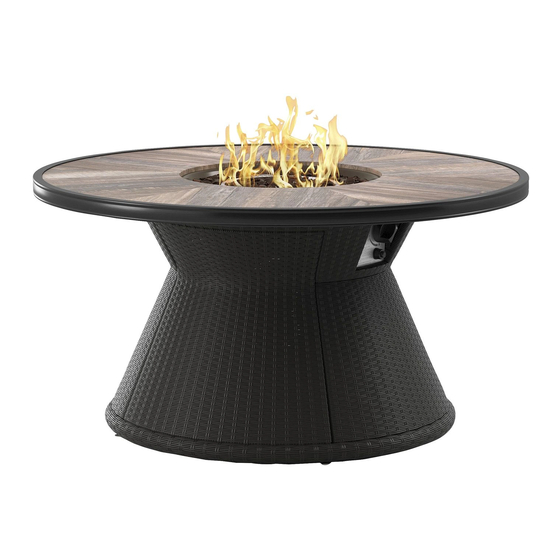
Summary of Contents for Ashley P775
- Page 1 Outdoor Round Fire Pit Table User Guide ITEM#: P775-776 Product has been CSA tested and certified. THIS PRODUCTWAS MANUFACTURED BY JIAXING HERO IMP & EXP CO,.LTD FOR ASHLEY FURNITURE INDUSTRIES, INC. Page 1 of 40 P775-776...
- Page 2 INFORMATION REGARDING REPLACEMNT HOSES, appliance. THERMOCOUPLES, ELECTRODES, IGNITION 2. Extinguish any open flame. MODULES, LAVA ROCKS, LOGS, FIRE ICE, ETC. 3. If odor continues. Keep away from the appliance and immediately call you gas supplier or fire department. Page 2 of 40 P775-776...
- Page 3 ANSI Z223. 1. In Canada, installation must conform to death. Read the installation, operating and local codes. If no local codes exist, follow the current maintenance instructions thoroughly before installing National standards of CANADA CAN/CGA-B 149.2. or servicing this equipment. Page 3 of 40 P775-776...
-
Page 4: Table Of Contents
3. Specifications ................7 4. Parts List ..................8 5. Installation ................... 9 6. Natural Gas Conversion ............13 7. Batteries ..................14 8. Lighting Instructions ..............15 9. Maintenance ................16 10. Troubleshooting Guide ............16 Page 4 of 40 P775-776... -
Page 5: Important Safety Information
Do NOT ignite or use the fire pit if the burner media (lava rock or fire ice) are wet. Ensure the burner media are completely dry before igniting as intense heat could cause the media to crack and pop. Always place the cover on the appliance when not in use in order to avoid water contacting the media. Page 5 of 40 P775-776... - Page 6 Keep the fuel supply hose away from any heated surfaces. If you have any questions regarding the use of this unit, or find that your fire pit unit needs service, please contact Ashley Furniture Industries at the below number. 1 (800) 477-2222 Customer Service.
-
Page 7: Specifications
Figure 1 SPECIFICATIONS INPUT 50,000 Btu/hr Propane Regulator 11 inches water column Pressure Natural Gas Minimum 7 inches water column Inlet Pressure Clearances to Sides: 24in. / 61cm Top: 72 in. / 183 cm combustible surfaces Page 7 of 40 P775-776... - Page 8 PARTS IDENTIFICATION LIST Item Description Burner Cover Bottom Base Door Cylinder Holder 1/4 in x 18 mm Bolt 1/4 in x 65 mm Bolt Flat Washer Lock Washer Wrench Allen Wrench Battery Fire Glass PVC Cover Page 8 of 40 P775-776...
-
Page 9: Installation
2.Attach the Cylinder Holder(E)to the Bottom Base(C) using 4pcs of 1/4 in X18mm Bolt(F),4pcs of Lock Washer(J) and 4 pcs of Flat Washer (H)by Allen Wrench(M). 3.Turn over the assembled frame then attach the Door(D) to the Bottom Base(C). Page 9 of 40 P775 -776... - Page 10 Cover (A)on the fire pit table top(B),then cover the fire pit with PVC cover (R)when not in use to protect it from the elements or when fire pit is cool COMPLETELY after the use. P775 -776 Page 10 of 40...
-
Page 11: Natural Gas Conversion
2. Extinguish any open fl ame. thoroughly before installing or 3. If odor continues, keep away from the appliance and servicing this equipment. immediately call your gas supplier or fi re department. Page 11 of 40 P775-776... -
Page 12: Lighting Instructions
If igniter does not light burner, use a long match or long butane lighter. After burner ignites, adjust flame to desired flame with the control knob. To Extinguish Turn and push the control knob clockwise to the OFF position. Close cylinder valve, disconnect propane cylinder. P775-776 Page 12 of 40... -
Page 13: Maintenance
Tighten the thermocouple nut at the Thermocouple connection lit after lighting back of the valve. at the main control valve is loose glass Cover the burner with fire fire glass on Burner per the instructions P775-776 Page 13 of 40... - Page 14 P775-776 Page 14 sur 40...
- Page 15 <,4= & -.()*5. 1. <,4 # 1 ,>>,5.(1 -.()*5. -67-. 91,00. 67:.5-. ( 1 6*.75 +6)-()7. ,5*.5 16() *. 1 ,>>,5.(1 .- ,>>.1.5 (00 *(,-.0.)- :6-5. 9675)(//.75 *. <,4 67 1. * >,5-.0.)- *. 9.7 P775-776 Page 15 sur 40...
- Page 16 (5. +60>1$-.0.)- *./ ()/-57+-(6)/ +6)9650.5 ,7? +6*./ 16+,7? ( ,7+7) +6*. 16+,1 * ()/-,11,-(6) * 6> 5,-(6) .- *. 0,()-.),)+. ,:,)- .?(/-. /7(:5. 1./ )650./ ),-(6),1./ ,+-7.11./ *. 1 ()/-,11,-(6) 67 1 6> 5,-(6) *. +.- D7(>.0.)- ,),*, P775-776 Page 16 sur 40...
- Page 17 & 6)/(<)./ *. +75(- 0>65-,)-./ )9650,-(6) # >56>6/ *. 56>,). > +(9(+,-(6)/ (/-. *./ ($+./ J )/-,11,-(6) 6):.5/(6) *. ,4 ,-75.1 ,--.5(./ K )/-57+-(6)/ * 1170,<. ,()-.),)+. &! 7(*. *. >,)),<. P775-776 Page 17 sur 40...
- Page 18 0 *(, *. B5"1.75 /6(- /.+ +60>1$-.0.)- ,:,)- *. 1 ,1170.5 +600. 1, +3,1.75 ()-.)/. >6755,(- +,7/.5 1. 0 *(, # +5,D7.5 .- /,7-.5 .--5. -67;675/ 1. +67:.5+1. /75 1 ,>>,5.(1 .) +,/ *. )6) 7/,<. ,9() * :(-.5 1 .,7 *. +6)-,+-.5 1. 0 *(, P775-776 Page 18 sur 40...
- Page 19 ,5*.5 1. -72,7 * ,1(0.)-,-(6) 16() *./ /759,+./ +3,7*./ ( :67/ ,:.4 *./ D7./-(6)/ +6)+.5),)- 1 7/,<. *. +.- ,>>,5.(1 67 -567:.4 D7. :6-5. 962.5 ) +.//(-. 1 .)-5.-(.) :.7(11.4 +6)-,+-.5 /31.2 75)(-75. )*7/-5(./ ,7 )70 56 +( *.//67/ & "K!!% .5:(+. 1(.)-$1. P775-776 Page 19 sur 40...
- Page 20 && >67+./ +616)). 5.//(6) *. <71,-.75 * .,7 *. 56>,). 5.//(6) * *0(//(6) >67+./ +616)). * .,7 ()(0,1. *. ,4 ,-75.1 .- /F () C &+0 ,7-F () C &K +0 B1,(.0.)- ,7? /759,+./ +60B7/-(B1./ P775-776 Page 20 sur 40...
- Page 21 Couvercle du brûleur Dessus Base Inférieure Porte Porte Cylindre Boulon 1/4 in x 18 mm Boulon 1/4 in x 65 mm Rondelle Plate Rondelle de Blocage Écrou Clé Clé Allen Batterie î Couvercle en PVC P775-776 Page 21 sur 40...
- Page 22 4 pcs Boulons ¼ in x18mm (F), 4 pcs Rondelle de Blocage (J) et 4 pcs Rondelle Plate (H) avec la Clé Allen (M). 3. Renversez le Cadre assemblé puis attachez la Porte (D) à la Base Inférieure (C). P775-776 Page 22 sur 40...
- Page 23 Couvercle du Brûleur (A) sur le dessus du foyer (B), puis couvrez le foyer avec le couvercle en PVC (R) lorsqu’il n’est pas en cours d’utilisation pour le protéger des éléments ou lorsque le foyer est COMPLETEMENT refroidi après utilisation. P775-776 Page 23 sur 40...
- Page 24 P775-776 Page 24 sur 40...
- Page 25 >5V/ D7. 1. B5Y1.75 /R,1170. 5S<1.5 1, 91,00. X +.11. *S/(5S. ,:.+ 1. B67-6) *. +600,)*. '# ! & ,# & 675).5 .- >67//.5 1. B67-6) *. +600,)*. .) /.)/ *./ ,(<7(11./ *R7). 06)-5. X 1, >6/(-(6) .50.5 1, :,)). *. 1, B67-.(11. *S+6)).+-.5 1, B67-.(11. *. >56>,). P775-776 Page 25 sur 40...
- Page 26 Il est recommandé que vous contactiez un technicien de service qualifié si vous pensez que l’appareil ne fonctionne pas correctement. û é é à é é ’ â é ’ é ’é ’ é é ’ ’ ’ é é ’ ’ ’é à é û û P775-776 Page 26 sur 40...
- Page 27 G U A R D A E S T A S I N S T R U C C I O N E S JJI7JJE _8#$'...
- Page 28 3 31 C S A Model 7 0 1 5 1 9 5 0 PA050-776 ! " , # , = # & !#'((& " ( '*&, #+ '*&, # & & !#'((& 0 # # (& '!'# + +, - ,5, 7/6 +6) ! 1(B5,/ "# E<% +(1()*56 *.
- Page 29 +, - ,)-.)<, 16/ +60B7/-(B1./ /`1(*6/ -,1./ +606 0,-.5(,1./ *. /-. >646 *. 97.<6 ./ 7) ,>,5,-6 *. +60B7/-(` ) +6)/-57++(`) >,>.1 *. +,5-`) , 7), *(/-,)+(, /.<75, *. 1, 6*6/ 16/ ,>,5,-6/ *. +60B7/-(` )>56*7+.) 06)` ?(*6*. +,5B6)6 " % *75,)-.
- Page 30 %"$ $, " -7 ; 9 JJI7JJE _8#$'...
- Page 31 , ()/-,1,+(`) *.B. +70>1(5 +6) 16/ +`*(<6/ 16+,1./ 6 .) ,7/.)+(, *. +`*(<6/ 16+,1./ *. -6*6/ 16/ +`*(<6/ 16+,1./ ,>1(+,B1./ ()+172.)*6 /() 1(0(-,+(`) +6) .1 `*(<6 ,+(6),1 *. <,/ +60B7/-(B1. &C J = `*(<6 )-.5),+(6),1 *. <,/ +60B7/-(B1. = `*(<6 *.
- Page 32 / /.<756 7/,5 ./-. >56*7+-6 >,5, +7,1D7(.5 >56>`/(-6 .?+.>-6 +606 /. *./+5(B. .) ./-. *6+70.)-6 ()+172.)*6 /() 1(0(-,+(`) 1, +6+(), # ( '(&Q .1 5.<71,*65 *. >5./(`) *. <,/ >56>,)6 /70()(/-5,*6 +6) ./-. ,>,5,-6 *.B. /.5 7-(1(4,*6 5.<71,*65 ./-_ 9(;,*6 >,5, 7), >5./(`) *. /,1(*, *. && >71<,*,/ *. +6170), *. ,<7, /-.
- Page 33 1 +(1()*56 *. /70()(/-56 *. ,/ >,5, 7/6 +6) ./-. ,>,5,-6 *.B. -.).5 7), +,>,+(*,* *. ! *.B. ./-,5 .D7(>,*6 +6) 7) +6).+-65 *. -(>6 & 2 7), ">56-.++(`) +6)-5, /6B5.11.),*6 *(/>6/(-(:6% '.5 (<75, & 1 +(1()*56 *. /70()(/-56 *. ,/ >,5, /.5 7-(1(4,*6 *.B.
- Page 34 (<75, & )-5,*, J! !!! C 35 && >71<,*,/ *. 5./(`) *.1 +6170), *. ,<7, 5.<71,*65 *. ,/ ,-75,1 >71<,*,/ *. +6170), *. ,<7, a)(06 7-65(4,+(6)./ , ,*6/F () C &+0 6>F () C &K +0 1,/ /7>.59(+(./ JJI7JJE _8#$'...
- Page 35 e-.0 (#&0(&/ !&, , Cubierta del quemador Parte superior Base inferior Puerta Adaptador del cilindro Tornillo de 1/4 pulg. x 18 mm Tornillo de 1/4 pulg. x 65 mm Arandela plana Arandela de seguridad Tuerca Llave inglesa Llave Allen Batería Caja Cubierta de PVC JJI7JJE...
- Page 36 1. Fije la base inferior (C) al tablero superior del fogón (B) usando 4 tornillos de 1/4 pulg. x 65 mm (G), 8 arandelas de seguridad (J), 8 arandelas planas (H) y 4 tuercas (K) mediante una llave Allen (M) y una llave inglesa (L).
- Page 37 4. Vierta la caja de (P) en el tablero superior del fogón (B) y alrededor. Asegúrese de que la perilla de control está en la posición «OFF». Desatornille la tapa del pulsador del módulo de ignición ubicado en el panel de control para acceder al compartimento de la batería (N). El módulo de ignición requiere una pila de tamaño AAA (N).
- Page 38 JJI7JJE _8#$'...
- Page 39 ( , # " 0 # ! & ! ! # ( , #" 1 , >' " 0 # ! ' # 1 :& $ !&" , 9 "&:# , (' ">'& # # &,' 1 9 ! (! ( &* "...
- Page 40 MANTENIMIENTO GUÍA DE SOLUCIÓN DE PROBLEMAS PROBLEMA CAUSA REMEDIO La falta de ox geno Termopar no está en llamas JJI7JJE _8#$'...
Need help?
Do you have a question about the P775 and is the answer not in the manual?
Questions and answers