Table of Contents
Advertisement
Advertisement
Table of Contents

Related Manuals for Soloshot SOLOSHOT2


Summary of Contents for Soloshot SOLOSHOT2
- Page 1 base & tag user guide...
- Page 2 (such as on the outside of a helmet or attached to a vehicle if used in motor sports). There is no one recommendation as it depends on the activity, terrain, aggressiveness of the activity, and specific use. By using SOLOSHOT, user agrees to assume all risk and not hold Soloshot Inc. liable for injuries or damages in any way.
-
Page 3: Important Safety Instructions
Be careful not to spill liquids of any kind on BASE or CHARGER. 18. Servicing - Do not attempt to service any part of SOLOSHOT2 yourself as opening or removing covers or otherwise removing or altering any component of SOLOSHOT2 may expose you to dangerous voltage or other hazards. - Page 4 Safety and Handling Review full Safety and Handling information in the SOLOSHOT2 User Guide Videos and Tutorials For SOLOSHOT videos and tutorials visit www.soloshot.com/videos Customer Service Call us at 1.866.347.0869, M-F 9am-5pm CST, or email us at info@soloshot.com...
-
Page 5: Table Of Contents
Table of Contents ------------- pgs 6 - 9 1. Equipment Overview ..................2. Important Information ..................pgs 10 - 13 3. Advanced Settings - Base ................pgs 14 - 23 6. Advanced Settings - Tag ................. pgs 24 - 29 pgs 30 - 45 7. -
Page 6: Equipment Overview
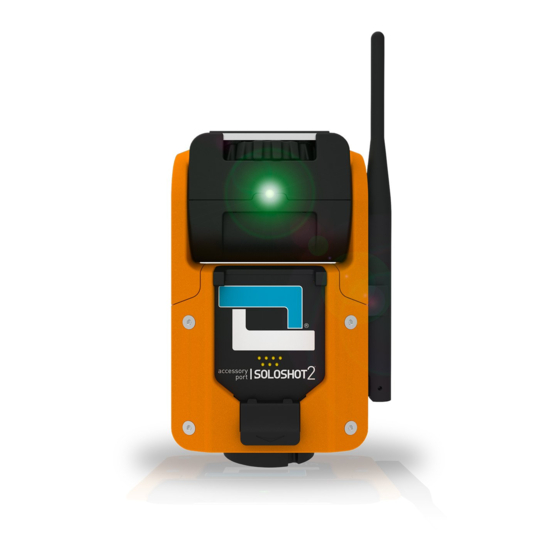
EQUIPMENT OVERVIEW BASE 1. Tracking LED 2. Tilt Drum 3. Accessory Port 4. Mounting Screw 5. Accessory Release Button 6. K-Lock Port 7. USB Ports (Mini & USB 2.0) front side... - Page 7 EQUIPMENT OVERVIEW BASE 7. Power Button 8. Mode Button 9. Pairing Button 10. Pan/Tilt Buttons 11. Mode LEDs 12. Antenna 13. Tripod Socket bottom back side...
- Page 8 EQUIPMENT OVERVIEW 1. Charging/Docking Contact 2. Power Button 3. Pairing Button 4. Status LEDs 5. Top Surface...
- Page 9 EQUIPMENT OVERVIEW TRIPOD TOOL CHARGING CABLE CLIP ARM BAND...
- Page 10 BASIC set up, pairing and calibration before attempting the advanced settings described in this manual. SOLOSHOT is a robot! It assumes that you have FOLLOWED THESE INSTRUCTIONS. While robots FREE us from repetitive and time-consuming tasks, they do not replace HUMAN CREATIVITY.
- Page 11 LISTEN! IMPORTANT Automatic tracking only works OUTDOORS in wide open spaces! BASE MUST REMAIN STATIONARY AFTER SETUP! USING A CAMERA CONTROLLER ACCESSORY? Refer to the Cheat Sheet and Manual enclosed with that product.
- Page 12 LISTEN! IMPORTANT Tag is waterproof to 20 ft and shockproof to a free-fall from 10 ft! CARE INSTRUCTIONS! Rinse your Tag in fresh water after use (especially in SALT WATER)! Wipe the Charging/Docking Contacts on Tag before charging or firmware upgrades.
- Page 13 LISTEN! IMPORTANT Base is NOT waterproof, weather resistant or shock resistant! Treat with care! CARE INSTRUCTIONS! Do not use water to clean your Base! Only wipe down with a clean dry cloth and use compressed air to clear debris or sand from the gold pins and the Tilt Drum Area.
-
Page 14: Advanced Settings - Base
ADVANCED SETTINGS - BASE Using Advanced Settings SOLOSHOT offers a variety of Modes designed for various sports, shooting styles and situations. Each of the six LEDs on the back of the Base represents a Setting (indicated by LED#) that can be toggled between different Modes (indicated by LED color). - Page 15 ADVANCED SETTINGS - BASE Tilt Settings LED 1 GREEN = Surf & Turf Mode – Ideal for sports involving a large, generally level playing field like Surfing, Park Skating & Soccer. = Big Altitude Mode – Great for sports with large altitude changes like Skydiving &...
- Page 16 ADVANCED SETTINGS - BASE Specialty Settings LED 2 GREEN = Standard Mode (default) – Base tracks Tag based on LED#1 setting. Suggested framing for Barrel Mode = Barrel Mode – Base assumes lost communication with Tag is due to getting barreled and continues to track for 8 seconds or until communication with Tag is reestablished.
- Page 17 ADVANCED SETTINGS - BASE Zoom Settings LED 3 *Only available when Camera Controller is connected. GREEN = Wide Frame Mode – Camera Controller automatically adjusts zoom AND tilt WIDE to maintain a wide shot as the Tag moves closer to or farther away from the Base = Medium Frame –...
- Page 18 ADVANCED SETTINGS - BASE LED 4 Single/Multi Settings Toggle to Multi Mode in order to track multiple Tags from the same Base. GREEN = Single Mode (default) Single Base - to - Single Tag = Multi Mode SEE PAGES 25 - 40 FOR DETAILED DESCRIPTION OF CREATING &...
- Page 19 ADVANCED SETTINGS - BASE Multi Mode Settings LED 5 only available in Multi Mode Use this setting to tell the Base when to switch between Tags. GREEN = Closest Mode - Base will follow Single Base - to - Closest Tag the closest Tag = Fastest Mode - Base will follow the fastest Tag...
- Page 20 ADVANCED SETTINGS - BASE LED 6 Multi Mode Record Settings *Only available if Multi Mode is ON and Camera Controller is connected to a supported camera. GREEN = Cut Mode - creates a new video file each time the Base switches between Tags = Continuous Mode –...
- Page 21 SUGGESTED SETTINGS LED 1 LED 2 LED 3* TIPS Tilt Specialty Zoom Settings Settings Settings Surfing Try Fastest or Follow Me in Multi Mode. Field Sports Tag the ref and use Wide for an interesting perspective. Kiteboarding Compare Surf & Turf + Jump Detection versus Big Altitude and see what works best for you.
- Page 22 ADVANCED SETTINGS - BASE Manually Offset Your Centering Position While in Surf & Turf Mode, your Base will automatically adjust its tilt to keep your feet on an imaginary line separating the bottom third and middle third of the screen and centered horizontally. While in Big Altitude Mode, your Base will automatically adjust its tilt to keep your Tag in the center of the screen.
- Page 23 ADVANCED SETTINGS - BASE Calibrating in Big Altitude Mode Use the POWER and MODE buttons on your Base to set LED1 to perform Setup Steps 5 & 8 with the following alterations: Step 5 - Use wider framing since vertical tracking is less accurate. Step 8 - Walk for at least 100-150 steps prior to pairing with Base for best vertical tracking results.
-
Page 24: Advanced Settings - Tag
ADVANCED SETTINGS - TAG Tag - Record ON/OFF Command* record By default, your Tag broadcasts a command as indicated by LED3 blinking RED. You can tell your camera to go to standby by holding down the BUTTON for 2 seconds until LED3 blinks GREEN. Remember: = record! Press and Hold to Toggle Recording... - Page 25 ADVANCED SETTINGS - TAG Tag - Hide Me Command GREEN LED3 will either blink (camera recording) or (camera on standby) when radio is ON. You may turn OFF your Tag’s radio at any time by quickly pressing the BUTTON twice. LEDs 1, 2 and 3 will briefly turn GREEN, then LED1 and LED2 will turn solid (camera GREEN...
- Page 26 ADVANCED SETTINGS - TAG Tag - Multi Mode Follow Me Command Tell all Bases set to “Multi Mode + Follow Me ” (pg 34) to follow your Tag by: 1. Quickly pressing the BUTTON (will NOT automatically start recording) 2. Tapping the TOP WHITE SURFACE surface of your Tag three times quickly (will automatically start recording) Press Once to Call Base GREEN...
- Page 27 ADVANCED SETTINGS - TAG Tag - Capture Centering Object Command* *For use when calibrating multiple Bases (sold separately) using a single Centering Object After “walking about” with your warm Tag, proceed to the Centering Object and GREEN Press the BUTTON 4 times in rapid succession. LEDs 1-3 will turn for 2 seconds before going back to their previous state indicating you have stored the Centering Object in your Tag for use later in your session.
- Page 28 ADVANCED SETTINGS - TAG Tag - Highlight Command* ON/OFF *Same requirements as Record Command You may tell your camera to immediately STOP and RESTART recording by: 1. Pressing the Button, or 2. Tapping the white surface of your Tag 3 times quickly Press Once to Send GREEN LEDs 1 - 3 will flash...
- Page 29 TAG COMMAND SUMMARY BUTTON SUMMARY Record ON/OFF* Press and hold until LED3 changes color* Radio ON/OFF Press twice to Toggle Follow Me Command Press Once (Base must be in Multi Mode + Follow Me Mode) Highlight Command* Press once* (or Tap White Surface 3 times) Capture Centering Object Press four times Use Centering Object...
-
Page 30: Multi Systems
MULTI SYSTEMS Creating a Multi-Device System You create a Unique System each time you pair a Base and Tag together by pressing their BUTTONS simultaneously during setup and calibration. You can add more Tags (sold separately) to this Unique System by pairing them to a Base or Tag that is already part of the system. - Page 31 MULTI SYSTEMS ) + ( UNIQUE x __ x __ MULTI SYSTEM You fill in the blanks. The possibilities are nearly endless. Additional Bases and Tags sold separately. Visit Soloshot.com for more information.
- Page 32 MULTIPLE TAGS Add New Tags Using A Tag Press & hold the BUTTON on the Tag that is already part of the system. LEDs 1, 2 and 3 will turn GREEN. Then press the BUTTON on the Tag you wish to bring into the system. The new Tag’s LEDs will also briefly turn GREEN.
- Page 33 MULTI SYSTEMS TIP – You can pair multiple Tags together BEFORE calibrating ANY Bases. This can come in handy at events where you want to pass out multiple Tags and keep one for calibrating your Base(s). TIP – You DO NOT need to warm up or “walkabout” Tags before pairing them together but you MUST warm up and “walkabout”...
- Page 34 MULTIPLE TAGS Add New Tags Using A Base Press & hold the BUTTON on an already calibrated Base Press and Hold before pressing the BUTTON on the Tag you would like to on Base and Extra Tag add to the system. LEDs 1, 2 and 3 on the Tag will briefly turn GREEN, then RED.
- Page 35 Example: you are filming at a location for an hour and then your friend shows up with their own SOLOSHOT2, sets up and films for a while. Eventually you want to join systems so at least one of the Bases films both of you.
- Page 36 MULTIPLE TAGS Turn Multi Mode ON STEP 1 Your Base by default is set to Single mode (LED4 = GREEN) meaning it only keeps track of a single Tag. To set your Base to Multi Mode, use quick presses of the BUTTON to cycle through the setting LEDs until LED4 is blinking.
- Page 37 MULTI SYSTEMS LED 4 Single/Multi Settings Toggle to Multi Mode to track multiple Tags from the same Base. GREEN = Single Mode (default) = Multi Mode Single Base - to - Single Tag *Extra Tags sold separately. See Extra Tag Quick Start Guide to learn how to pair multiple Tags to the same Base.
- Page 38 MULTIPLE TAGS Set Multi Tracking Mode Step 2 When Multi Mode is on, your Base will by default track the closest Tag that is paired with the system by default as indicated by LED5 being GREEN. You can change this setting to Fastest Mode (RED) or Call Mode (ORANGE) using the BUTTON.
- Page 39 MULTI SYSTEMS Multi Mode Settings LED 5 only available in Multi Mode Use this setting to tell the Base when to switch between Tags. GREEN = Closest Tag Mode - Base will follow Single Base - to - Closest Tag the closest Tag = Fastest Tag Mode - Base will follow the fastest Tag...
- Page 40 MULTIPLE TAGS Select Multi Mode Record Setting STEP 3 *Camera Controller ACCESSORY required. Sold separately LED6 will be active when you have a camera controller attached to your Base AND your Base is set to Multi Mode on. Your Base will be set to Cut Mode by default (LED6 GREEN). You can change this setting to Continuous Mode (RED), using the BUTTON.
- Page 41 = Cut Mode - creates a new video file each time the Base switches between Tags = Continuous Mode – continuous video recording when the Base switches between Tags See online User Guide for detailed information on Settings, Multi Mode filming and other advanced features at www.soloshot.com.
- Page 42 MULTIPLE BASES Pair Extra Base(s)* into your SOLOSHOT2 system to capture the action from multiple angles. Extra Base(s)* can be used to: 1. Film one Tag from multiple perspectives 2. Film multiple subjects from multiple vantage points (Requires Extra Tags, sold separately)
- Page 43 MULTI SYSTEMS ADDING BASES - METHOD 1 Set Up Each Base Using the Same Tag and Standard Calibration Use the same Tag to calibrate each Base using the steps described in the Cheat Sheet of this Manual. Each Base you calibrate will be in Single Mode by default (LED4 = GREEN) and will be tracking the Tag used to calibrate it.
- Page 44 MULTIPLE BASES ADDING BASES - METHOD 2 Use Shared Centering Object 1. Identify a Centering Object that will be visible from all the camera locations you wish to set up. Example: Manhole Cover 2. Walk over to the shared Centering Object with your warm Tag, TOP WHITE SIDE UP facing the sky, and, after completing the 50 - 100 step walkabout, press the BUTTON 4 times as described on pg 22.
- Page 45 3. Set up each Base as described in Steps 1-5 of the Cheat Sheet. Once each Base is set up, you can either follow the Pairing & Calibration procedure described in Step 4 below or setup and calibrate each Base one-by-one according to the steps outlined in the Cheat Sheet.
- Page 46 CHARGING Base Charge the Base using the USB-to-Mini charging cable (provided) by plugging the Mini end into the corresponding socket on the SOLOSHOT2 Base and the USB end into a standard USB wall adaptor (not provided). The charging GREEN will be while charging and when charging is complete.
- Page 47 CHARGING While holding the Tag at a 45 degree angle, dock the Tag into the Base by connecting the depressions on the top of the Tag into the hooks at the top of the accessory port and then bringing the Tag toward the port until the release button clicks.
-
Page 48: Firmware Updates
FIRMWARE UPDATE Base Check SOLOSHOT.com for the latest SOLOSHOT2 Base firmware updates. You will be provided with files named SOLOSHOT.ss2 and 002.ss2. Copy those files to a standard USB drive. Hold Button down, then tap the Power button while holding down Button to put the Base in Update Mode. - Page 49 FIRMWARE UPDATE Check SOLOSHOT.com for the latest SOLOSHOT2 Base firmware updates. You will be provided with files named 001.ss2. Copy those files to a standard USB drive. Hold Button down, then tap the Power button while holding down Button to put the Tag in Update Mode. The Power button will...
- Page 50 Safety and Handling Review full Safety and Handling information in the SOLOSHOT2 User Guide Videos and Tutorials For SOLOSHOT videos and tutorials visit www.soloshot.com/videos Customer Service Call us at 1.866.347.0869, M-F 9am-5pm CST, or email us at info@soloshot.com...
- Page 51 @SOLOSHOTupdates Follow us and share your SOLOSHOT experiences! SOLOSHOT2 is designed and built in the USA by Soloshot Inc. SOLOSHOT, SOLOSHOT2, Robot Cameraman, Automatic Cameraman, Film Yourself, Personal Cameraman, Dedicated Cameraman and the SOLOSHOT logo are trademarks of Soloshot Inc.
- Page 52 SOLOSHOT, Inc. | 2540 Boardwalk Street, San Antonio, TX 78217 www.SOLOSHOT.com | 1.866.347.0869 | info@soloshot.com DESIGNED & BUILT IN THE USA!
Need help?
Do you have a question about the SOLOSHOT2 and is the answer not in the manual?
Questions and answers