Javad TRIUMPH-LS Quick Start Manual
With j-field 2.0
Hide thumbs
Also See for TRIUMPH-LS:
- User manual (168 pages) ,
- Update to user manual (16 pages) ,
- Quick start manual (6 pages)

Related Manuals for Javad TRIUMPH-LS


Summary of Contents for Javad TRIUMPH-LS
- Page 1 Q U I C K S TA R T G U I D E T O T H E T R I U M P H - L S W I T H J - F I E L D 2 . 0 Version 20160520...
-
Page 2: Table Of Contents
Table of Contents M-Local ..................... 62 Introduction ....................3 CoGo ......................64 Anatomy - Exterior of TRIUMPH-LS ...........4 Direct ....................64 Screen Anatomy - Home Screens ............7 Inverse ....................65 Charging the Batteries ................9 Shift ...................... 66 Help & Support ..................9 Rotate .................... -
Page 3: Introduction
This Quick Start Guide to the TRIUMPH-LS contains the Page - Each Project has 10 pages that can contain points and lines and can be basic information a user new to J-Field, the field software of toggled on or off similar to CAD layers. Each Page has the option of having its TRIUMPH-LS and VICTOR-LS, needs to know to get started own coordinate system. -
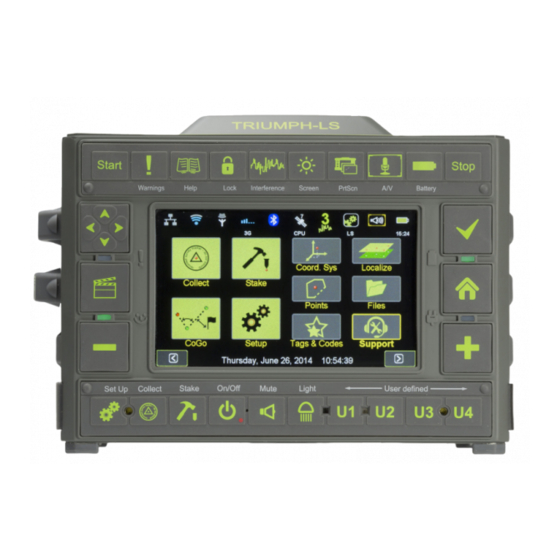
Page 4: Anatomy - Exterior Of Triumph-Ls
Charging port if the system is screens Setup - Cycle between unresponsive Light - Turn on/off the the Setup and Advanced Stake - Cycle through flashlight Setup screens Built in the stake screens Microphone www.javad.com... - Page 5 Use the provided cable. SIM CARD Slot 1 USB Port - Use this port for connect- ing USB storage drives and dongles to the TRIUMPH-LS. This is not for connecting the TRIUMPH-LS to the SIM CARD Slot 2 computer. Headset...
- Page 6 UHF antenna 400-470 MHz, TRIUMPH-LS 2.5dB, RT Angle, SMA (optional, if UHF module is installed) AC Power Cable Ext Power/Charger AC Power Adapter Power Cable Charging kit Shown assembled while the TRIUMPH-LS is being www.javad.com...
-
Page 7: Screen Anatomy - Home Screens
Setup - Configure the ShapeTags & Codes - Manage ShapeTags, Codes setup profiles Support - menu, used to request support and install updates. CoGo - Various CoGo Functions, DPOS and Camera Tools Updates available Messages Available RAMS Connection Established www.javad.com... - Page 8 Previous Screen - Advance to the Data Exchange - Export / Import Calculator - Several Tap to open the Next Screen - Advance to the Home Screen 1 various data formats different calculators Timing screen Home Screen 1 are available www.javad.com...
-
Page 9: Charging The Batteries
LEDs have different meanings when the LS is on from their meanings when the unit is The TRIUMPH-LS AND VICTOR-LS come from the factory being charged. When the unit is with the batteries charged and ready to use so you can on, you’ll want to pay attention to... -
Page 10: Calibration
TRIUMPH-LS to your network using a cable The level sensors are sensitive to the internal temperatures connected to the LAN port and your network interface card of the TRIUMPH-LS. -
Page 11: Points And Point Filters
Project’s database file with their native coordinate section of this manual. system as was selected when they were imported. • Survey Coordinates - These are coordinates determined from GNSS observation. All surveyed points are stored with Survey Coordinates with WGS84 (ITRF 2008) coordinates. www.javad.com Points... - Page 12 DPOS - The DPOS button opens the DPOS screen that allows raw GNSS data to be object is displayed in the list: Survey Points , Design submitted to the JAVAD Data Processing Service. Base station data can be processed Points, Polylines (and lines) or Trajectories.
- Page 13 Filter Screen - Current Page is 1, Page 0 is hidden The Pages screen can be open by tapping Pages. It displays the page names and allows it to be edited along with the coordinate system and color. www.javad.com Points...
- Page 14 Base Type. looks for names which contain the search string in the middle, but do not begin or end with it; looks for names which end with the search string. Activating more than one switch combines the results: www.javad.com Points...
- Page 15 Description to all be displayed in the left panel of the Point screen rather than just displaying the Point Name. Cluster Average finds groups of points in a cluster and creates an averaged point from the group. www.javad.com Adjusting a Base Station Position...
-
Page 16: Coordinate Systems
Region, Country and type of coordinate system: Coordinate System Screen Adding a State Plane Coordinate System To add a new coordinate system that is currently not listed in the Coordinate System screen when the All Project button www.javad.com Coordinate Systems... -
Page 17: Creating An Adjusted Grid-To-Ground C.s
The duplicated system will be created with the date appended to the end of its name: For latitudes south of 42N, “Geoid12B CONUS South 42N” should be chosen and for latitudes north of 40N, “Geoid12B CONUS North 40N” should be chosen. www.javad.com Coordinate Systems... - Page 18 Tap the position icon beside East Origin to set origin point in the grid system for the transformation. Here the base station coordinate is chosen from the points List: www.javad.com Coordinate Systems...
- Page 19 You may also wish to round the scale difference to the nearest ppm by tapping its button and entering that value. In this screen options exist to enter a new factor as a Ratio Tap the button to add the current project’s name to www.javad.com Coordinate Systems...
- Page 20 Press OK and then Apply to create this coordinate system: You can now use this coordinate system as the Project Coordinate System or just for some Pages if you choose. www.javad.com Coordinate Systems...
-
Page 21: Files And Data Exchange
Check the Double Vial Detector option if you are using the Javad rover rod with a double leveling vial. This allows the downward facing camera to detect both vials. Click on ‘Connect without setting up your device’... -
Page 22: Mounting A Cloud Drive
To mount a cloud drive navigate to https://app.javad.com/ Good practice is to use jca/#/inventory/devices and login from your PC’s browser. the provided microSD If you have not setup a Javad.com login, you will need to card for survey-related Survey projects do so. data storage including... - Page 23 Mount Cloud Drive. You should see your Google and Dropbox accounts listed if you completed the previous steps correctly. Choose the desired account and press www.javad.com Files and Data Exhange...
-
Page 24: Mounting A Shared Network Folder
J-Field while it is connected to a local network. First a folder from a PC connected to the same local network as the TRIUMPH-LS needs to be created. Then enter the network path as shown above along with your Windows account name and password. -
Page 25: Importing Points From A Text File
Note that if an error message is received while trying to read the network shared folder, it may be necessary to reboot the TRIUMPH-LS to resolve this. This is a known issue with the Windows operating system in the TRIUMPH-LS. -
Page 26: Exporting Points To A Text File
Sep. 1, typically set to be a comma. Highlighting a field from the box on the left side of the screen and tapping Sep. 2 will add a plus sign after the field name to indicate that it will be separated with Sep. 2. www.javad.com Files and Data Exhange... - Page 27 Export to create the file. More Settings opens the Export CSV Settings screen where options exist to specify how to format cut and fill values and Surveyed Design Points. Export File Preview Screen Export CSV Settings Screen www.javad.com Files and Data Exhange...
-
Page 28: Exporting Photos, Screenshots, Gnss Data
Project Archive contains all the files necessary to restore the project if it becomes corrupt or deleted. It can also be used to copy the project to a different TRIUMPH-LS. Export Project Archive Screen - Set to export only photos... -
Page 29: Shapetags & Codes
Symbol displayed on the map. The ID field is a numerical field that is not used in J-Field but is an export option for text files and may be www.javad.com ShapeTags & Codes... -
Page 30: Setup
(the blue box on the right side of the screen). Across the top from left to right are buttons to Rename, Delete, Search, Sort Alphabetically, Sort by Date. www.javad.com Setup... - Page 31 Collect section of this manual. Setup Favorite ShapeTags & Codes Screen configuration of the Stake and Collect Action screens’ User Defined (whitebox) Buttons are stored in the Action Group profile as well as the U1-U4 hardware button options. Action Setup Screen www.javad.com Setup...
-
Page 32: Base/Rover Setup
RTK corrections via UHF or FH915 SS (frequency hopping spread spectrum) radios from your Javad Base receiver and radio to your Rover. It reads the communication parameters from a UHF or SS General Group rover profile and creates a matching base station profile internally. - Page 33 To connect the Base and the Rover via Bluetooth, tap on Connect. The external radio, if using one, should be powered on prior to pressing Connect. Always have an antenna connected to the radio before powering it on to avoid potential damage to the radio. www.javad.com Base/Rover Setup...
- Page 34 Base and Rover profile. Use From Base to update the Rover profile to the parameters from the Base or use To Base to send the Rover radio parameters to the Base before starting the Base. www.javad.com Base/Rover Setup...
- Page 35 Transmit L2C is always enabled. If for some reason it is not checked, it will become enabled automatically when the Base is started with Base/Rover Setup. To configure the UHF or FH915 parameters tap the UHF or FH915 SS Base Configuration Screen FH915 Configuration button. www.javad.com Base/Rover Setup...
- Page 36 20% as compared to DQPSK modulation. Increasing the Output Power increases radio range but also increases radio power consumption. With an antenna height 4 m (13.1 ft) and D16QAM modulation, 5 Hz RTK can www.javad.com Base/Rover Setup...
- Page 37 5 Hz RTK can be achieved with a FH915 SS radio with a 4 m (13.1 ft) antenna height. With 2 m you may achieve up to 2 km (1.2 miles), but it is dependent upon the environment. FH915 SS Configuration Screen www.javad.com Base/Rover Setup...
- Page 38 The base station raw GNSS data is always recorded and then transfered to J-Field when Stop Base is pressed at the end of a survey session so that it can be sent to Javad’s Data Processing Online Service, also known as DPOS. With the...
- Page 39 Rover is too close for set Output Power. If the broadcast is too overpowering, corrections will be lost and the link quality will drop. www.javad.com Base/Rover Setup...
- Page 40 Base GNSS data into J-Field. Choose Stop & Download. After the download completes the Base can be powered off, the radio can be powered off while the data is downloading without causing any problems. www.javad.com Base/Rover Setup...
- Page 41 Status screen for an “err” listed in the UHF State. If an error state is displayed, press Restore CFG to restore the factory UHF configuration. UHF Status Screen - UHF State “err, freq”, Use Restore CFG to repair www.javad.com Base/Rover Setup...
-
Page 42: Collect
CAD functions and point data can be edited. The View button opens a screen to configure what point attributes are displayed on the map and allows some graphical parameters to be customized. To the right of the View button is the Action Setup button www.javad.com Collect... - Page 43 (disabled above). The clock icon indicates the How to Stop? setting has been set to a fixed number of epochs. www.javad.com Collect...
-
Page 44: Action Profile Setup
TRIUMPH-LS. You can press Monuments in Multipath Environments with 5 Hz BEAST Start and then set the TRIUMPH-LS up over the desired MODE Corrections point. The starting of data collection will be delayed by the selected Delay period. - Page 45 Rover GNSS data can also be submitted to DPOS if it is recorded with the settings in What To Record. Save for PP button displayed after a fixed solution was not able to be collected. www.javad.com Collect...
-
Page 46: Rtk Verification And Validation
Phase-1. Once a Group has the required that at least two separate fixed initiations are acquired at Confidence Level Phase-1 is complete. least 2 minutes apart. Having at least 2 fixed initiations in agreement and acquired at least 2 to 3 minutes apart has www.javad.com Collect... -
Page 47: Recommended Collection Settings
Recommended Collection Settings & Start with Start Button or Start When Tilted Š Default Action Profiles Stop After: 2 epochs Š Verify without V6 Reset Š Boundary Action Profile - To be used for control and Š Consistency Counter: 0 www.javad.com Collect... - Page 48 ShapeTag, Code, Description and/or Attributes fields after data collection, Auto Accept must be set to Off. If these fields do not need to be changed and you desire fast data collection with the Quick Topo settings, set Auto Accept to www.javad.com Collect...
- Page 49 Unassigned User Defined (touch and hold) to remove or change Button, tap to assign the User Defined Button * Total number of SVs obsered by RTK Rover may be different from number of SVs observed by RTK Base www.javad.com Collect...
- Page 50 Use this value to evaluate and Reset GNSS Tracking compare the performance of each engine. Charts plotting each fixed epoch for each engine Manually reset engines to compel new fixed solutions when automatic verification is turned off (unchecked) www.javad.com Collect...
-
Page 51: Collect Screen Anatomy
Phase-2 option Coordinates of current position Scales of the plots Horizontal Vertical Example One: Phase-1 ONE This Point was collected in a high multipath environment, several feet away from a 2 story building. www.javad.com Collect... - Page 52 Example One: Phase-2 This Point was collected in a high multipath environment, several feet away from a 2 story building. The effect of multipath can be seen with the large vertical spread displayed in the vertical plot. www.javad.com Collect...
-
Page 53: Stake
Sequence defines the order of the points to be stake. The From Map mode is suggested mode for new users. This allows you to pan the map cursor over a point displayed in the map and tap Next to select that point to be staked. www.javad.com Stake... - Page 54 DTT (Distance to Target) whitebox below it. Further down are the Ahead/Back and Right/Left boxes that display the distances to the point relative to the TRIUMPH-LS. The Cut/ Fill option is in the lower right box. On the right side, the Target Name option is used as another method to select the point being staked.
-
Page 55: Real-Time Position Shift
RTK surveyed points found in the current project collected from this base station. This shift will continue to be applied to all the points surveyed from Position Shift Screen from the Collect Action Screen this base station. www.javad.com Real-Time Position Shift... -
Page 56: Hybrid Rtk With Dpos
J-Field, has the ability to adjust the base station coordinates associated RTK points surveyed with DPOS (Javad’s Data Online Processing Service). Your raw GNSS base station data is sent to the DPOS Base/Rover Setup - Prompt to stop the base and download... - Page 57 Action Setup screen - Activate Post-Processing option after 5 When this option is enabled, the (APP) button will be display how many epochs of raw data have been Collect Action screen displaying the prompt to save raw data. www.javad.com Hybrid RTK with DPOS...
-
Page 58: Processing Raw Data With Dpos
DPOS processing. automatically adjusted CORS-Processing - rover points with raw GNSS files Š are processed with CORS data (including your base data if this option is enabled in the Advanced settings) www.javad.com Hybrid RTK with DPOS... -
Page 59: Reviewing Dpos Results
Base Rover Statistics Screen Full DPOS results can be reviewed in the Processed-Point Info screen by tapping found in the Point screen. The detailed use of Processed-Point Info screen is explained on the following two pages. www.javad.com Hybrid RTK with DPOS... - Page 60 Base Rover Statistics - View the Base Rover Statics screen for the solution shown in this column. www.javad.com Hybrid RTK with DPOS...
- Page 61 Processed) Solution Base-Rover Post-Processed with BCP (Base M-Local Solution - 3 pairs of CORS Processed) Solution coordinates used in this example Tap this column to view the setup properties of the calculated M-Local for this point www.javad.com Hybrid RTK with DPOS...
-
Page 62: M-Local
Vertically or only as check points. The residuals for each pair of points are shown in the middle of the screen. Be sure to press Apply to save the added points to M-Local and apply the adjustment to the associated base and rover coordinates. www.javad.com M-Local... - Page 63 Processed Point Info Screen - Prompt to apply the M-Local coordinates to all the associated base and rover coordinates www.javad.com M-Local...
-
Page 64: Cogo
This functionally is similar in all CoGo menus when you see a white box separated with a vertical line in the middle. The resultant point is shown in the orange box. Clicking on this box will allow you to edit the Name, Description and www.javad.com M-Local... -
Page 65: Inverse
B, Grid copies the value of the box into the selected clipboard box. CoGo Inverse - Ground distance is displayed, tap the D button to cycle through the other distance type www.javad.com M-Local... -
Page 66: Shift
Tap the Move button once ready to shift the selected points. Position Shift, DPOS or M-Shift should be used. The Multi-Select screen is used to select the points to be shifted. To select individual points in this screen, use (Check Hardware) button for easier selection of individual points. www.javad.com M-Local... -
Page 67: Rotate
Rotate CoGo Rotate CoGo Rotate is very similar to CoGo Shift. Here the (Delta) button calculates the angle between the first selected points to the second selected point with the selected PB coordinate as the vertex. www.javad.com M-Local... -
Page 68: Appendix A: Creating A Rtn Profile
Enter a name for type the new profile Tap New to create Select RTK Rover a new RTN APN as the operating (Access Point mode Name) Enter a name for the new APN www.javad.com Appendix A: Creating a RTN Profile... - Page 69 Tap Done to exit Tap the the setup (list) button to view the list of mountpoints Find the desired mountpoint and tap OK. A mountpoint with RTCM 3 format and both GPS + GLONASS is desirable. www.javad.com Appendix A: Creating a RTN Profile...
- Page 70 900 Rock Avenue, San Jose, CA 95131 USA Phone: +1(408)770-1770 Fax: +1(408)770-1799 www.javad.com Copyright © JAVAD GNSS, Inc., 2016 All rights reserved. No unauthorized duplication.
Need help?
Do you have a question about the TRIUMPH-LS and is the answer not in the manual?
Questions and answers