Advertisement
Quick Links
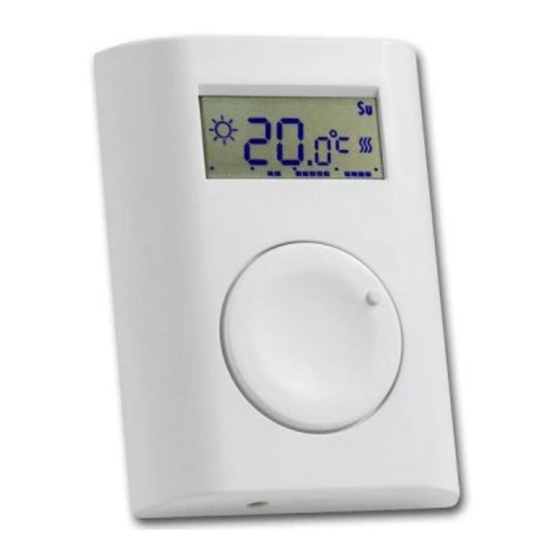
The TP-83IR programmable wireless indoor thermostat
The TP-83IR is a wireless indoor thermostat with a programmable weekly
heating schedule. It is designed for indoor temperature regulation which
balances economy with comfort. The device is capable of recognizing
warm-up persistence characteristics (within 2 days) and will adjust the
settings accordingly so that a high level of operational comfort is achieved.
You need not find out how early the heating should start in order to get to a
comfortable temperature at the desired time. The required timing is
configured automatically. The thermostat is equipped with an IR sensor.
This is especially suitable for under-floor heating control – using the IR-
measured temperature floor heating regulation can be performed with
higher precision and allows for a comfortable floor temperature with no
additional risk of damaging the floor.
The thermostat is compatible with AC-82, AC-83 and AC-8014 receivers or
GD-04 with GD-04R.
Temperature adjustment can be performed by simply turning the setting knob.
When combined with an Oasis wireless security system (Jablotron), the
following are possible:
Switching the heating ON and OFF remotely (by mobile phone, remote
control or Internet).
Disabling the heating when windows are open.
Informing the user about heating faults and frost threats (if the temperature
drops below a pre-configured value a warning SMS is sent).
Informing on the occurrence of fire (when the temperature is above a pre-
configured value).
Installation
The TP-83IR should be mounted in a dry indoor location. Choose a mounting
location about 1.5 meters above the floor in an area with good air circulation. The
view of the IR sensor on the bottom must be direct and must not be shielded by
any object – see the picture. Avoid places with draughts, dead air spots and
radiant heat from the sun or appliances. It should not be installed close to any
metal structure or other objects that may obstruct radio signal transmissions.
1. Release the upper cover by pressing the plastic tab on the bottom side of the
housing
2. Mount the back part on to the desired location.
3. Insert the battery (the polarity is marked on the holder).
4. Close the thermostat.
Enrollment
Install and connect the receiving unit to the heating system. If the receiving unit
was purchased separately then the thermostat must be enrolled to it – enter
enrollment mode on the receiving unit (see its manual) and either enter menu M1
or connect the battery to the thermostat (both operations cause an enrollment
signal to be sent). More information you can find in the receiver's manual.
Symbols on the display
Comfort temperature
Lower temperature
Manual mode
Time adjustment
Adjustment and programming
All the required parameters can be configured in the adjustment menu using
the knob. The menu is divided into the following parts:
M1
manual temperature-adjustment
M2
setting the economical or comfortable temperature, time
adjustment
M3
weekly programming schedule
M4
service menu
TP-83IR programmable wireless thermostat
Week days
Programming
Service menu
Heating ON
Low battery
Time / temperature
display
Scheduled time display
You can enter the menu and scroll through M1 to M4 by pressing and holding
the knob. The desired submenu is selected by releasing the knob.
Scrolling inside any particular menu M1 to M4 is done by turning the knob. The
currently displayed parameter can be adjusted by pressing the knob briefly,
turning the knob until the desired value is displayed, and confirming the setting
by re-pressing the knob (this will also cause a return to the menu so that you can
configure other parameters immediately). The adjustment menu is escaped from
by pressing the knob while OK is displayed or automatically after approx. 30
seconds.
M1 – manual mode
1.
for 2 seconds.
Note: As mentioned above, entering the M1 menu causes an enrollment
signal to be sent.
M2 – temperature & time setting
2.
If the M2 menu is entered, turning the knob will scroll through the Lower
temperature ( ), Comfortable temperature ( ) and Time (
followed by an OK option.
Each parameter can be entered by briefly pressing the knob. When
entered the displayed temperature flashes and can be adjusted by turning the
knob (re-pressing the knob confirms the setting). The Time parameter
adjustment is similar but requires three steps – for the day, hour and minutes.
M3 – programming the weekly heating schedule
3.
This mode allows you to program when the thermostat should switch between
Day ( ) and Night ( ) operation. The heating schedule can be programmed
either for each day separately or just for working days or just for the weekend or
for all days together.
Mo
Mo Tu We Th Fr
PRG
Enter the M3 menu, scroll to the desired option by turning the knob and enter
the schedule programming by briefly pressing the knob (this erases the current
schedule setting).
Mo
Mo
Mo
M4 – Service menu
4.
This menu allows for the configuration of parameters which usually stay fixed
during normal operation. When the service menu is entered, the
shown on the display. The menu contains 9 items (they can be scrolled through
by turning the knob). Each of the first 7 items corresponds to a parameter which
can be configured in a standard way (by pressing the knob, turning the knob until
the desired value is displayed, and re-pressing the knob).
Example: If the accuracy is adjusted to ±0.5˚C and the temperature is set to
24˚C, the thermostat switches the heating on when the temperature drops
below 23.5˚C and it switches it off if the temperature goes above 24.5˚C. In
reality the temperature scatter can be slightly higher because of the
temperature persistence of the room.
Warning: too high an accuracy can cause the heating to turn on and
off too frequently.
1 / 2
If set to manual mode, the thermostat performs
fixed temperature regulation regardless of the
weekly schedule. The desired temperature can be
set within the range of t Lo to t Hi. The M1 menu
is escaped from by pressing and holding the knob
Mo
Sa
Su
PRG
PRG
Schedule programming is done by marking
periods of time for which the Day heating
operation is requested. The marking bar is
shown at the bottom of the display, each hour
can be either marked or unmarked. You mark
or
unmark
by
turning
mark/unmark mode is displayed by
symbols, the currently programmed hour is
shown on the display (00 to 23). Switching
between mark/unmark modes is done by
pressing the knob (this applies when turning
clockwise, turning the knob anti-clockwise
always switches to unmark mode).
Turning the knob to the rightmost position
(following hour 23) will display an OK option.
Pressing the knob will then finish programming.
The SPAN parameter allows you to configure the
–
hysteresis
the
accuracy
temperature is regulated. One of the following
accuracy ranges can be selected: ±0.1˚C, ±0.2˚C
or ±0.5˚C (the factory default setting is ±0.2˚C).
) parameters
or
is
Mo Tu We Th Fr Sa
Su
PRG
the
knob.
The
/
symbol is
to
which
the
MKL53301
Advertisement

Related Manuals for jablotron TP-83IR


Summary of Contents for jablotron TP-83IR
-
Page 1: Symbols On The Display
Mo Tu We Th Fr Sa Installation The TP-83IR should be mounted in a dry indoor location. Choose a mounting Enter the M3 menu, scroll to the desired option by turning the knob and enter location about 1.5 meters above the floor in an area with good air circulation. The... -
Page 2: Battery Replacement
Can be operated according to ERC REC 70-03 +6°C to +40°C 18°C Lower temperature JABLOTRON ALARMS. hereby declares that the TP-83IR is in compliance with the essential requirements and other relevant +6°C to +40°C 21°C Comfortable temperature provisions of Directive 1999/5/EC. The original of the conformity...
Need help?
Do you have a question about the TP-83IR and is the answer not in the manual?
Questions and answers