Trio Avionics Pro Pilot Operation Manuals
Hide thumbs
Also See for Pro Pilot:
- Operation and installation manual (83 pages) ,
- Operation manual (89 pages)
Table of Contents
Advertisement
Quick Links
Advertisement
Table of Contents

Related Manuals for Trio Avionics Pro Pilot


Summary of Contents for Trio Avionics Pro Pilot
- Page 1 Pro Pilot Operation Manual Trio Avionics Corporation Manual Part Number 13200000...
- Page 2 Notice: This manual uses illustrations that generally show the Pro Pilot model that mounts in a standard 3-1/8” round cutout in the instrument panel. However, all functions are duplicated in the stack mount version of the Pro Pilot. The instructions herein are valid for both systems with the following exceptions: ...
-
Page 3: Table Of Contents
Table of Contents Pro Pilot Control Head Diagram ....................6 Chapter 1 Horizontal Navigation Overview (HNAV) ..............7 GPS Requirements ..........................7 Operation ..............................7 Basic H NAV Operation Modes ....................... 7 Track Mode (TRK) ..........................8 ... - Page 4 Track Mode (TRK) ..........................24 Tracking a Course (CRS) ........................24 Using Course Mode ........................... 24 Intercept a Course (INT) ........................25 Intercept Operation ..........................25 Selecting a Track Offset Position (TOP) ....................26 Initiating the Recover Mode……………..…………………………………………………………………….27 ...
- Page 5 Chapter 11 ..........................51 Alerts, Warnings and Alarms ....................51 Alerts ..............................51 Warnings ..............................51 Alarms ..............................51 Trio Avionics Pro Pilot Manual Page 5...
-
Page 6: Pro Pilot Control Head Diagram
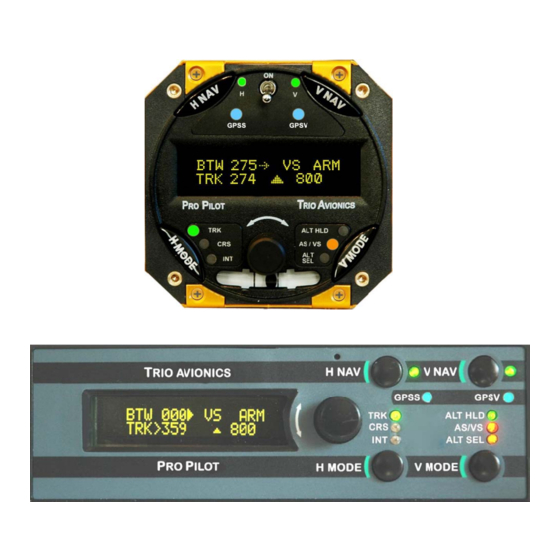
Pro Pilot Control Head Diagram H NAV Servo V NAV Servo On/Off H NAV Servo V NAV Servo Switch On/Off On/Off GPSS/GPSV LED’s Display Screen H MODE V MODE LEDs LEDs H MODE V MODE Pushbutton Pushbutton Rotary Encoder And Pushbutton... -
Page 7: Chapter 1 Horizontal Navigation Overview (Hnav)
Chapter 1 Horizontal Navigation Overview (HNAV) The H NAV function of the Pro Pilot controls the roll axis servo for attitude correction (wing leveling) and provides horizontal navigation using signals from a GPS receiver or EFIS system. GPS Requirements The Pro Pilot does not contain a built-in GPS or other navigation data source. It is necessary that an appropriate host GPS source be supplied and correctly connected to the Control and Display Head at the time of installation. -
Page 8: Track Mode (Trk)
Track Mode (TRK) The track mode (TRK) is used for automatic tracking of a GPS flight plan. It is also used to “GOTO” a waypoint directly as selected in the GPS. Course Mode (CRS) The course mode (CRS) allows tracking a pilot selected course in lieu of a GPS route or GOTO waypoint. -
Page 9: Intercept Mode (Int)
In the Intercept (INT) mode, the intercept angle to the original track may also be changed by rotating the encoder. The intercept angle will change in the direction that the encoder is rotated (as above). The Pro Pilot will automatically switch from the INT mode to the TRK mode as it closes on the intercept boundary. -
Page 10: Chapter 2 Vertical Navigation Overview (Vnav)
Vertical Navigation Overview (VNAV) The V NAV function of the Pro Pilot controls the pitch axis of the aircraft. It provides commands to the pitch servo that attaches to the elevator control system. The V NAV system uses a rate gyro, pressure sensors, airspeed sensors and accelerometers as primary references in controlling the pitch attitude of the aircraft. -
Page 11: Vertical Climb/Descent
Vertical Climb/Descent The Pro Pilot also allows the pilot to select a desired climb or descent rate (i.e. VS (vertical speed), in ft. per minute). Press the V MODE button again and: Set the desired climb or descent rate by rotating the encoder knob. -
Page 12: Chapter 3 Control And Display Overview
(CRS) is automatically selected (CRS LED illuminated). All servo power is initially off on power up and the Pro Pilot is disconnected from the aircraft control system. Trio Avionics Pro Pilot Manual... -
Page 13: H Mode And V Mode Buttons
H MODE and V MODE buttons The H MODE switch controls the selection of the TRK (track), CRS (course) and INT (intercept) modes. With GPS data present, the default mode during power up is TRK. Pressing the H MODE switch repeatedly advances the display screen from: TRK --->... -
Page 14: Roll (H Nav) & Pitch (V Nav) Servo Activation
LED is unlighted, the respective servo is inactive and that autopilot function is disconnected from the control system. When the LEDs are illuminated, the Pro Pilot is engaged and providing control signals to the Pitch and Roll servos. The roll servo is activated (or deactivated) by pressing the H NAV pushbutton momentarily. -
Page 15: H Mode Encoder Functions
NOTE: When switching the display/encoder from H MODE to V MODE the initial button press will simply change the direction of the arrow and the right side display parameters. The encoder pushbutton switch performs a number of functions, depending which way the arrow is pointing. -
Page 16: Mode Encoder Functions
If the GPS data to the Pro Pilot is unavailable, as indicated by a NO GPS warning, the encoder knob switch provides a method to turn the airplane to a new heading or stabilize the aircraft in a straight and level attitude. - Page 17 3 – Altitude Control Functions When the Altitude Hold is engaged, the encoder knob is used to make fine adjustments to the altitude. It is also employed to set a desired climb/descent rate when on the VS SET screen, and it is used to select a target altitude when it is on the ALT/ELEV SEL screen.
-
Page 18: Chapter 4 Preflight Power Up
A preflight check on the Pro Pilot at this point would be to engage the servos by pressing the H NAV and VNAV pushbuttons momentarily and noting that the “H” LED and V LEDs illuminate. The servo is now controlling the ailerons and elevator. -
Page 19: Chapter 5 Information Fields
Power up Display When the Pro Pilot is powered on a logo display is present showing the firmware revision operating in the unit. (This can be field programmed to present a personalized screen at power on). -
Page 20: Track Display Information
The bearing to waypoint (BTW) field is located on the left side of the top line as illustrated. This field is updated whenever the GPS data to the Pro Pilot is refreshed, normally once every one or two seconds, depending on the GPS interface data rate. (A GPS with NMEA data output generally updates once every one or two seconds, while an Aviation Data Link updates once every second). -
Page 21: Other Available Fields On The Bottom Line
If this symbol has its apex to the left (<), the autopilot will fly to the left to eliminate the error. If the symbol has its apex the right (>) the autopilot will fly to the right to eliminate the error. Here the aircraft is just .02 miles to the right of the desired track, so the autopilot will fly to the left to resume correct DTK. -
Page 22: Estimated Time En Route, Hh:mm (Ete)
Estimated Time En Route, HH:MM (ETE) The ETE (estimated time en route) field shows the time to the current waypoint based on the closing velocity (NMEA link only) to the waypoint (which may be different from the groundspeed GS/distance calculation discussed above). If the last "E"... -
Page 23: Gps Data Anomalies
GPS data stream is greater than 999 miles. Tracking functions are not affected by this condition. TRN? The TRN? warning is displayed in this field when the Pro Pilot detects a negative closing velocity (going away from the “TO” waypoint). -
Page 24: Chapter 6 Horizontal Operation
The three numeric characters following CMD represent the pilot commanded ground track. The CMD display field will show the current ground track (heading) the plane was traveling when the mode is entered. The Pro Pilot will turn the plane to keep the groundtrack (GTK) and the commanded course (CMD) the same value. Trio Avionics Pro Pilot Manual... -
Page 25: Intercept A Course (Int)
Example: If the current ground track is 010 degrees when the CRS mode is selected, the commanded course (CMD) will be initialized to 010 degrees. If H NAV servo is activated while in the CRS mode, the current groundtrack is automatically entered as the commanded groundtrack (CMD). -
Page 26: Selecting A Track Offset Position (Top)
With the advent of highly accurate GPS navigation and coupled autopilots, aircraft are tracking more and more closely to the airway centerlines on designated airways (the Pro Pilot can easily hold the course centerline within 50 to 100 feet in smooth air). This creates the real possibility of overtaking or head-on encounters with other aircraft that are also tracking the airway centerline, especially during climb and descent when normal altitude separation is not in effect. -
Page 27: Initiating The Recover Mode
In the TRK mode (only) press and rotate the ROTARY ENCODER switch counterclockwise or clockwise to change the offset distance to 0.0, or by changing modes, or by simply cycling power to the Pro Pilot using the POWER switch. ... -
Page 28: Variable Display Field - Top Line
“----“(dashed lines) or may enter the NO FPLAN mode when the condition is detected. This is usually a condition that clears after another GPS sample or two is transmitted to the Pro Pilot. No pilot action is required. Normal TRK mode tracking computations are inhibited until the GPS data integrity is restored. -
Page 29: Chapter 7 Horizontal Flight Examples
One of the design features of the Pro Pilot is its ability to identify the desired track line (DTK) and fly to it regardless of the direction the airplane is heading when the autopilot is engaged. In an extreme... -
Page 30: Course Mode Example
In such case, after approximately 7 seconds without signal the Pro Pilot displays the NO GPS message. Since the Pro Pilot is no longer able to provide the navigation function, the ENCODER can be used to control the aircraft turn rate, or to correct for gyro drift to effect a straight ahead flight path The Pro Pilot servo is still engaged so the aircraft is being controlled in the “wing leveler”... -
Page 31: Intercept Mode Example
Progressing toward the DTK, as the IDS value approaches 0.0 the Pro Pilot switches automatically from the INT mode to the TRK mode when the aircraft is 1.0 miles right of the DTK. The Pro Pilot now is turning the airplane back to the right slightly and the XTK is approaching 0.00. The Pro Pilot will now re- establish the airplane back on the DTK headed directly toward the programmed waypoint. - Page 32 When the PCS servo reconnect occurs the current GTK is snapshot as the commanded groundtrack (TRK or CRS entry) or intercept angle (INT entry). NOTE: The PCS function also works with the altitude control portion of the Pro Pilot. This is discussed in detail later in this manual.
-
Page 33: Chapter 8 Vertical Operation
After adjusting the primary aircraft altimeter, the Pro Pilot may be slightly off altitude. If the required altitude correction is more than 30 or 40 feet, the pilot may simply rotate the encoder knob... -
Page 34: Setting Vertical Speed (Set Vs)
NOTE: In the PCS mode the vertical rate change must be at least 200 FPM or the Pro Pilot will enter ALT HLD upon releasing the PCS (remote disconnect) button. If the rate is greater than 200 fpm it will maintain the climb/descent (or airspeed) that it senses when the button is released. -
Page 35: Altitude Pre-Select Function (Alt Sel)
If the Pro Pilot is commanding a climb to an assigned altitude of 10,000 ft and a controller asks the pilot to temporarily hold at 6,000 ft., the pilot may press the encoder button upon reaching 6,000 ft and the aircraft will hold at that altitude. -
Page 36: Entering The Current Altitude
Rotating the encoder knob will change the baro elevation in 5 foot increments, and it should be set to be as close to the actual airfield elevation as possible. This will assure that the internal Pro Pilot system altimeter will agree closely with the aircraft altimeter that has also been corrected to airfield elevation. -
Page 37: Pausing The Climb Example
6,500 feet. At that point, the Pro Pilot will enter the ALT HLD mode and the green ALT HLD LED will illuminate to inform the pilot that the aircraft is holding at the current altitude. The AS/VS LED and the ALT SEL LED will extinguish. -
Page 38: Changing The Destination Altitude
Example: If a controller has cleared the aircraft to climb to 5,500 feet, the pilot might go to the ALT SEL screen and enter that altitude. If a specific climb rate was not entered, the Pro Pilot will enter the default climb rate that was chosen in the PREFERENCES menu. - Page 39 ENCODER. Once pressed, VSP SUS will be displayed along with the 800 ft/min climb rate in the bottom field. The Pro Pilot is now properly set for the flight. The GPS has a flight plan and the climb rate and target altitude have been entered.
-
Page 40: Vertical Use Of Pilot Command Steering
It should also be noted that the PCS function (when employed) will affect the H NAV mode as well. As previously described, it will put the Pro Pilot into the CRS mode and track the course that the aircraft is on when the button is released. -
Page 41: Chapter 9 Gpss And Gpsv Operation
ARINC 429 data stream provided by IFR certified WAAS enabled GPS receivers. When ARINC signals are available and the Pro Pilot is in the Track (TRK) mode, the autopilot follows the roll commands (GPSS) and vertical commands (GPSV) issued by the originating GPS receiver or EFIS. -
Page 42: Gpss Led Indicator
GPSV data is available, but is not being used due to the autopilot not being in the TRK mode, or the servo is not ON. Putting the Pro Pilot into the Track (TRK) mode will again activate the GPSS and GPSV guidance. -
Page 43: Unusual Conditions
Example Approach Scenario For purposes of illustration, assume we are cruising in the en route mode, the Pro Pilot is using the ARINC 429 data for roll steering commands and is in altitude hold mode at 4,500 feet. The destination is Palomar Airport in Carlsbad, California (a sample approach chart is shown on the following page). - Page 44 Pro Pilot commands a “bend over” maneuver. The aircraft pitches down and begins to descend. The pilot immediately retards the throttle to remain at approach speed. The Pro Pilot will now direct the aircraft to remain on the lateral/vertical descent path to the airport. Trio Avionics Pro Pilot Manual...
-
Page 45: Chapter 10 Autopilot Preferences Menu
Chapter 10 Autopilot Preferences Menu The Preferences Settings menus are designed to allow the pilot to set various flight options and selection used during flight. Using the Preferences Menu To enter the Preferences Menu, press and hold the encoder knob for a period of 3 seconds while in the navigation display. -
Page 46: Flight Distance And Flight Time
To enter the BACKLIGHT SET and DISPLAY BRT selections perform the following steps: 1. Enter the PREFERENCES SETTINGS menus as detailed previously and select the BACKLIGHT SET and DISPLAY BRT menu. 2. Press and release the H MODE button. The arrow will be placed to the left of the BACKLIGHT SET value. -
Page 47: Circle Last Waypoint Setting
If the option is set to NO, the Pro Pilot will track directly outbound from the last waypoint in a flight plan, or the GOTO waypoint. The waypoint identifier will be placed in the lower left display line upon waypoint passage and will flash for 10 seconds to indicate passage. -
Page 48: Selecting Airspeed Or Vertical Speed For Pcs
Pilot has a means whereby the users can adjust the maximum rate of turn to their personal satisfaction. When shipped, the Pro Pilot is defaulted to an “automatic” mode where the actual turn rate is automatically adjusted based on groundspeed (as measured by your GPS) to limit the bank angle to approximately 15 to 20 degrees. -
Page 49: Setting Led Flash Rate
To set the TURN RATE selection, perform the following steps: 1. Select the MAX TURN RATE menu. 2. Press and release the HMODE button. The arrow will be placed at the AUTO (MAN) field 3. Rotate, or press the encoder to change the selection between AUTO and MAN 4. -
Page 50: Custom Startup Display Screen
Autopilot software version and serial number This screen is fixed and cannot be altered. It contains a permanent record of the manufacturer software version and device serial number. This data should be available if calling Trio Avionics for questions or service information... -
Page 51: Alerts, Warnings And Alarms
NO FLT PLN – GPS is available but no flight plan or GOTO has been entered. The Pro Pilot will enter the Course (CRS) mode and will fly a pilot selected course over the ground.
Need help?
Do you have a question about the Pro Pilot and is the answer not in the manual?
Questions and answers