Table of Contents
Advertisement
Quick Links
Download this manual
See also:
User Manual
SPY
SPY
P
P
INT
INT
Surveillance camera
TINY series
smart
TINY
LIVE
series · série
series · série
series · série
Models:
TINY-PLUS
TINY-W
BF
TINY-W
3
TINY
4G
Quick start guide
v1.3
1
Getting started
2
3
Complete instructions
4
www.spypoint.com
1
Getting started
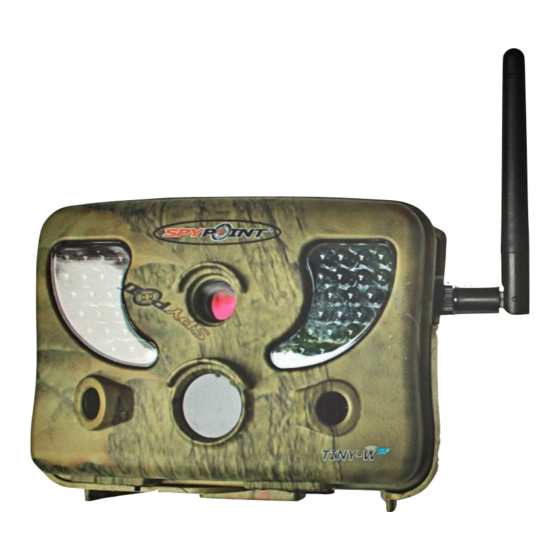
COMPONENTS
1
2
3
4
5
6
7
8
9
10
11
12
13
14
15
16 17
18
19
20 21
1
Photo lens
Image sensor and infrared filter.
2
Antenna
Allows
wireless
communication
between
(if applicable)
the camera and a BLACKBOX (receiver/
controller). For installation (if applicable),
remove the cap and screw the antenna on the
left side of the camera.
3
Invisible LEDs
Night lighting to obtain black and white
photos and videos.
4
Test light
Flashes in TEST mode when there is detec-
tion and flashes 60 seconds in PHOTO/VIDEO
mode to allow the user to leave without being
photographed or recorded.
5
Side sensors
Allows to prepare the camera so when the
(2)
target passes through the central sensor, the
system is already pre triggered. When acti-
vated, the detection area is expanded.
6
Fresnel lens
Expands the detection area and increases the
(in front of
sensitivity of the camera's motion sensor.
the central
sensor)
7
Cable lock
Allows the user to install a cable lock (CL-6FT,
hole
sold separately).
8
Tripod mount
Standard ¼-20" tripod mount.
9
Slot for instal-
Allows the user to install the camera using
lation strap
the installation strap included.
10
Power button
Allows the user to turn on/off the camera.
11
BUSY LED
Lights up when the camera is recording.
12
Navigation
Buttons to set the camera.
buttons
13
Viewing
To access the main menu and view photos/
screen
Videos.
14
Battery switch
Allows the user to select the power source
according to the type of batteries used.
15
Microphone
To record sound, lift the rubber cap and turn
it slightly to completely clear the microphone
receiver.
16
SD card slot
An SD card is required to record photos/
videos. The camera is compatible with SD/
SDHC memory card, up to 32 GB capacity
(not included).
17
Removable
Insert 6 AA batteries (alkaline or lithium) or
battery holder
a rechargeable lithium battery pack (LIT-09/
LIT-C-8, sold separately).
18
USB port
To transfer photos/videos to a computer.
19
1)12V power
1)This camera can be powered from an
jack
external 12-volt DC input such as a 12V
battery or a 12V adapter, each sold
2)Solar panel
separately.
jack
2)Allows the user to connect a solar panel
(SP-12V) to maintain the charge of the
lithium battery pack (LIT-09/LIT-C-8), sold
separately.
20
External
1/8" port which triggers the taking of pho-
trigger jack
tos or videos using a normally open contact.
(Example: using a magnetic door contact
connected to an alarm system).
21
TV OUT
To view or delete photos/videos directly on
TV.
BATTERY INSTALLATION
Connectors
Connectors
Insert connectors
first
6 alkaline AA batteries
Lithium battery pack
LIT-09/LIT-C-8
We recommend the use of new batteries to ensure a maximum
performance of the camera. Rechargeable AA batteries are not
recommended.
Battery switch position (depending on the power source)
Power source
Battery switch position
• 6 AA
• 12V
ALK
• 12V + 6 AA
•
LIT-09*
• 12V +
LIT-09*
RECH
• Solar panel +
LIT-09*
*
Rechargeable lithium battery pack, sold separately (LIT-09) or with
a charger (LIT-C-8).
INSTERTING THE MEMORY CARD
Insert an SD/SDHC memory card (up to 32 GB
capacity) in the card slot, gold contacts facing
up. The card is inserted correctly when a click
is heard.
Before inserting or removing a memory
card, always turn off the camera to
prevent loss or damage of the photos already
recorded.
Advertisement
Table of Contents

Related Manuals for Spypoint TINY-WBF


Summary of Contents for Spypoint TINY-WBF
- Page 1 The card is inserted correctly when a click Navigation Buttons to set the camera. Error messages is heard. buttons Before inserting or removing a memory card, always turn off the camera to Complete instructions prevent loss or damage of the photos already www.spypoint.com recorded.
- Page 2 34’ 30° 40° 70° Visit www.spypoint.com, the complete instructions for the camera VIDEO can be found in the Support section. Video length: After 60 seconds, the camera starts in video mode to take videos. Camera...
Need help?
Do you have a question about the TINY-WBF and is the answer not in the manual?
Questions and answers