
Related Manuals for Mesalabs 90XL


Summary of Contents for Mesalabs 90XL
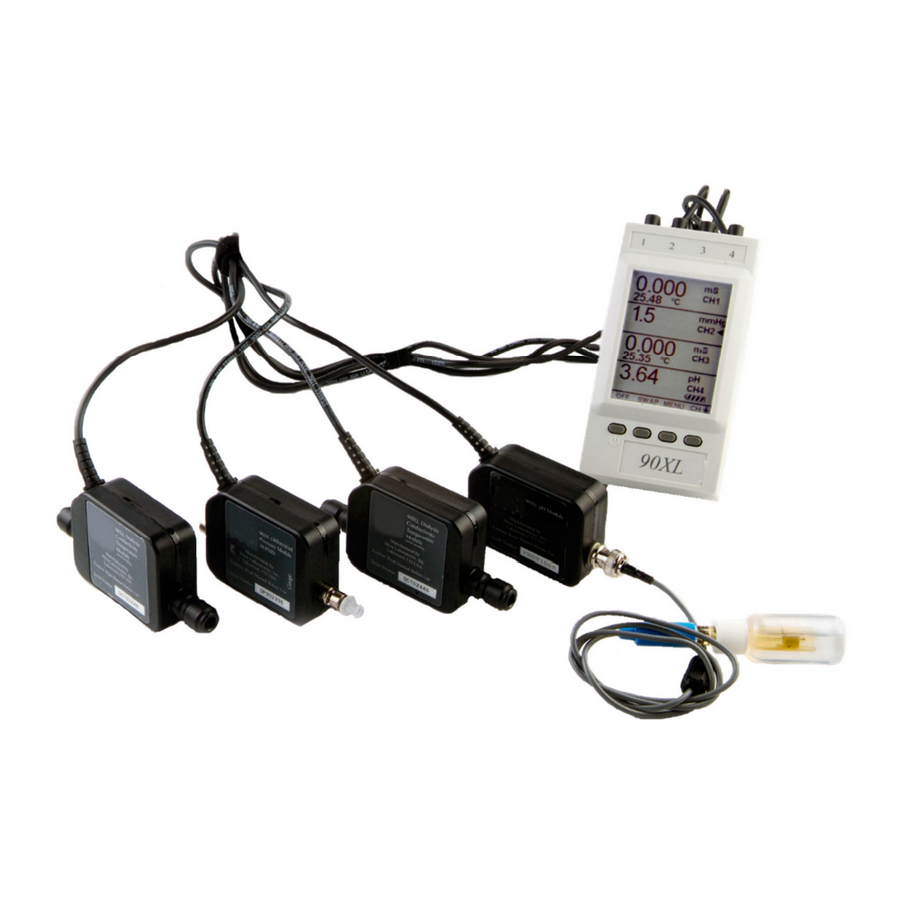
- Page 1 90XL™ Meter User’s Guide Part No. 901120027 Rev H © 2018 Mesa Laboratories, Inc. All Rights Reserved...
- Page 2 This Page Intentionally Left Blank...
-
Page 3: Table Of Contents
FEATURES, COMPONENTS, AND CONTROLS ..............7 A. Display Module Holder and IV Pole Holder ..............8 B. Key and Symbol Descriptions ..................9 C. 90XL Screen Flow Diagram ..................10 D. 90XL Display Screens ....................11 1. MAIN Screen Overview ................... 11 2. MENU Screen Overview .................. 12 OPERATING INSTRUCTIONS .................. -
Page 4: Description
DESCRIPTION The 90XL meter is designed to be used by hemodialysis professionals to measure and display readings of conductivity, temperature, pH, and pressure of the dialysate fluids used in hemodialysis delivery systems. The display module includes the LCD display as well as the user interface. It is used in conjunction with specific measurement sensor modules that contain the appropriate sensor for the desired measurement. -
Page 5: Iii. Safety Information
WARNINGS AND CAUTIONS WARNING: The 90XL Display Module and its attached sensor modules should never be used without first verifying accuracy of measurement functions. Using the device without verifying accurate function could result in improper calibration of the dialysis delivery system. An improperly calibrated dialysis delivery system could result in compromised dialysis treatment(s) and/or patient injury. -
Page 6: Iv. General Overview
IV. GENERAL OVERVIEW The 90XL meter is a portable, multifunction meter designed to measure the conductivity, pH, temperature, and pressure of the dialysate fluids associated with hemodialysis delivery systems, and of the water used in hemodialysis. The display module houses the electronic circuitry, navigation keys, digital display, and rechargeable lithium-ion battery. -
Page 7: Features, Components, And Controls
FEATURES, COMPONENTS, AND CONTROLS Sensor module measurements are shown on the display module screen. Using the navigation keys, the user may access numerous display screens and views to select individual functions, such as: Adjust date and time Calibrate sensor modules Adjust screen contrast and brightness Restore factory default values Select units of measure for readings... -
Page 8: Display Module Holder And Iv Pole Holder
Display Module Holder and IV Pole Holder The Display Module is supplied with a protective holder. The holder may be used as a tilt stand on a flat surface, it may be used with the supplied IV Pole Holder to mount the Display Module on an IV pole, or the Display Module may be inserted with the LCD and buttons facing inside to protect it during transport and storage. -
Page 9: Key And Symbol Descriptions
Key and Symbol Descriptions SCROLL UP A LIST OF START THE TIMER SELECTIONS, SCROLL UP FUNCTION ONE LINE IN HELP SCROLL DOWN A LIST OF STOP THE TIMER SELECTIONS, SCROLL FUNCTION DOWN ONE LINE IN HELP CHANGE THE POSITION OF SCROLL DOWN AN ENTIRE THE READINGS IN DUAL PAGE IN HELP... -
Page 10: 90Xl Screen Flow Diagram
90XL Screen Flow Diagram... -
Page 11: 90Xl Display Screens
Battery Charge Indicator Key Labels The 90XL screen that displays all real-time measurement information is called the MAIN screen. The MAIN screen can display up to 4 channels of information based on the number and types of sensor modules that are connected. The readings from all sensor modules are displayed simultaneously on the one MAIN screen. -
Page 12: Menu Screen Overview
MENU Screen Overview The MENU key on the MAIN screen will advance you to the list of channel specific, as well as system related functions. NOTE: The selected channel on the MAIN screen continues to be displayed on the MENU screen. -
Page 13: Vi. Operating Instructions
Turn the 90XL OFF… The 90XL may be turned off manually by pressing the OFF key at the bottom of the MAIN screen. Additionally, if an AUTO-OFF (see configuration section) function has been enabled, the instrument will power down automatically if no key activity is sensed during the selected time period. -
Page 14: How To Connect / Disconnect A Sensor Module
Plug the connector into the port until a slight click is felt. There is a slight pause while the sensor module establishes communication with the display module. The 90XL will then display the reading on the channel that matches the sensor module connector. -
Page 15: Meter Configuration
Meter Configuration MENU Screen Using the arrow keys, move cursor to select digits and set the date. Press SAVE to advance to the time screen Select “CONFIGURATION” CONFIGURATION Screen Detailed information about the selected sensor module Using the arrow keys, move cursor to select digits and set the time. -
Page 16: Changing The Units Of Measure
Changing the Units of Measure Units of measure may be changed for conductivity, temperature, and pressure by using the following procedures. Once new units of measure have been selected, they will be retained in the sensor module until changed again by the user. Conductivity units: Select the channel displaying conductivity on the MAIN screen using... - Page 17 Pressure units: Select the channel displaying pressure on the MAIN screen using the arrow keys. Select “UNITS OF MEASURE” from the MENU screen. Scroll to the units desired using the arrow keys and press “SEL”. After a brief pause, the display will return to the MAIN screen and display the parameter in the new units.
-
Page 18: How To Take Measurements
When the display is stable, take your reading. pH Measurements Module cable connected to 90XL display module Sample Method: Insert the pH sensor module electrode into the sample as shown above. When the display is stable, take your reading. -
Page 19: How To Take Pressure Measurements
How to Take Pressure Measurements Turn on the 90XL meter and attach a pressure sensor module to any open port on the top of the display module. Once the pressure sensor module is sensed, pressure will be displayed in the appropriate channel section of the LCD screen. - Page 20 Artificial Kidney Dialysis Machine Negative Pressure Adapter Transducer Protector To 90XL Display Module Open Differential Pressure Measurement To measure differential pressure, attach monitor tubing to the “Gauge” and “Ref” Luer ports on the pressure sensor module. Pressure will read positive only if the greater of the two measurement points is connected to the “Gauge”...
-
Page 21: How To Verify Sensor Module Calibrations
· 14.0 mS conductivity standard solution (NaCl) Mesa P/N 02.0027 · 90XL Sample Kit Mesa P/N 503110017 To verify calibration of the conductivity/temperature sensor module: To rinse the sample tray and sensor module, pour approximately 50 ml of fresh reference solution into the sample tray. Insert the conductivity sensor module into the center sensor holder of the tray. - Page 22 90XL Temperature Verification The 90XL temperature calibration may be verified against any N.I.S.T. traceable standard, or a second 90XL sensor module. Liquid must be moving through the sensor module when a temperature reading is taken. To verify temperature calibration of the conductivity/temperature sensor...
-
Page 23: Xl Ph Sensor Module
· 7.00 pH buffer solution, Mesa P/N 02.0031 · 90XL Sample Kit, Mesa P/N 503110017 To verify calibration of the pH sensor module: Rinse the sample tray and the pH sensor probe with some of the buffer solution to eliminate any contaminants. Discard the rinse solution – do not pour used solution back into the original container. -
Page 24: Xl Pressure Calibration Verification
NOTE: If the display does not read zero, refer to the “Calibration and Maintenance” section of this User’s Guide. Connect the 90XL and the reference standard using the stop cock and monitoring lines as shown below. Check for leaks. Apply positive or negative pressure to both the 90XL pressure sensor module and the reference standard to verify accuracy. -
Page 25: Timer Function
Timer Function Event Timing To access the timer function: Select MENU from the MAIN screen and scroll to TIMER using the arrow keys. Press START to begin event timing; Press STOP to stop event timing. Press RESET to return the timer to zero. You may start to time another event at this point. -
Page 26: Vii. Calibration Instructions
VII. CALIBRATION INSTRUCTIONS General Information SENSOR MODULE CALIBRATION -The 90XL display module does not require calibration, although the menu options on the display module are used to calibrate the connected measurement sensor modules. Mesa recommends that users verify sensor modules values against non-expired NIST-traceable solutions before use and calibrate (adjust) the meter only when these verifications are out of tolerance. -
Page 27: How To Calibrate The Conductivity/Temperature Sensor Module
Mid-range (Standard) – 13.40 or 14.00 mS standard solution required High range – 100.0 mS standard solution required The 90XL conductivity/temperature sensor module is capable of measuring conductivities through a range of 1 uS to 200 mS. For the typical range of final dialysate conductivities, the sensor module needs to be calibrated at the mid- range only. -
Page 28: Low Range Conductivity Calibration
NOTE: Gently tap the cell to expel droplets, or let dry. This initial step may be performed in advance of the actual calibration procedure. Step 2 – The 90XL will read the cell (theoretically zero) and perform an evaluation based on the factory set value. Press NEXT to continue... -
Page 29: Mid-Range (Standard) Conductivity Calibration
Press ABORT and contact Mesa Labs. Step 3 - Empty reference solution from the sensor module, and discard. The 90XL must detect a value of less than 1 mS to proceed. Step 4 - Draw fresh reference solution slowly through the sensor module. - Page 30 Step 5 - Expel the reference solution from the sensor module and discard. The 90XL must detect an internal value of less than 1 mS to proceed. Step 6 - Draw fresh reference solution through the sensor module for verification. While reference solution is flowing, the 90XL must detect 4 stable conductivity values for verification before proceeding.
-
Page 31: High-Range Conductivity Calibration
100 mS CAL STEP 3 Step 3 - Empty reference solution and discard. The EMPTY CELL 90XL must detect a value of less than 4 mS to DISCARD RINSE proceed. Value must be less than 4 mS to proceed. - Page 32 STEP 5 Step 5 - Expel the reference solution from the sensor EMPTY CELL module and discard. The 90XL must detect an internal DISCARD REF. SOL. value of less than 4 mS to proceed. Value must be less than 4 mS to proceed.
-
Page 33: How To Calibrate The Ph Sensor Module
How to Calibrate the pH Sensor Module GENERAL INFORMATION The pH calibration procedure is identical for each of the pH buffer standards. Described below is the procedure for the 7.00 pH standard, since this is the one commonly used. If you desire to calibrate the sensor module with 4.00 buffer solution, a 7.00 pH calibration should always be done first, then 4.00 may be performed. - Page 34 Step 3 - Pour about 50 ml of fresh buffer solution into the sample tray. Place the pH sensor in the outer sensor holder and allow reading to stabilize. The displayed factory pH value should be within 0.2 pH unit of the reference solution value. Press NEXT to continue.
-
Page 35: How To Calibrate The Pressure Sensor Module
How to Calibrate the Pressure Sensor Module PROCEDURE DISPLAY Make sure the pressure sensor module is connected to the display module. Remove all monitor lines and transducer protectors from both “Gauge” and “Ref” sensor module ports. Both ports on the sensor module must be open to atmosphere. -
Page 36: Cleaning, Disinfection, And Storage
If disinfection is required, use household bleach (5.25%) at a dilution of 1 part bleach to 99 parts water. The 90XL display module and sensor modules should be stored in a clean, dry environment between 0° C and 50° C. It may be stored connected to the AC charger when not in use. -
Page 37: Battery Information
Return the Display Module to Mesa Labs or authorized distributor for service. CAUTION: Do not charge the 90XL when ambient temperature is greater than 45° C. (113 ° F) CAUTION: If the battery fully discharges, the date and time functions must be reset. -
Page 38: 90Xl Accessories
90XL ACCESSORIES The following accessories are available for the 90XL meter. Item Part No. Charger 201110021 Replacement pH electrode 201110005 90XL User’s Guide 901120027 Standard Solutions Visit dialyguard.mesalabs.com pH buffer Solutions Visit dialyguard.mesalabs.com Sampling Kit P/N 503110017 Transducer Protector P/N 503110023... - Page 39 In-Line Adapter Display Module Cover/Holder P/N 350120003 P/N 303110075 Carrying Case w/ Cut Outs pH Probe Assembly P/N 201110003-1 P/N 201110005 IV Pole Connector Sensor Module Extension Cable P/N 503110024 2 Meter P/N 350110015 5 Meter P/N 350110016...
-
Page 40: Troubleshooting
TROUBLESHOOTING Do not open the display module or the sensor modules. There are no user-serviceable parts inside, and it will void the warranty. If the display module does not turn on, or shuts down right after it turns on, the battery may be depleted. -
Page 41: User Assistance And Factory Service
USER ASSISTANCE AND FACTORY SERVICE Mesa Laboratories, Inc. (Mesa Labs) provides user assistance, full repair and calibration /factory certification services for the 90XL Meter and its components at its corporate headquarters or at authorized distributor locations throughout the world. NOTE: Yearly factory calibrations are recommended on the Conductivity/Temperature and Pressure sensor modules. -
Page 42: 90Xl Specifications
XIII. 90XL SPECIFICATIONS TECHNICAL Conductivity Temperature Pressure Range 0 to 14 pH 0 to 200.0 mS 10 to 90˚C -600 to +1600 mmHg units 0.1 µS from 0 - 80 µS Resolution 0.001 from 0 to 22.00 mS ±0.1˚ from 10 0.01 pH... -
Page 43: Limited Warranty
XIV. LIMITED WARRANTY MESA LABORATORIES, INC. warrants to the original purchaser of the 90XL Meter that it will repair or replace, at its option, any malfunctioning or defective part without charge for the terms listed below. Parts used for replacement are warranted for the remainder of the original warranty period.
Need help?
Do you have a question about the 90XL and is the answer not in the manual?
Questions and answers