Table of Contents
Advertisement
Quick Links
Locking Pet Door
GPA00-16366 | Product Manual
Have questions about your Locking Pet Door or need training tips for your pet?
Our Customer Care representatives are here to help you.
Call our USA-based Customer Care Center at
+1 (866) 381-2785
USA & Canada: Mon-Fri 8am-8pm EST | Sat 9am-5pm EST
This product includes a one year warranty.
Call, click, or chat with us before you return your product.
premierpet.com
Advertisement
Table of Contents

Subscribe to Our Youtube Channel
Related Manuals for Premier Pet GPA00-16366


Summary of Contents for Premier Pet GPA00-16366
- Page 1 Locking Pet Door GPA00-16366 | Product Manual Have questions about your Locking Pet Door or need training tips for your pet? Our Customer Care representatives are here to help you. Call our USA-based Customer Care Center at +1 (866) 381-2785 USA &...
- Page 2 Important Safety Information Explanation of Attention Words and Symbols used in this guide This is the safety alert symbol. It is used to alert you to potential personal injury hazards. Obey all safety messages that follow this symbol to avoid possible injury or death. WARNING indicates a hazardous situation which, if not avoided, could result in death or serious injury.
-
Page 3: Table Of Contents
TABLE OF CONTENTS What’s Included Tools Needed Key Definitions Installation in Non-Glass Doors Determine Pet Door Location Prepare Door Cut Pet Door Opening Fit Core Covers Install Pet Door Training Pet Installation in Glass Doors and Windows Installation in Walls 4-Way Locking System Replacement Parts and Accessories Warranty... -
Page 4: What's Included
What’s Included ˝ (53 mm) Interior Frame Screws (4 pcs.) with flap and 4-way lock ˝ (37 mm) Screws (4 pcs.) Tunnel Support ˝ (15 mm) Screws (4 pcs.) Screw Guides (4 pcs.) Exterior Frame Cutting Template Binder Posts (4 pcs.) Finishing Plugs Short Plastic Long Plastic... -
Page 5: Key Definitions
Key Definitions Outer Frame Size: Overall pet door dimensions Cut-Out Size: Dimensions of opening cut in homeowner’s door for proper fit and pet door installation Flap Opening Size: Usable flap size for pet to enter and exit through pet door Interior Frame: Pet door frame on the inside of home;... -
Page 6: Cut Pet Door Opening
Step 3 Cut Pet Door Opening 3A Drill ½” (13mm) holes in inside corners and center of bottom curve of drawn template. Helpful Tip: Use both hands to hold drill steady and straight at a 90° angle. 3B Beginning in one of the holes just drilled, cut along the drawn template lines. -
Page 7: Install Pet Door
4C Insert the long plastic core cover into channel of “U”-shaped section of tunnel support. Insert the short plastic core cover into channel of straight section of tunnel support. 4D Turn over assembled tunnel and insert plastic core covers of assembled tunnel between frame posts and lip on flap opening of exterior frame (frame without the flap). -
Page 8: Training Pet
5C Place exterior frame (with assembled tunnel if needed for your installation) into cut-out from underside of door. Next, place interior frame into cut-out aligning with exterior frame. Insert binder posts into screw holes in exterior frame from underside of door. Hold binder post in place and insert appropriate length screw into screw holes in interior frame. -
Page 9: Installation In Glass Doors And Windows
Installation in Glass Doors and Windows NOTICE It is not possible to cut holes in tempered or double pane glass except at the time of manufacture. Consult a professional glazier or glass manufacturer to install the pet door in a glass door or window. The Locking Pet Door is also designed for installation in glass windows and doors. -
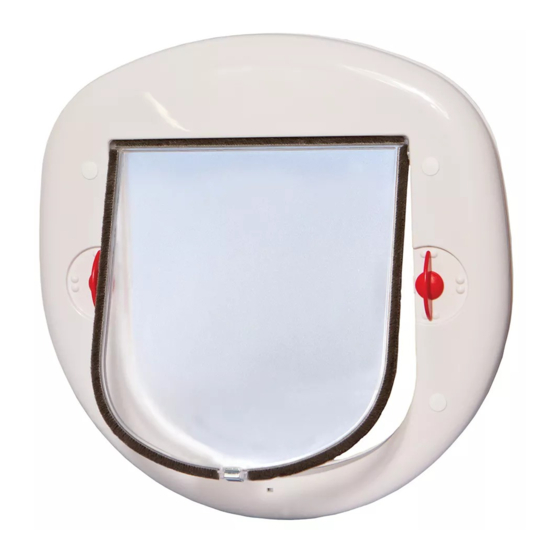
Page 10: 4-Way Locking System
4-Way Locking System The 4-way lock is fitted on the inside of your door and allows you to control your pet’s access in and out of your home. Do not use the 4-way lock until your pet is familiar with using the pet door. Locks Knobs Out-Only: The out-only access option allows... -
Page 11: Warranty
Warranty One Year Non-Transferrable Limited Warranty This Product has the benefit of a limited manufacturer’s warranty. Complete details of the warranty applicable to this Product and its terms can be found at premierpet.com. Terms of Use and Limitations of Liability Terms of Use Use of this Product is subject to your acceptance without modification of the terms, conditions and notices contained herein. - Page 12 Radio Systems Corporation 10427 PetSafe Way Knoxville, TN 37932 +1 (866) 381-2785 premierpet.com L400-2199 ©2017 Radio Systems Corporation...
Need help?
Do you have a question about the GPA00-16366 and is the answer not in the manual?
Questions and answers